[fusion_builder_container hundred_percent=”no” hundred_percent_height=”no” hundred_percent_height_scroll=”no” hundred_percent_height_center_content=”yes” equal_height_columns=”no” menu_anchor=”” hide_on_mobile=”small-visibility,medium-visibility,large-visibility” status=”published” publish_date=”” id=”” background_color=”” background_image=”” background_position=”center center” background_repeat=”no-repeat” fade=”no” background_parallax=”none” enable_mobile=”no” parallax_speed=”0.3″ video_mp4=”” video_webm=”” video_ogv=”” video_url=”” video_aspect_ratio=”16:9″ video_loop=”yes” video_mute=”yes” video_preview_image=”” border_size=”” border_color=”” border_style=”solid” margin_top=”” margin_bottom=”” padding_top=”” padding_right=”” padding_bottom=”” padding_left=””][fusion_builder_row][fusion_builder_column type=”1_1″ layout=”1_1″ spacing=”” center_content=”no” link=”” target=”_self” min_height=”” hide_on_mobile=”small-visibility,medium-visibility,large-visibility” id=”” background_color=”” background_image=”” background_image_id=”” background_position=”left top” background_repeat=”no-repeat” hover_type=”none” border_size=”0″ border_color=”” border_style=”solid” border_position=”all” padding_top=”” padding_right=”” padding_bottom=”” padding_left=”” margin_top=”” margin_bottom=”” animation_type=”” animation_direction=”left” animation_speed=”0.3″ animation_offset=”” last=”no”][fusion_imageframe image_id=”17743|full” max_width=”” style_type=”” blur=”” stylecolor=”” hover_type=”none” bordersize=”” bordercolor=”” borderradius=”” align=”center” lightbox=”no” gallery_id=”” lightbox_image=”” lightbox_image_id=”” alt=”” link=”” linktarget=”_self” hide_on_mobile=”small-visibility,medium-visibility,large-visibility” id=”” animation_type=”” animation_direction=”left” animation_speed=”0.3″ animation_offset=””]http://clickon.agency/earnandexcel/wp-content/uploads/Excel-Training-London.jpg[/fusion_imageframe][fusion_text columns=”” column_min_width=”” column_spacing=”” rule_style=”default” rule_size=”” rule_color=”” hide_on_mobile=”small-visibility,medium-visibility,large-visibility” id=””]
Excel Funtion: VBA
[/fusion_text][/fusion_builder_column][fusion_builder_column type=”2_3″ layout=”2_3″ spacing=”” center_content=”no” link=”” target=”_self” min_height=”” hide_on_mobile=”small-visibility,medium-visibility,large-visibility” id=”” background_color=”” background_image=”” background_image_id=”” background_position=”left top” background_repeat=”no-repeat” hover_type=”none” border_size=”0″ border_color=”” border_style=”solid” border_position=”all” padding_top=”” padding_right=”” padding_bottom=”” padding_left=”” margin_top=”” margin_bottom=”” animation_type=”” animation_direction=”left” animation_speed=”0.3″ animation_offset=”” last=”no”][fusion_builder_row_inner][fusion_builder_column_inner type=”1_1″ layout=”1_1″ spacing=”” center_content=”no” hover_type=”none” link=”” min_height=”” hide_on_mobile=”small-visibility,medium-visibility,large-visibility” id=”” background_color=”” background_image=”” background_position=”left top” background_repeat=”no-repeat” border_size=”0″ border_color=”” border_style=”solid” padding_top=”” padding_right=”” padding_bottom=”” padding_left=”” dimension_margin=”” animation_type=”” animation_direction=”left” animation_speed=”0.3″ animation_offset=”” last=”no” border_position=”all”][fusion_menu_anchor name=”a1″ /][fusion_text columns=”” column_min_width=”” column_spacing=”” rule_style=”default” rule_size=”” rule_color=”” hide_on_mobile=”small-visibility,medium-visibility,large-visibility” id=””]
Excel VBA: Learn the basics in a few minutes
What is VBA? VBA stands for Visual Basic for Applications. It is an implementation of Microsoft’s event-driven programming language Visual Basic which is now used with Microsoft Office applications such as MS Excel, MS Word and MS Access.
[/fusion_text][fusion_separator style_type=”single|dashed” hide_on_mobile=”small-visibility,medium-visibility,large-visibility” id=”” sep_color=”#008000″ top_margin=”20″ bottom_margin=”20″ border_size=”2″ icon=”” icon_circle=”” icon_circle_color=”” width=”” alignment=”center” /][/fusion_builder_column_inner][/fusion_builder_row_inner][fusion_builder_row_inner][fusion_builder_column_inner type=”1_1″ layout=”1_1″ spacing=”” center_content=”no” hover_type=”none” link=”” min_height=”” hide_on_mobile=”small-visibility,medium-visibility,large-visibility” id=”” background_color=”” background_image=”” background_position=”left top” background_repeat=”no-repeat” border_size=”0″ border_color=”” border_style=”solid” animation_type=”” animation_direction=”left” animation_speed=”0.3″ animation_offset=”” last=”no” border_position=”all”][fusion_menu_anchor name=”a2″ /][fusion_text columns=”” column_min_width=”” column_spacing=”” rule_style=”default” rule_size=”” rule_color=”” hide_on_mobile=”small-visibility,medium-visibility,large-visibility” id=””]
Introduction to this Excel VBA Tutorial
Why do we need to learn VBA? VBA is an incredible skill because it can help us automate our work, that is anything you do in Excel with a certain amount of repetition or frequency can be dealt with automatically by controlling Excel. What do I mean by controlling Excel? Well, quite simply, you can write some code (known as Visual Basic for Applications (or VBA) which sits ‘behind the scenes’ and can do all the tasks you normally would from copying/pasting, writing formulas, creating charts, saving files in a folder and pretty much everything else you can imagine! The potential to save time is incredible, I regularly create VBA scripts that save me up to an hour and my personal record is automating an entire monthly reporting process that lasted over 100 hours down to 5 minutes! What’s even more remarkable is that from my time saved, I was able to solve other problems for the companies I worked for and was promoted several times. My peers simply couldn’t compete with me because I was significantly more productive than them.
So today, I am going to teach you the basics of VBA and how it could be a great foundation to enhance your Excel skills to a higher level of expertise. After this tutorial, I hope you will be confident enough to start creating your own macros and continue practicing it. Soon, you’ll realize how amazing VBA can help you on your day to day work. And in no time, you can be the next Excel VBA Rockstar!
[/fusion_text][fusion_separator style_type=”single|dashed” hide_on_mobile=”small-visibility,medium-visibility,large-visibility” id=”” sep_color=”#008000″ top_margin=”20″ bottom_margin=”20″ border_size=”2″ icon=”” icon_circle=”” icon_circle_color=”” width=”” alignment=”center” /][/fusion_builder_column_inner][/fusion_builder_row_inner][fusion_builder_row_inner][fusion_builder_column_inner type=”1_1″ layout=”1_1″ spacing=”” center_content=”no” hover_type=”none” link=”” min_height=”” hide_on_mobile=”small-visibility,medium-visibility,large-visibility” id=”” background_color=”” background_image=”” background_position=”left top” background_repeat=”no-repeat” border_size=”0″ border_color=”” border_style=”solid” animation_type=”” animation_direction=”left” animation_speed=”0.3″ animation_offset=”” last=”no” border_position=”all”][fusion_menu_anchor name=”a3″ /][fusion_text columns=”” column_min_width=”” column_spacing=”” rule_style=”default” rule_size=”” rule_color=”” hide_on_mobile=”small-visibility,medium-visibility,large-visibility” id=””]
VBA Cells
For our first lesson, we are going to make something automatically display in a cell in our Excel spreadsheet. By the way, there are two ways to refer to a cell in Excel, one is using the word Cells and the other one is by using the word Range. The latter I am going to discuss after this topic.
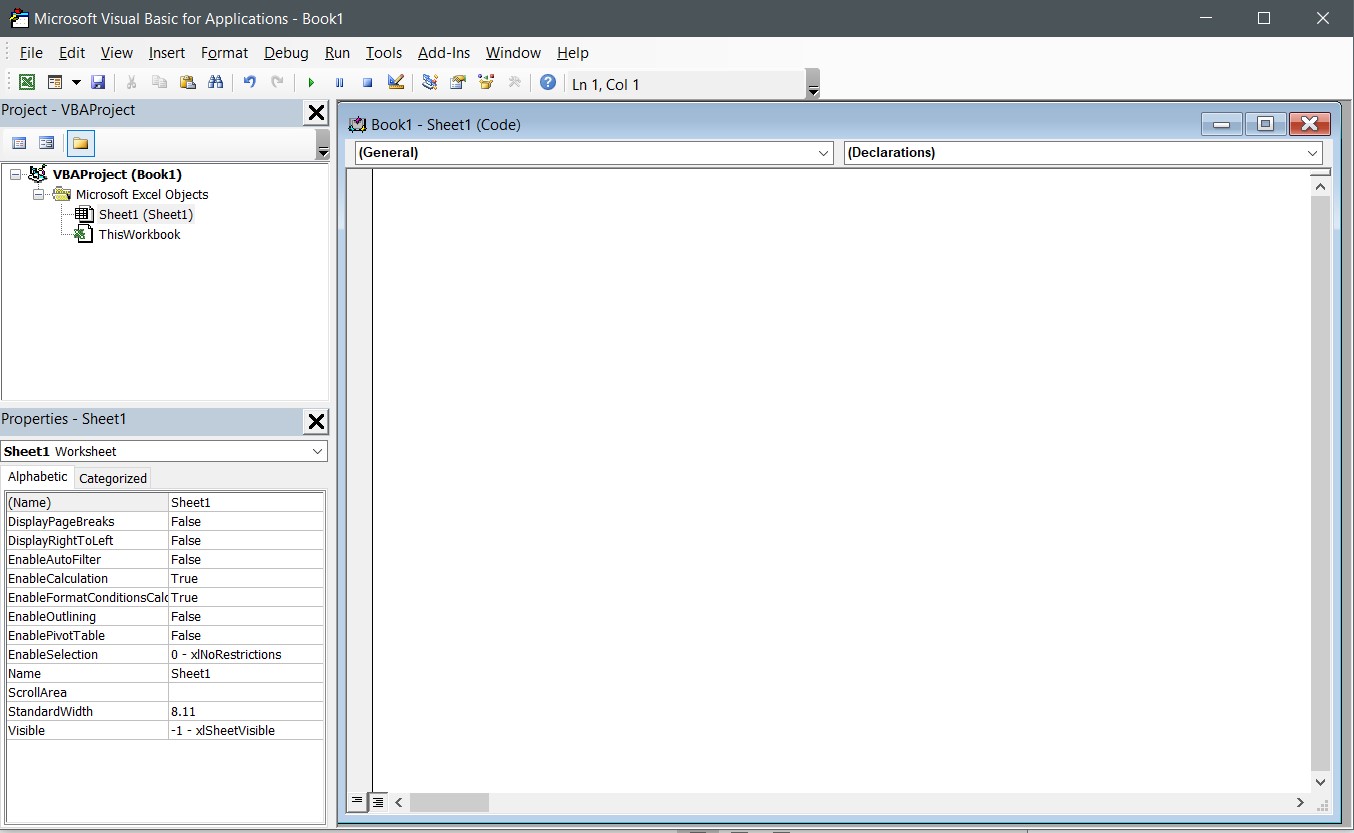
But before that, what we need to do first is to open the Visual Basic window. To do that, go to the Developer tab then click the Visual Basic button. Or, you can simply hold ALT key then press F11 key. (Alt+F11)
 Excel VBA
Whichever method you choose, a window should appear like the picture below. Double click an object on the left pane under Project – VBA Project. In this case, I clicked Sheet1 to show the coding area for Sheet1. By doing so, all written codes in this object will only affect Sheet1 worksheet. Similarly, if you add codes in object Sheet2 or Sheet3, the codes will only be run in its respective worksheet.
 Excel VBA
Now let’s start writing some codes. Again, we want some texts to automatically appear in cell B5 in Sheet1 so we will need to add the following code:
Sub Learning()
Cells(5,2) = “Hello”
End Sub
Cells(5,2) also refers to cell B5, where 5 refers Row number, and 2 is the column number, which is B.
Hit the Run/Play button or press F5, and the word Hello should then appear in our Sheet1 cell B5 like this:
 Excel VBA
Note: A Sub (short for Subroutine) is a series of Visual Basic statements enclosed by the Sub and End Sub statements. A Sub procedure performs a task provided in a form of code.
[/fusion_text][fusion_separator style_type=”single|dashed” hide_on_mobile=”small-visibility,medium-visibility,large-visibility” id=”” sep_color=”#008000″ top_margin=”20″ bottom_margin=”20″ border_size=”2″ icon=”” icon_circle=”” icon_circle_color=”” width=”” alignment=”center” /][/fusion_builder_column_inner][/fusion_builder_row_inner][fusion_builder_row_inner][fusion_builder_column_inner type=”1_1″ layout=”1_1″ spacing=”” center_content=”no” hover_type=”none” link=”” min_height=”” hide_on_mobile=”small-visibility,medium-visibility,large-visibility” id=”” background_color=”” background_image=”” background_position=”left top” background_repeat=”no-repeat” border_size=”0″ border_color=”” border_style=”solid” animation_type=”” animation_direction=”left” animation_speed=”0.3″ animation_offset=”” last=”no” border_position=”all”][fusion_menu_anchor name=”a4″ /][fusion_text columns=”” column_min_width=”” column_spacing=”” rule_style=”default” rule_size=”” rule_color=”” hide_on_mobile=”small-visibility,medium-visibility,large-visibility” id=””]
VBA Range
As I have mentioned previously, we can also use the word Range when cell referencing. The good thing about using Range is it lets you reference either a single cell or multiple cells all at once. It is also easier to use because its format is the common way Excel cells are named like cell A1, A2 or cells A1:A10. But of course, Cells property has its advantages as well when it comes to coding loops.
Let’s use the Range object in VBA.
This is the code to add in the VBA editor:
Sub Learning()
Range(“A1”) = “Hello”
End Sub
 Excel VBA
To display the text “Hello” in multiple cells or in a range of cells, we simply tweak the code like so:
Sub Learning()
Range(“A1:A10”) = “Hello”
End Sub
 Excel VBA
What we did is instead of cell “A1” enclosed in our range, we replaced it with “A1:A10”, displaying the word Hello from cells A1 to A10.
[/fusion_text][fusion_separator style_type=”single|dashed” hide_on_mobile=”small-visibility,medium-visibility,large-visibility” id=”” sep_color=”#008000″ top_margin=”20″ bottom_margin=”20″ border_size=”2″ icon=”” icon_circle=”” icon_circle_color=”” width=”” alignment=”center” /][/fusion_builder_column_inner][/fusion_builder_row_inner][fusion_builder_row_inner][fusion_builder_column_inner type=”1_1″ layout=”1_1″ spacing=”” center_content=”no” hover_type=”none” link=”” min_height=”” hide_on_mobile=”small-visibility,medium-visibility,large-visibility” id=”” background_color=”” background_image=”” background_position=”left top” background_repeat=”no-repeat” border_size=”0″ border_color=”” border_style=”solid” animation_type=”” animation_direction=”left” animation_speed=”0.3″ animation_offset=”” last=”no” border_position=”all”][fusion_menu_anchor name=”a5″ /][fusion_text columns=”” column_min_width=”” column_spacing=”” rule_style=”default” rule_size=”” rule_color=”” hide_on_mobile=”small-visibility,medium-visibility,large-visibility” id=””]
VBA Copy and Paste
Everyone would agree when I say that Copy and Paste are the two most common Excel operations. You may have done a lot of copying and pasting manually. Now I will show you how quick and easy VBA can do it for you.
First, go back to the VBA window. Assuming we have some text written in cell A1 and we want to copy and paste it in cell A2, add this code:
Sub Learning()
Range(“A1”).Copy Range(“A2”)
End Sub
The 2nd Range object is the destination range. This can also be a single or multiple range of cells.
This is how it would look like in the VBA editor and Excel sheet.
 Excel VBA
To paste to multiple cells, add this code:
Sub Learning()
Range(“A1”).Copy Range(“A2:A5”)
[/fusion_text][fusion_separator style_type=”single|dashed” hide_on_mobile=”small-visibility,medium-visibility,large-visibility” id=”” sep_color=”#008000″ top_margin=”20″ bottom_margin=”20″ border_size=”2″ icon=”” icon_circle=”” icon_circle_color=”” width=”” alignment=”center” /][/fusion_builder_column_inner][/fusion_builder_row_inner][fusion_builder_row_inner][fusion_builder_column_inner type=”1_1″ layout=”1_1″ spacing=”” center_content=”no” hover_type=”none” link=”” min_height=”” hide_on_mobile=”small-visibility,medium-visibility,large-visibility” id=”” background_color=”” background_image=”” background_position=”left top” background_repeat=”no-repeat” border_size=”0″ border_color=”” border_style=”solid” animation_type=”” animation_direction=”left” animation_speed=”0.3″ animation_offset=”” last=”no” border_position=”all”][fusion_menu_anchor name=”a6″ /][fusion_text columns=”” column_min_width=”” column_spacing=”” rule_style=”default” rule_size=”” rule_color=”” hide_on_mobile=”small-visibility,medium-visibility,large-visibility” id=””]
Color Cells with VBA Color Index
VBA is so useful when we want to automate repetitive tasks. One example at work is, we often use cell highlighting or cell colors for quick overview of statuses etc.
There are two ways to set the color. One is with the use of ColorIndex, which has 56 colors, or Color which makes it possible to use any color at all.
When using the ColorIndex, you can refer to the image below for the color and its corresponding colorindex.
 Excel VBA
To set the color of our cell to one of these, write the code:
Sub Learning()
Range(“A1”).Interior.ColorIndex = 49
End Sub
This is how it should look like in VBA Editor and Excel sheet:
 Excel VBA
Second option is to use the Color property. Under this, there are 2 inputs we can use:
- vbColor – This is the easiest way however; the colors are limited.
Sample code:
Sub Learning()
Range(“A1”).Interior.Color = vbYellow
Range(“A2”).Interior.Color = vbRed
Range(“A3”).Interior.Color = vbBlue
End Sub
 Excel VBA
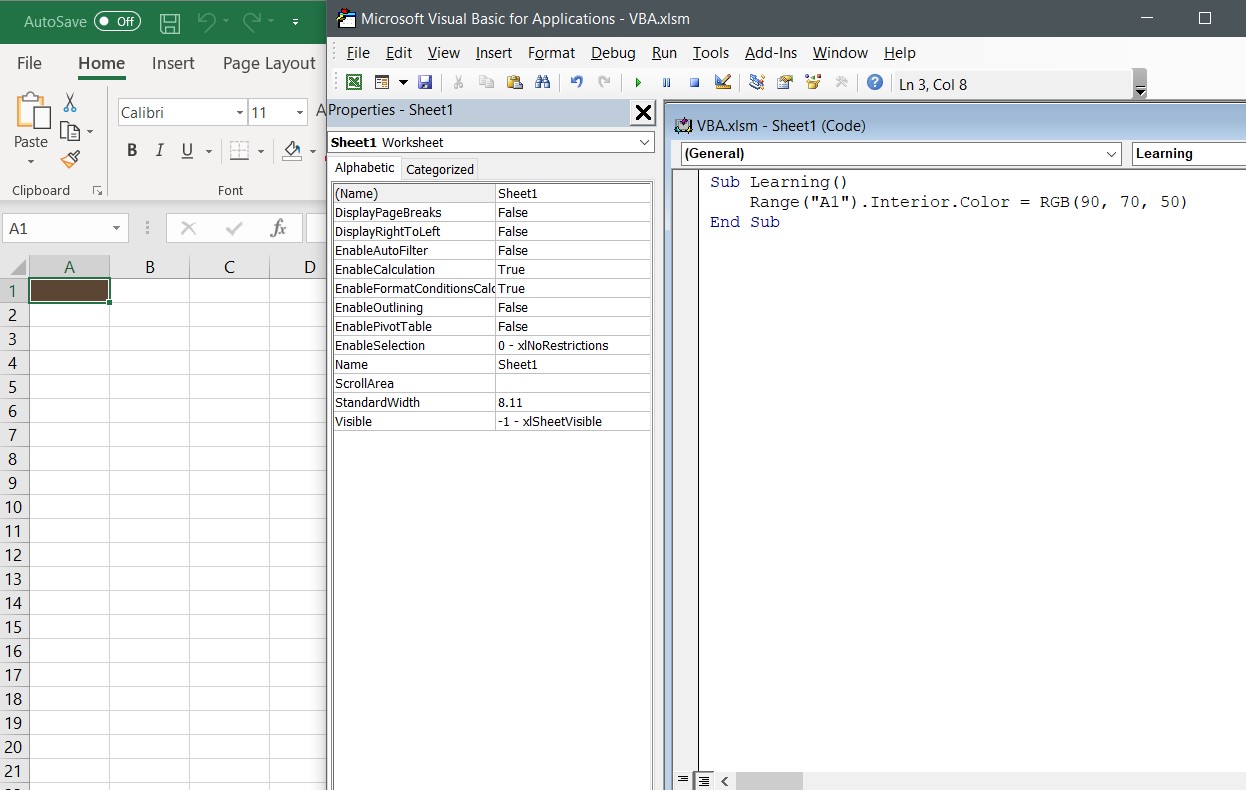
- RGB Colors – RGB which stands for Red Green Blue. To use RGB, enter a value between 0 to 255 for each color code.
Here is an example code:
Sub Learning()
Range(“A1”).Interior.Color = RGB(90, 70, 50)
End Sub
Illustrated in VBA editor and Excel sheet, we’ll see:
 Excel VBA
[/fusion_text][fusion_separator style_type=”single|dashed” hide_on_mobile=”small-visibility,medium-visibility,large-visibility” id=”” sep_color=”#008000″ top_margin=”20″ bottom_margin=”20″ border_size=”2″ icon=”” icon_circle=”” icon_circle_color=”” width=”” alignment=”center” /][/fusion_builder_column_inner][/fusion_builder_row_inner][fusion_builder_row_inner][fusion_builder_column_inner type=”1_1″ layout=”1_1″ spacing=”” center_content=”no” hover_type=”none” link=”” min_height=”” hide_on_mobile=”small-visibility,medium-visibility,large-visibility” id=”” background_color=”” background_image=”” background_position=”left top” background_repeat=”no-repeat” border_size=”0″ border_color=”” border_style=”solid” animation_type=”” animation_direction=”left” animation_speed=”0.3″ animation_offset=”” last=”no” border_position=”all”][fusion_menu_anchor name=”a7″ /][fusion_text columns=”” column_min_width=”” column_spacing=”” rule_style=”default” rule_size=”” rule_color=”” hide_on_mobile=”small-visibility,medium-visibility,large-visibility” id=””]
VBA Control Fonts
We can also control the font’s attributes in VBA. The commonly used attributes are:
Bold, Color, ColorIndex, FontStyle, Italic, Name, Size, Underline, etc.
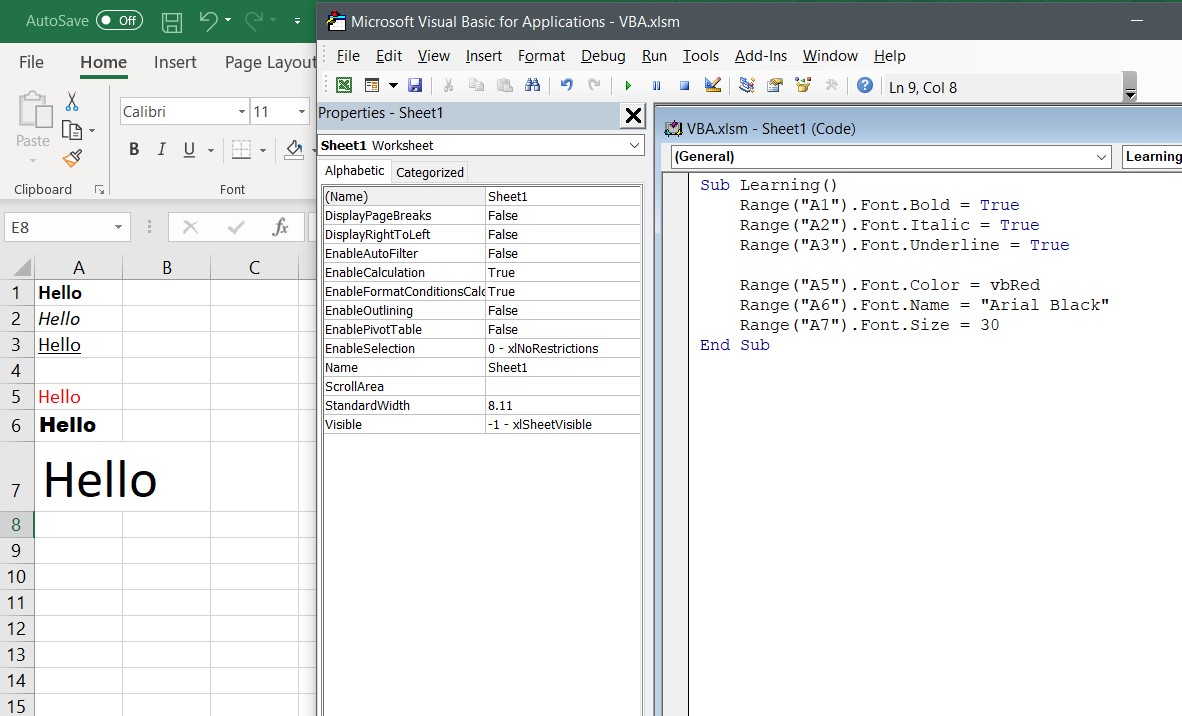
Here is the sample code for your reference:
Sub Learning()
Range(“A1”).Font.Bold = True
Range(“A2”).Font.Italic = True
Range(“A3”).Font.Underline = True
Range(“A5”).Font.Color = vbRed
Range(“A6”).Font.Name = “Arial Black”
Range(“A7”).Font.Size = 30
End Sub
Let’s see our codes in action. By looking at the result of our codes, we can see that:
Text in A1 was set to Bold
A2 was set to Italic
A3 was underlined
A5 font color was set to red
A6 font name was set to Arial Black; and lastly,
A7 font size was set to 30
 Excel VBA
[/fusion_text][fusion_separator style_type=”single|dashed” hide_on_mobile=”small-visibility,medium-visibility,large-visibility” id=”” sep_color=”#008000″ top_margin=”20″ bottom_margin=”20″ border_size=”2″ icon=”” icon_circle=”” icon_circle_color=”” width=”” alignment=”center” /][/fusion_builder_column_inner][/fusion_builder_row_inner][fusion_builder_row_inner][fusion_builder_column_inner type=”1_1″ layout=”1_1″ spacing=”” center_content=”no” hover_type=”none” link=”” min_height=”” hide_on_mobile=”small-visibility,medium-visibility,large-visibility” id=”” background_color=”” background_image=”” background_position=”left top” background_repeat=”no-repeat” border_size=”0″ border_color=”” border_style=”solid” animation_type=”” animation_direction=”left” animation_speed=”0.3″ animation_offset=”” last=”no” border_position=”all”][fusion_menu_anchor name=”a8″ /][fusion_text columns=”” column_min_width=”” column_spacing=”” rule_style=”default” rule_size=”” rule_color=”” hide_on_mobile=”small-visibility,medium-visibility,large-visibility” id=””]
VBA Clearing Cells
There are different options to clear the cells in Excel. I will show you how to implement it using VBA.
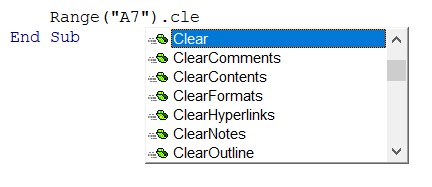
The image below is the list of cell-clearing options. This suggestion box pops-up when you start typing the word ‘clear’, giving you options on what to clear in a cell.
 Excel VBA
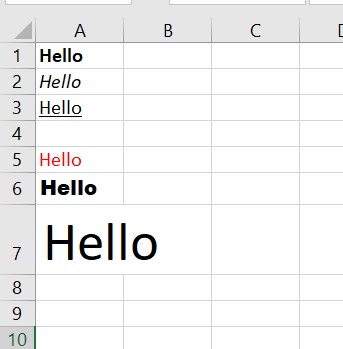
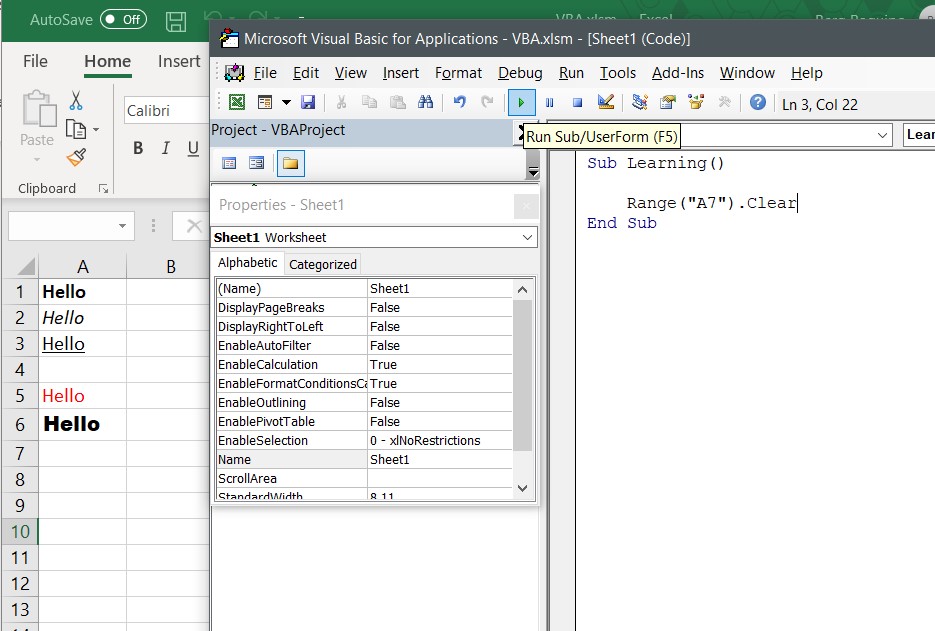
Clear – Clears the entire specified range
Range(“A7”).Clear
 Excel VBA
 Excel VBA
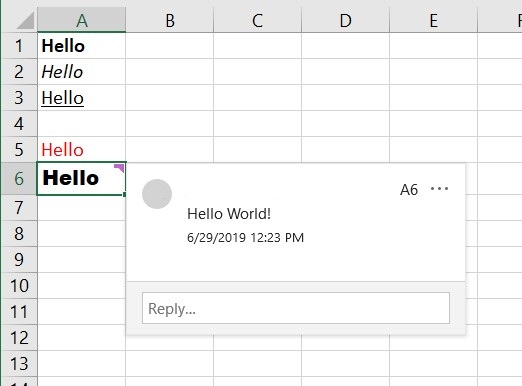
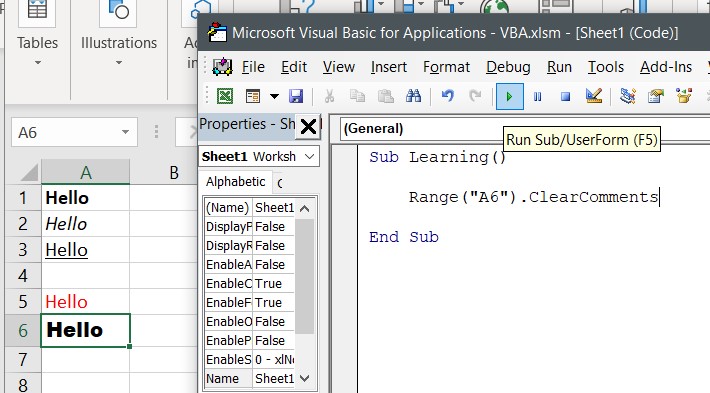
ClearComments – Clears all cell comments from the specified range
Range(“A6”).ClearComments
 Excel VBA
 Excel VBA
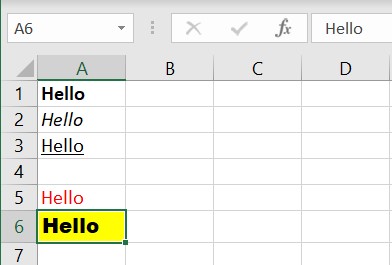
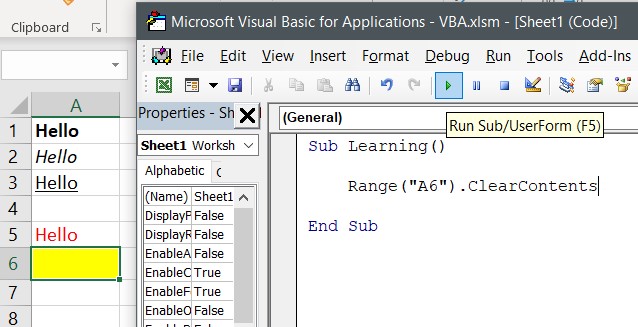
ClearContents – Clears formulas and values from the range
Range(“A6”).ClearContents
 Excel VBA
 Excel VBA
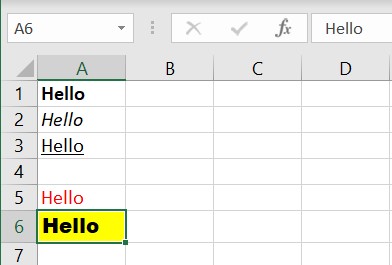
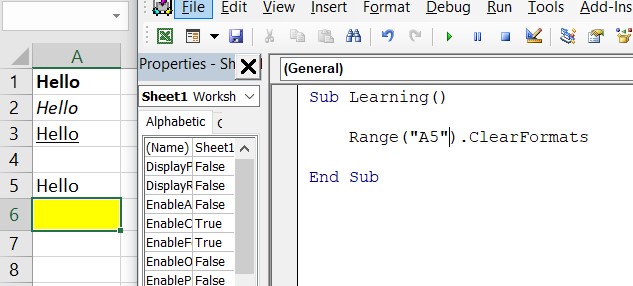
ClearFormats – Clears the formatting from the specified range
 Excel VBA
 Excel VBA
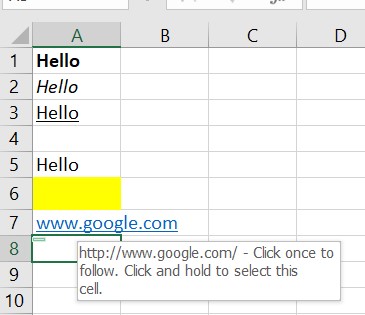
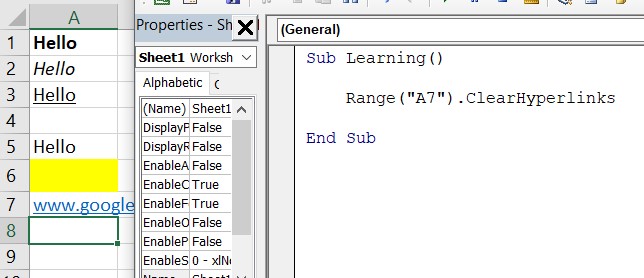
ClearHyperlinks – Removes all hyperlinks from the specified range
 Excel VBA
 Excel VBA
ClearNotes – Clears notes and sound notes from the specified range
ClearOutline – Clears the outline for the specified range
To clear cell color, you can use this code as reference:
Cells.Interior.Color = xlColorIndexNone
[/fusion_text][fusion_separator style_type=”single|dashed” hide_on_mobile=”small-visibility,medium-visibility,large-visibility” id=”” sep_color=”#008000″ top_margin=”20″ bottom_margin=”20″ border_size=”2″ icon=”” icon_circle=”” icon_circle_color=”” width=”” alignment=”center” /][/fusion_builder_column_inner][/fusion_builder_row_inner][fusion_builder_row_inner][fusion_builder_column_inner type=”1_1″ layout=”1_1″ spacing=”” center_content=”no” hover_type=”none” link=”” min_height=”” hide_on_mobile=”small-visibility,medium-visibility,large-visibility” id=”” background_color=”” background_image=”” background_position=”left top” background_repeat=”no-repeat” border_size=”0″ border_color=”” border_style=”solid” animation_type=”” animation_direction=”left” animation_speed=”0.3″ animation_offset=”” last=”no” border_position=”all”][fusion_menu_anchor name=”a9″ /][fusion_text columns=”” column_min_width=”” column_spacing=”” rule_style=”default” rule_size=”” rule_color=”” hide_on_mobile=”small-visibility,medium-visibility,large-visibility” id=””]
VBA Columns Widths
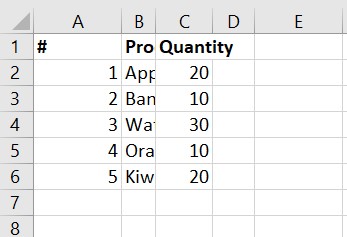
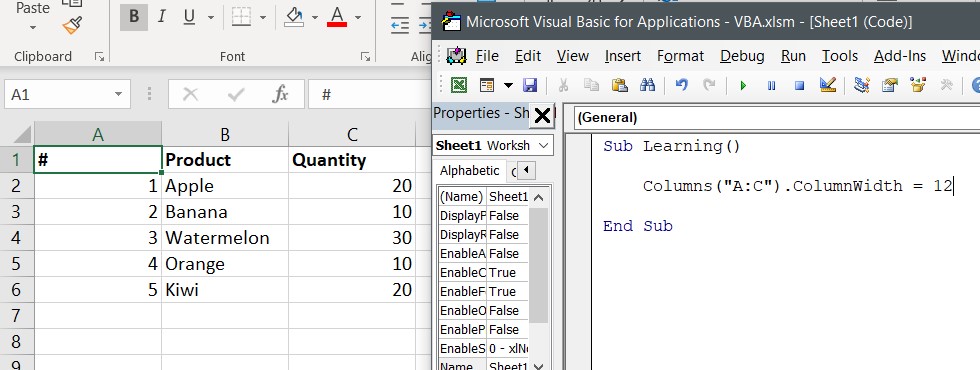
Excel column widths can also be manipulated using VBA. This one is quite important especially in reports or data presentations when same and exact column widths are needed to display data properly.
To set the column width in VBA, use this code are reference:
Sub Learning()
Columns(“A:C”).ColumnWidth = 12
End Sub
 Excel VBA
 Excel VBA
[/fusion_text][fusion_separator style_type=”single|dashed” hide_on_mobile=”small-visibility,medium-visibility,large-visibility” id=”” sep_color=”#008000″ top_margin=”20″ bottom_margin=”20″ border_size=”2″ icon=”” icon_circle=”” icon_circle_color=”” width=”” alignment=”center” /][/fusion_builder_column_inner][/fusion_builder_row_inner][fusion_builder_row_inner][fusion_builder_column_inner type=”1_1″ layout=”1_1″ spacing=”” center_content=”no” hover_type=”none” link=”” min_height=”” hide_on_mobile=”small-visibility,medium-visibility,large-visibility” id=”” background_color=”” background_image=”” background_position=”left top” background_repeat=”no-repeat” border_size=”0″ border_color=”” border_style=”solid” animation_type=”” animation_direction=”left” animation_speed=”0.3″ animation_offset=”” last=”no” border_position=”all”][fusion_menu_anchor name=”a10″ /][fusion_text columns=”” column_min_width=”” column_spacing=”” rule_style=”default” rule_size=”” rule_color=”” hide_on_mobile=”small-visibility,medium-visibility,large-visibility” id=””]
VBA Building Logic
VBA consists of several built-in operators and functions which can be used to build expressions and conditional logic. This includes mathematical, string, comparison and logical operators. So, when logical function and operators are combined into a series codes to evaluate a condition, it executes one set of code at a time, returns TRUE or FALSE as a result. Depending on the result, the following codes will continue to execute until it reaches the end of the conditional logic. Conditional statements are the If-Then with Else or ElseIf and the Select Case.
[/fusion_text][fusion_separator style_type=”single|dashed” hide_on_mobile=”small-visibility,medium-visibility,large-visibility” id=”” sep_color=”#008000″ top_margin=”20″ bottom_margin=”20″ border_size=”2″ icon=”” icon_circle=”” icon_circle_color=”” width=”” alignment=”center” /][/fusion_builder_column_inner][/fusion_builder_row_inner][fusion_builder_row_inner][fusion_builder_column_inner type=”1_1″ layout=”1_1″ spacing=”” center_content=”no” hover_type=”none” link=”” min_height=”” hide_on_mobile=”small-visibility,medium-visibility,large-visibility” id=”” background_color=”” background_image=”” background_position=”left top” background_repeat=”no-repeat” border_size=”0″ border_color=”” border_style=”solid” animation_type=”” animation_direction=”left” animation_speed=”0.3″ animation_offset=”” last=”no” border_position=”all”][fusion_menu_anchor name=”a11″ /][fusion_text columns=”” column_min_width=”” column_spacing=”” rule_style=”default” rule_size=”” rule_color=”” hide_on_mobile=”small-visibility,medium-visibility,large-visibility” id=””]
VBA IF Statement
VBA IF Statement is the most commonly used conditional statement. It allows you to evaluate for a condition then performs an action depending on the result.
IF THEN ELSE Statement simply means: “IF a condition is met, THEN what happens? ELSE, what happens when it is not met?”
Syntax # 1:
IF condition THEN code_if_true ELSE code_if_false
*Note that above statement is a simple one-line IF THEN ELSE statement where you don’t need to use the END IF statement. And that the ELSE part is optional.
Syntax # 2:
IF condition THEN
code_if_true
ELSE
Code_if_false
END IF
*Note that the second syntax is helpful if you have multiple lines of code to execute if the condition returns TRUE. Essentially, you need to use the END IF statement when using this syntax to avoid a compile error.
Examples of VBA IF THEN Statement
For instance, you want to check if a product’s quantity (cell B1) is under or above the minimum stock limit (10) and displays the result in cell C1.
Example#1 – One-line code:
Sub Learning()
If Range(“B1”) > 10 Then Range(“C1”) = “Above Minimum Limit” Else Range(“C1”) = “Below Minimum Limit”
End Sub
 Excel VBA
Example#2 – Block of code:
Sub Learning()
If Range(“B1”) > 10 Then
Range(“C1”) = “Above Minimum Limit”
Else
Range(“C1”) = “Below Minimum Limit”
Range(“C1”).Interior.Color = vbRed
End If
End Sub
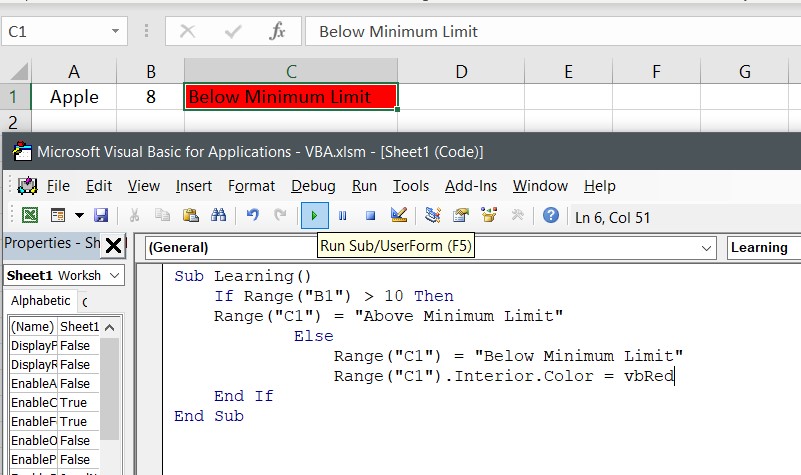 Excel VBA
[/fusion_text][fusion_separator style_type=”single|dashed” hide_on_mobile=”small-visibility,medium-visibility,large-visibility” id=”” sep_color=”#008000″ top_margin=”20″ bottom_margin=”20″ border_size=”2″ icon=”” icon_circle=”” icon_circle_color=”” width=”” alignment=”center” /][/fusion_builder_column_inner][/fusion_builder_row_inner][fusion_builder_row_inner][fusion_builder_column_inner type=”1_1″ layout=”1_1″ spacing=”” center_content=”no” hover_type=”none” link=”” min_height=”” hide_on_mobile=”small-visibility,medium-visibility,large-visibility” id=”” background_color=”” background_image=”” background_position=”left top” background_repeat=”no-repeat” border_size=”0″ border_color=”” border_style=”solid” animation_type=”” animation_direction=”left” animation_speed=”0.3″ animation_offset=”” last=”no” border_position=”all”][fusion_menu_anchor name=”a12″ /][fusion_text columns=”” column_min_width=”” column_spacing=”” rule_style=”default” rule_size=”” rule_color=”” hide_on_mobile=”small-visibility,medium-visibility,large-visibility” id=””]
Select Case Approach
Another logical function that you can use most specifically with three or more conditions is the Case Statement.
The Case statement performs the corresponding code for the first condition that is found to be TRUE.
Below is the syntax of Case statement:
Select Case test_expression
Case condition_1
Result_1
Case condition_2
Result_2
…
Case Else
Result_else
End Select
Once a condition is met, it will execute the corresponding code and will not evaluate the conditions any further.
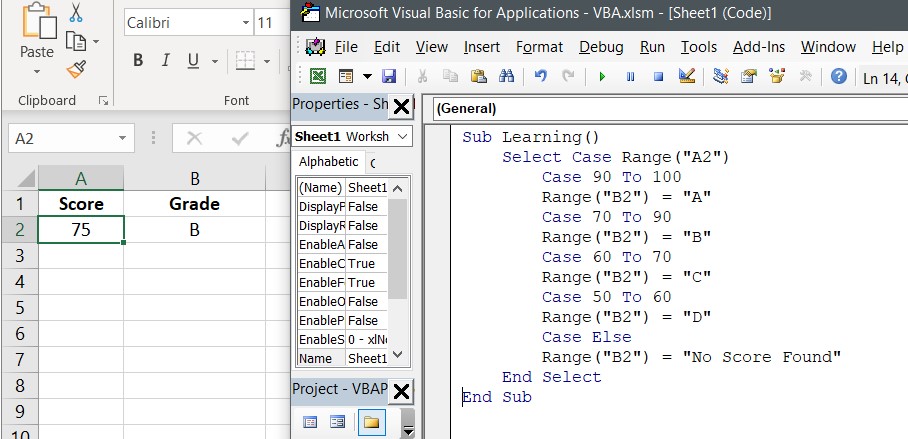
Example code used in VBA:
Sub Learning()
Select Case Range(“A2”)
Case 90 To 100
Range(“B2”) = “A”
Case 70 To 90
Range(“B2”) = “B”
Case 60 To 70
Range(“B2”) = “C”
Case 50 To 60
Range(“B2”) = “D”
Case Else
Range(“B2”) = “No Score Found”
End Select
End Sub
The code returned “B” since score 75 falls under the case 70 to 90.
 Excel VBA
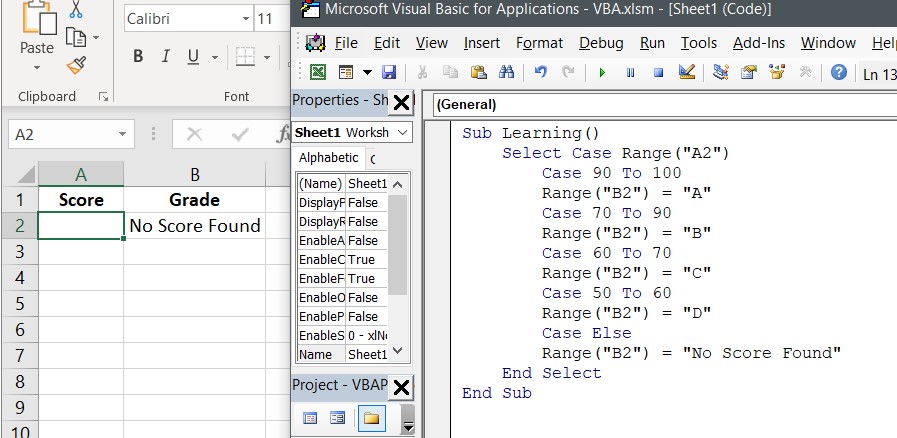
Second example, cell A2 is empty and as indicated in our Case Else, if no test_expression match any clause in all the other Case statements, then “No Score Found” will be the value in cell B2.
 Excel VBA
[/fusion_text][fusion_separator style_type=”single|dashed” hide_on_mobile=”small-visibility,medium-visibility,large-visibility” id=”” sep_color=”#008000″ top_margin=”20″ bottom_margin=”20″ border_size=”2″ icon=”” icon_circle=”” icon_circle_color=”” width=”” alignment=”center” /][/fusion_builder_column_inner][/fusion_builder_row_inner][fusion_builder_row_inner][fusion_builder_column_inner type=”1_1″ layout=”1_1″ spacing=”” center_content=”no” hover_type=”none” link=”” min_height=”” hide_on_mobile=”small-visibility,medium-visibility,large-visibility” id=”” background_color=”” background_image=”” background_position=”left top” background_repeat=”no-repeat” border_size=”0″ border_color=”” border_style=”solid” animation_type=”” animation_direction=”left” animation_speed=”0.3″ animation_offset=”” last=”no” border_position=”all”][fusion_menu_anchor name=”a13″ /][fusion_text columns=”” column_min_width=”” column_spacing=”” rule_style=”default” rule_size=”” rule_color=”” hide_on_mobile=”small-visibility,medium-visibility,large-visibility” id=””]
Start To Automate With Loops
Loops plays an essential role in controlling and handling code execution of repetitive tasks. Looping executes code repetitively until the condition is found TRUE. It is an effective way of optimizing your code in terms of speed and accuracy. There are multiple methods to loop, such as:
For – Next
For – Each – Next
Do While Loop
Do Until Loop
While – Wend
[/fusion_text][fusion_separator style_type=”single|dashed” hide_on_mobile=”small-visibility,medium-visibility,large-visibility” id=”” sep_color=”#008000″ top_margin=”20″ bottom_margin=”20″ border_size=”2″ icon=”” icon_circle=”” icon_circle_color=”” width=”” alignment=”center” /][/fusion_builder_column_inner][/fusion_builder_row_inner][fusion_builder_row_inner][fusion_builder_column_inner type=”1_1″ layout=”1_1″ spacing=”” center_content=”no” hover_type=”none” link=”” min_height=”” hide_on_mobile=”small-visibility,medium-visibility,large-visibility” id=”” background_color=”” background_image=”” background_position=”left top” background_repeat=”no-repeat” border_size=”0″ border_color=”” border_style=”solid” animation_type=”” animation_direction=”left” animation_speed=”0.3″ animation_offset=”” last=”no” border_position=”all”][fusion_menu_anchor name=”a14″ /][fusion_text columns=”” column_min_width=”” column_spacing=”” rule_style=”default” rule_size=”” rule_color=”” hide_on_mobile=”small-visibility,medium-visibility,large-visibility” id=””]
VBA For Loop
For loop is the most common loop in Excel VBA. This type of loop allows you to run the VBA code in a pre-determined number of times. Once all the statements have been executed, it goes back to the start of the structure, and that is why it is called a loop.
This is the syntax for For Loop:
Sub ()
For counter_variable = <start> to <end>
…statements…
Next [counter_variable]
End Sub
Sample code for your reference:
Sub Learning()
For iCtr = 1 to 10
Cells(iCtr, 1).value = “Hello”
Next iCtr
End Sub
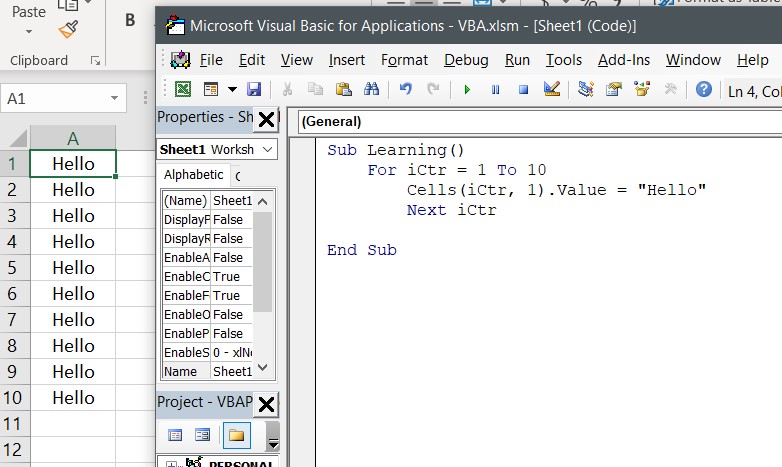
When used in Excel VBA:
 Excel VBA
Looking at the image above, the statement between For and Next was executed 10 times. For iCtr = 1, enters the value “Hello” to Cells(iCtr, 1) which is cell A1. The code then reaches Next iCtr, and so it increments and goes back to the For statement. Now, our variable iCtr = 2, “Hello” is entered in the cell at the intersection of row 2 and column 1 (cell A2). The code executes until it reaches the end counter, which is 10, and that will be row 10, column 1 (cell A10).
[/fusion_text][fusion_separator style_type=”single|dashed” hide_on_mobile=”small-visibility,medium-visibility,large-visibility” id=”” sep_color=”#008000″ top_margin=”20″ bottom_margin=”20″ border_size=”2″ icon=”” icon_circle=”” icon_circle_color=”” width=”” alignment=”center” /][/fusion_builder_column_inner][/fusion_builder_row_inner][fusion_builder_row_inner][fusion_builder_column_inner type=”1_1″ layout=”1_1″ spacing=”” center_content=”no” hover_type=”none” link=”” min_height=”” hide_on_mobile=”small-visibility,medium-visibility,large-visibility” id=”” background_color=”” background_image=”” background_position=”left top” background_repeat=”no-repeat” border_size=”0″ border_color=”” border_style=”solid” animation_type=”” animation_direction=”left” animation_speed=”0.3″ animation_offset=”” last=”no” border_position=”all”][fusion_menu_anchor name=”a15″ /][fusion_text columns=”” column_min_width=”” column_spacing=”” rule_style=”default” rule_size=”” rule_color=”” hide_on_mobile=”small-visibility,medium-visibility,large-visibility” id=””]
Combine Logic And Loops To Automate
Let’s start combining logic and loops to automate our Excel task. Here is one good yet simple example you can start practicing on:
Sub Learning()
Dim iCtr As Integer
For iCtr = 1 To 20
If Cells(iCtr, 1) = “Apple” Then
Cells(iCtr, 1).Interior.Color = vbYellow
End If
Next iCtr
End Sub
In this code, there is an IF statement between the For and Next statements. The IF statement evaluates the data and finds the value “Apple” in the list, and if found, colors the cell yellow. The counter 1 to 20 used as a variable for row number Cells(iCtr,1) indicates that it should loop from row 1 to 20 and then executes the statements that follow.
Here is how it should look like when added in VBA Editor.
 Excel VBA
[/fusion_text][fusion_separator style_type=”single|dashed” hide_on_mobile=”small-visibility,medium-visibility,large-visibility” id=”” sep_color=”#008000″ top_margin=”20″ bottom_margin=”20″ border_size=”2″ icon=”” icon_circle=”” icon_circle_color=”” width=”” alignment=”center” /][/fusion_builder_column_inner][/fusion_builder_row_inner][/fusion_builder_column][fusion_builder_column type=”1_3″ layout=”1_3″ spacing=”” center_content=”no” link=”” target=”_self” min_height=”” hide_on_mobile=”small-visibility,medium-visibility,large-visibility” id=”” background_image_id=”” background_color=”” background_image=”” background_position=”left top” undefined=”” background_repeat=”no-repeat” hover_type=”none” border_size=”0″ border_color=”” border_style=”solid” border_position=”all” padding_top=”” padding_right=”” padding_bottom=”” padding_left=”” margin_top=”” margin_bottom=”” animation_type=”” animation_direction=”left” animation_speed=”0.3″ animation_offset=”” last=”no”][fusion_text columns=”” column_min_width=”” column_spacing=”” rule_style=”default” rule_size=”” rule_color=”” hide_on_mobile=”small-visibility,medium-visibility,large-visibility” id=””]
Contents
[/fusion_text][fusion_text columns=”” column_min_width=”” column_spacing=”” rule_style=”default” rule_size=”” rule_color=”” hide_on_mobile=”small-visibility,medium-visibility,large-visibility” id=””]
Excel VBA: Learn the basics in a few minutes
[/fusion_text][fusion_widget_area name=”avada-custom-sidebar-vba” title_size=”” title_color=”” background_color=”” padding_top=”” padding_right=”” padding_bottom=”” padding_left=”” hide_on_mobile=”small-visibility,medium-visibility,large-visibility” id=”” /][/fusion_builder_column][/fusion_builder_row][/fusion_builder_container]
Blackjacks Rules: Learn the basics in a few minutes
For those who was looking tips to start blackjack find here all the rules you need to know.
