Efficiently printing labels from Excel spreadsheets can be a game-changer for businesses, event planners, and anyone looking to organize their personal workspace. With some simple steps, you can leverage the power of Excel and Word to create professional, customized labels to suit your specific needs.
This comprehensive guide will walk you through the entire process – from setting up your Excel data to troubleshooting any issues – to becoming an expert at printing labels directly from your spreadsheets.
With a bit of practice, you’ll be able to produce labels quickly and accurately, saving time while also enhancing precision and brand image. So read on to transform the way you create and print labels using Microsoft’s powerful programs.
Why Printing Labels from Excel Matters
Before we delve into the nitty-gritty of how to print labels from Excel, it’s essential to understand why this skill is so valuable. Labels are a versatile tool that can be used in various scenarios:
1. Streamline Your Business Operations
For business owners, efficiently printing labels can save time and reduce the margin for error when dealing with inventory, shipping, and customer management. It can also enhance your brand’s professionalism and overall efficiency.
2. Organize Large Events
If you’re organizing a wedding, corporate event, or any gathering that involves managing guest lists, labels from Excel can be a game-changer. Printing labels ensure your invitations, name tags, and seating charts are accurate and visually appealing.
3. Simplify Home Office Management
Even in a home office, printing labels from Excel can help you keep track of important documents, file folders, and various items around your workspace. It’s a simple yet effective way to stay organized and efficient.
Step-by-Step Guide: How to Print Labels from Excel
Now, let’s get into the practical details. Here’s a step-by-step guide to printing labels from Excel like a professional:
Step 1: Set Up Your Excel Spreadsheet
- Open Excel: Begin by launching Microsoft Excel on your computer.
- Enter Data: Create a spreadsheet with all the information you want to include on your labels. This could be names, addresses, product details, or any other data.
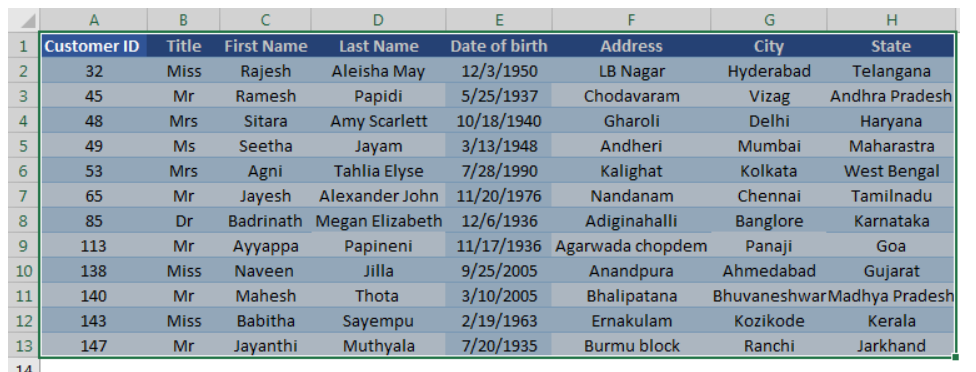
- Format Cells: Make sure your data is correctly formatted and organized in cells. Use separate columns for different types of information.
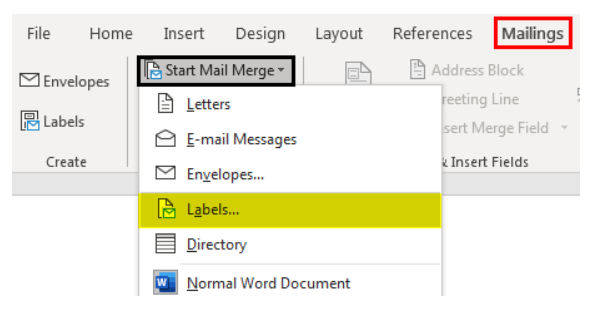
Step 2: Prepare Your Label Document
- Open Word: Open Microsoft Word, which you’ll use to create the label document.
- Mailings Tab: Go to the “Mailings” tab and select “Start Mail Merge” and then “Labels.”
- Label Options: Choose your label type from the list of available label vendors.

- If your label brand isn’t listed, you can set custom label dimensions by going to “Details”.

- Select Recipients: Click “Select Recipients” and choose “Use an Existing List.” Browse and select your Excel spreadsheet.

Step 3: Insert Merge Fields
- Insert Merge Fields: Click “Insert Merge Field” to add the data from your Excel sheet to the labels.

- Place the cursor where you want the data to appear, and select the corresponding field.

- Preview Your Labels: Use the “Update Labels” button to preview how your labels will look with the data.

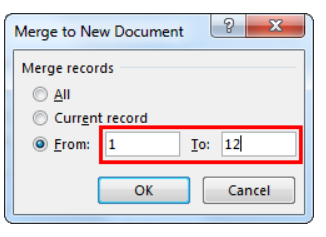
Step 4: Complete the Merge
- Finish & Merge: After inserting all necessary fields, click “Finish & Merge” and select “Edit Individual Documents.”

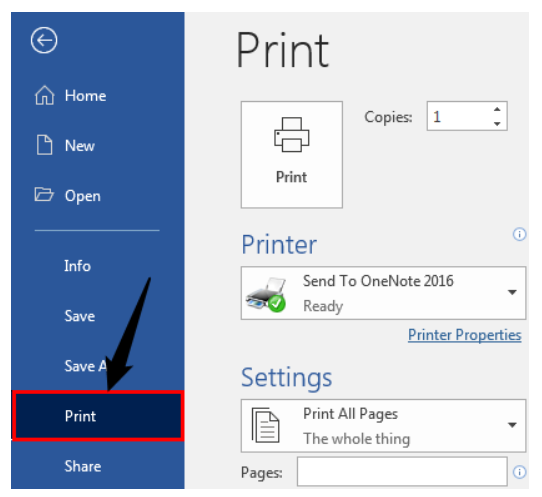
- Printing Options: Choose your preferred printing options, ensuring the correct printer and label type are selected.
- Print: Click “Print” to start printing your labels.
Step 5: Review and Adjust
- Review Labels: Examine the printed labels to ensure accuracy.
- Adjust as Needed: If you notice any errors, return to your Excel spreadsheet, make the necessary corrections, and repeat the merge process.
Troubleshooting and Tips
Here are some common issues you might encounter when printing labels from Excel and how to resolve them:
1. Formatting Problems
If your labels aren’t displaying data correctly, double-check your Excel spreadsheet formatting. Ensure that the data is correctly organized into separate columns.
2. Alignment Issues
If your labels appear misaligned on the paper, adjust the layout settings in Word’s “Label Options” to match your label sheet.
3. Blank Labels
Should you encounter blank labels, it’s likely due to an empty field in your Excel spreadsheet. Ensure that all cells are filled with data.
4. Printer Troubles
If you face printer-related issues, such as paper jams or low ink, address them before initiating the printing process.
Conclusion
Mastering the art of printing labels from Excel can significantly boost your efficiency, whether for business purposes or personal organization. By following our comprehensive guide, you can become a pro at this essential skill, enhancing your productivity and precision.
So, if you want to streamline your business operations, organize large events flawlessly, or simplify home office management, make sure you’re equipped with the expertise to print labels from Excel like a pro.