Excel is one of the most versatile and powerful software tools available today, empowering users across countless industries to manage data, automate tasks, and derive actionable insights. However, Microsoft’s robust security features like Protected View can sometimes limit Excel’s capabilities and hinder productivity. By learning how to remove Protected View, you can unlock Excel’s full potential to boost your efficiency.
Understanding Protected View’s Purpose
Before disabling Protected View, it’s crucial to understand its core purpose. As a security function, Protected View restricts certain actions like editing, links, macros, etc. when you open Excel files from potentially unsafe locations. It safeguards your system against threats by:
- Opening files in read-only mode to prevent modifications.
- Blocking potentially malicious external content like links or embedded programs.
- Displaying a notification bar to indicate the file is in Protected View.
By limiting interactions, Protected View prevents harmful files from executing malicious code or corrupting data. It provides an extra layer of defense when accessing Excel files from unknown or untrusted sources.
Key Features of Protected View
Protected View contains three key features that enable its security capabilities:
Read-Only Access
Opening files in read-only mode prevents accidental changes to the original data. Users cannot alter content until they disable Protected View. This preserves the integrity of the file.
Blocks External Content
Protected View blocks external links, media files, and other content that could launch malicious attacks. This isolates the file from external threats.
Notification Bar
A clear notification bar indicates when a file is in Protected View mode. Users have the option to enable editing if they deem the file safe and wish to override protections.
Step-by-Step Guide to Removing Protected View
Ready to take control of Protected View? By following these simple yet effective steps, you can bid farewell to the shackles of Protected View and unlock the full potential of Excel. Say goodbye to interruptions and hello to uninterrupted productivity.
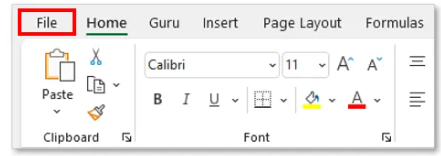
1. Navigate Through the Ribbon
To initiate the process, find your way through the Ribbon. Begin by selecting “File”
and then proceed to “Options.”
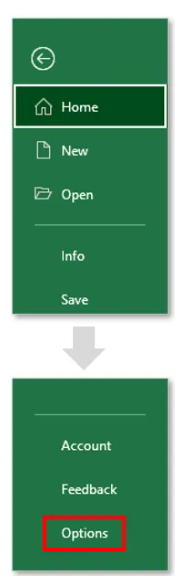
Dive into the heart of trust management by selecting “Trust Center.”
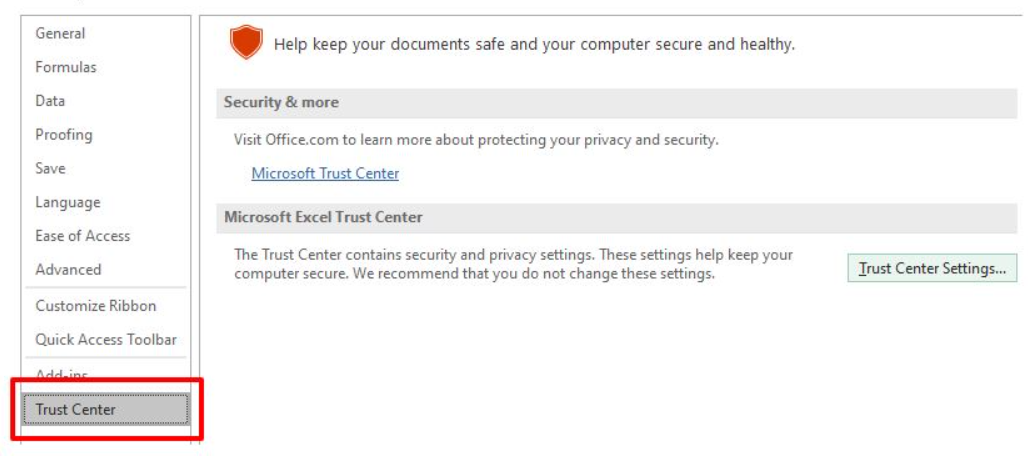
2. Trust Center Settings Exploration
Within the Trust Center, locate and select “Trust Center Settings.” Here lies the gateway to various security configurations, including Protected View.
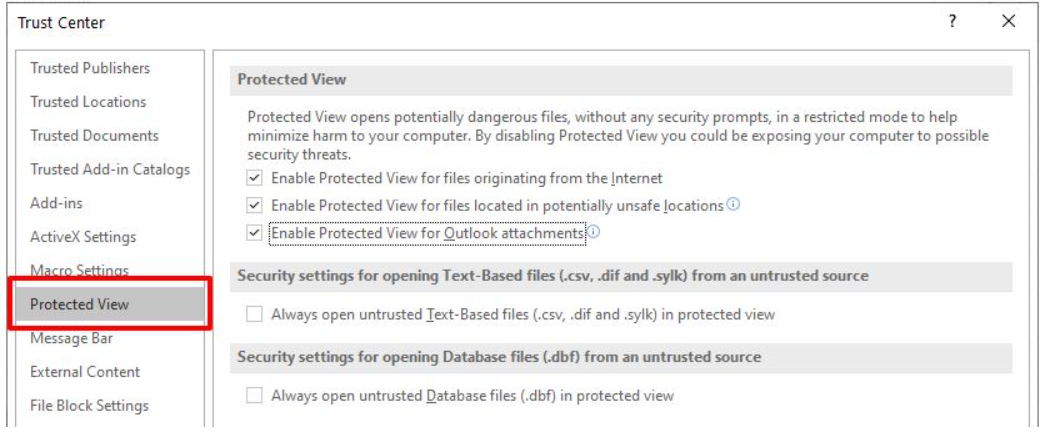
3. Unveiling the Protected View Options
As you delve into Trust Center Settings, specifically focus on “Protected View.” Now proceed by removing the check marks from the three checkboxes associated with Protected View.

4. Saving the Liberation
Click the “OK” button to cement your newfound freedom. Your Excel spreadsheets will now break free from the shackles of Protected View, ensuring a seamless and uninterrupted workflow.
Unleashing Excel’s True Potential
By removing Protected View in the Trust Center, you can now harness the full power and versatility of Excel. With the shackles removed, you’re free to:
- Edit Files Seamlessly: Make changes without read-only restrictions.
- Use Macros: Write and run macros to automate repetitive tasks.
- Access External Data: Pull data from external sources into your reports.
- Share Files Collaboratively: Modify shared files without ownership barriers.
Just be sure to only disable Protected View on safe, trusted files from known sources. With great Excel power comes great responsibility!
Maintaining a Balance of Security
While removing Protected View enables fuller access to Excel, don’t neglect the inherent security risks. Keep these tips in mind:
- Only disable Protected View on trusted files from safe sources. If the source is questionable, leave protections enabled.
- Be cautious about links, attachments, and media content within Excel files. Proceed with caution before clicking.
- Consider using other software security programs like antivirus software for broader protection.
- Learn how to identify suspicious files that may contain malicious content. Warning signs include macros, external hyperlinks, mismatched extensions (like .exe in a document), etc.
- Practice safe cyber habits like avoiding suspicious downloads, links, and email attachments.
Harnessing Excel Efficiency While Managing Risk
Finding the right balance is crucial. With Protected View disabled, continue exercising caution and thoughtful security practices. Perform frequent malware scans, maintain antivirus software, back up critical files, and learn how to inspect Excel documents for red flags.
By marrying strong security with Excel’s capabilities, you can maximize productivity while still protecting critical systems and data. Remove Protected View as needed while remaining vigilant against potential threats.
Conclusion
Protected View locks down Excel’s capabilities, but disabling it requires careful consideration of the risks. With the right balance of precaution and functionality, you can achieve Excel excellence. Unchain spreadsheets from Protected View exclusively when the source is trusted and risks are minimal.
Excel beyond boundaries, but stay behind the firewall of common sense. By removing Protected View judiciously, you can leverage this powerful tool to its fullest potential while still upholding watertight security.