When working with spreadsheets in Excel, it’s often necessary to perform some basic formatting on cells. This can include things like adding formatting text, merging and centering content, or adjusting the alignment of data within cells.
While these actions may seem simple enough to do manually, there are some quick shortcuts that make it easy to carry out these tasks quickly and easily.
In this blog post, we’ll walk you through the steps to merge and center the selected cells in Excel using a few clicks of the mouse. Whether you’re new to Excel or a seasoned pro, this guide will help you get up and running in no time!
Why Do You Need to Merge the Cells?

If you’ve ever tried to create a table in Microsoft Word, you know how frustrating it can be to get the cells to line up just the way you want them.
The same is true for Excel, except that there’s an easy fix: just merge the cells! Merging cells in Excel allows you to combine two or more cells into a single cell. This can be useful when you want to create a table or chart with irregularly spaced data.
For example, if you have a list of names and ages, you could merge the cells next to each other to create two columns. You can also use merged cells to create a header row or title for your table.
Apart from this, there are various other advantages because of which you might want to merge the cells.
By merging cells, you can create a single cell that spans multiple columns or rows.
This can be useful for creating headings and labels, or for aligning data in cells that are otherwise hard to read.
Merging cells is also a convenient way to create extra space in your worksheet.
If used correctly, merging cells can be a helpful tool for organizing and displaying your data. So next time you’re struggling to get your cells to line up, remember: merging is your friend!
How to Merge and Center the Cells? – Right Way to Do It
By following these simple steps, you can merge and center the data in your cells:
Step 1.
Select and highlight the cells that you want to merge. You can do this by clicking and dragging your mouse over the cells, or manually selecting them by clicking on each one. Make sure these cells are all adjacent to each other, and that you do not highlight any cells that you do not want to merge.
Step 2.

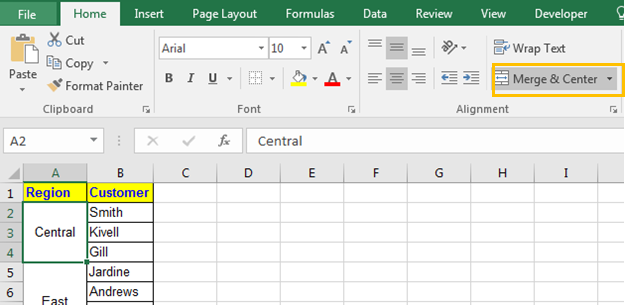
Once you have selected the cells, go to the “Home” tab in Excel and click on the “Merge & Center” button. This will merge and center the selected cells, aligning them in the center of the page.
Step 3.

If you want to change any of the formatting of your merged cells, click on the “Format” tab. Here you can adjust the font style, size, and color of your text, as well as the alignment and borders of your data.
Step 4.

Once you are happy with your formatting, simply click on the “Save” button and your new merged cells will be ready to use in your spreadsheet. And with these simple steps, you can quickly and easily merge and center the cells in your worksheet to create a professional, organized table that looks great.
How to Unmerge the Merged Cells?

If you need to unmerge the cells for any reason, simply select the merged cells and click on the “Unmerge Cells” button on the “Home” tab. Remember that once you unmerge cells, your data will be split back into separate cells, so be sure to edit the data before saving your document.
Bottom Line
Merging and centering cells in Excel is a great way to make your data look neat and tidy. While it may seem like a small thing, it can make a big difference in the overall appearance of your spreadsheet.
And, best of all, it’s easy to do! Simply select the cells that you want to merge, then click the “Merge and Center” button on the Home tab. Your selected cells will be merged into a single cell and centered within that cell.
That’s all there is to it! So go ahead and give it a try – your worksheet will thank you for it!