In the digital era, data is increasingly created and stored in digital formats like Excel. Excel offers powerful functionalities for organizing, calculating, and analyzing data. However, Excel files are not always suitable for sharing or preserving data in the long run. This is where PDFs come into play. PDF (Portable Document Format) provides a universal, static format that maintains data integrity across platforms.
Converting Excel files to PDFs enhances accessibility, allows wider sharing of information, and ensures long-term preservation. This comprehensive guide will outline a step-by-step process to seamlessly convert Excel data into PDF format. Follow these instructions to generate professional, shareable PDF versions of your Excel workbooks.
Why Convert Excel to PDF?
Here are some key benefits of converting Excel files to PDF format:
- PDFs preserve all formatting, formulas, and data exactly as they appear in the Excel workbook.
- PDFs can be opened on any device with a PDF reader installed, while Excel may require having Excel installed.
- PDFs allow you to share data while preventing others from editing the original content.
- PDFs have smaller file sizes than Excel files containing the same data.
- PDFs ensure the long-term integrity of data when archived. Excel files may get corrupted over time.
- PDF pages do not change based on device screen size or operating systems like Excel files.
Step 1: Launch Excel and Open Your Workbook
Begin by launching Microsoft Excel and opening the Excel workbook you wish to convert to a PDF. Double-click to open the file. Ensure your workbook is fully prepared and organized before proceeding to the next step.
Step 2: Access the “Save As” Option
Once your Excel workbook is ready, navigate to the “File” tab, prominently located at the top left corner of the Excel interface. Click on it to access the drop-down menu, and from there, select the “Save As” option.
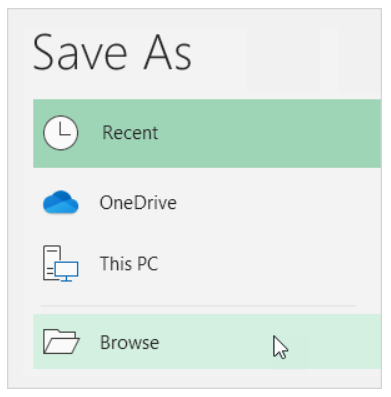
Step 3: Browse to Choose Your Save Location
After selecting “Save As,” a dialog box will appear. This is where you can define where you want to save the PDF file. Click on the “Browse” button to specify your desired destination folder or location.
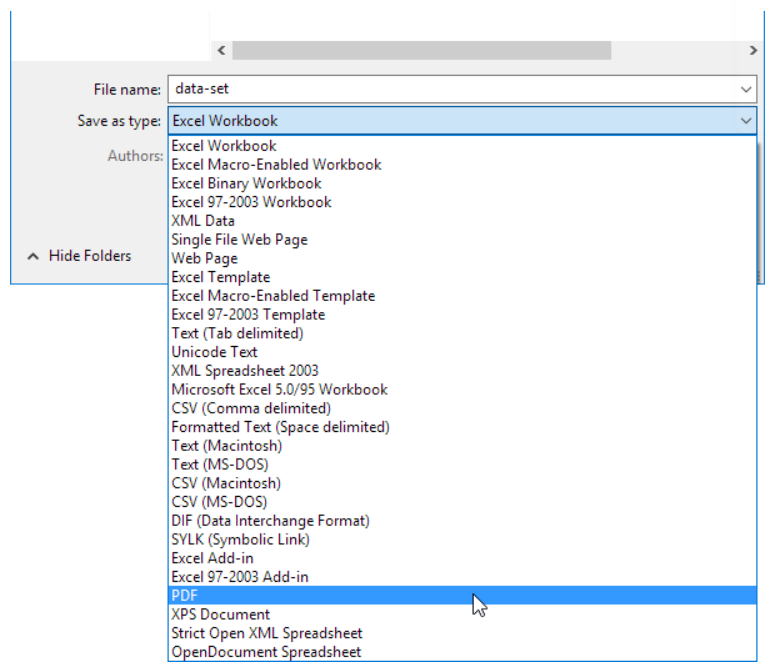
Step 4: Select PDF as Your File Format
In the same dialog box, you will find a drop-down list labeled “Save as type.” Click on it and choose “PDF” from the available options. This is the key step in ensuring your Excel file is converted to a PDF.
Step 5: Explore PDF Conversion Options
Before finalizing the conversion, click on the “Options” button.

This will allow you to customize the PDF conversion settings to meet your specific needs. You can choose to publish a selection, the active sheet, or the entire workbook as a PDF.

Step 6: Confirm and Save
Once you have selected your preferred options, click “OK” to confirm. You will be directed back to the “Save As” dialog box. Now, click the “Save” button, and your Excel workbook will be converted into a PDF, neatly saved in the location you specified.
By following these straightforward steps, you can seamlessly convert Excel files to PDFs, making your data easily accessible and shareable across various platforms. This knowledge will not only enhance your productivity but also streamline your data-sharing process.
Conclusion
Converting Excel to PDF is no longer a complex, technical process. This straightforward 6-step guide equips you with a simple yet effective technique to generate PDF versions of Excel workbooks. The ability to effortlessly create PDFs from Excel enhances productivity in data sharing and collaboration. PDFs can be easily shared across diverse devices and platforms.
They also ensure the long-term preservation of data integrity. With this knowledge, individuals and organizations can improve information accessibility, distribution, and archival. Follow these steps regularly to unlock the versatility of PDFs, while retaining access to the powerful functionalities of Excel data. This produces the best of both worlds in data management and information sharing.