Managing data is an essential yet often overlooked skill in today’s technology-driven world. With the exponential growth of digital information, it’s more important than ever to organize and structure data efficiently. This is especially true when it comes to critical contact information like addresses, which serve as the backbone of communication for businesses and organizations.
Knowing how to properly separate address components in a spreadsheet program like Excel can optimize data accuracy, enhance searchability, streamline communication, and unlock a world of benefits.
In this comprehensive guide, we will explore the value of separating addresses in Excel and provide a step-by-step walkthrough of this game-changing technique. Follow along to master this integral skill that can bolster data integrity across a wide range of professional settings.
Understanding the Importance of Properly Separated Addresses
Before delving into the nitty-gritty details of how to separate addresses in Excel, it’s crucial to understand why this is a valuable skill. Properly organized and separated addresses can significantly impact various aspects of your professional life:
1. Enhanced Data Accuracy
Having well-structured addresses ensures that your data is accurate and error-free. This is especially critical if you use this data for mailing purposes or to reach out to customers and clients. Incorrect or poorly formatted addresses can lead to returned mail and missed opportunities.
2. Improved Searchability
Efficiently separated addresses make it easier to search and filter your data. This can be a game-changer when you’re dealing with extensive lists, allowing you to quickly find the information you need without sifting through endless rows and columns.
3. Streamlined Communication
For businesses, clean and organized addresses are key to effective communication with customers. Whether you’re sending out newsletters, promotional materials, or invoices, having the right addresses at your fingertips can streamline the process and boost customer satisfaction.
Step-by-Step Guide: How to Separate Addresses in Excel
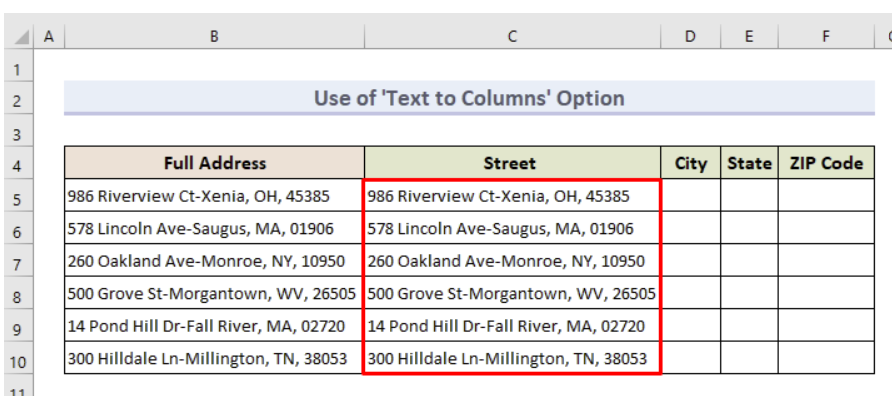
Step 1: Select the Target Column
Begin by selecting the column that contains the full address you want to split. Copy this column into an adjacent one for the separation process.
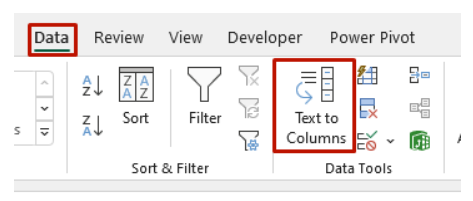
Step 2: Access the ‘Text to Columns’ Feature
Next, navigate to the ‘Data’ tab in Excel. Here, you’ll find the ‘Text to Columns’ option.
Step 3: Launch the ‘Text to Columns’ Wizard
Clicking on ‘Text to Columns’ will open the ‘Convert Text to Columns Wizard’ Step 1 window.
Step 4: Choose the Delimiter
In the first window, you’ll need to specify the delimiter that separates the different components of the address. Delimiters can be commas, tabs, hyphens, or spaces. Select the appropriate delimiter based on your data.
Step 5: Preview and Proceed
Once you’ve selected the delimiter, you’ll see a preview of how Excel will split the address. If it looks correct, click the ‘Next’ button.

Step 6: Choosing Comma and Hyphen
After you click the “Next” button, a window for Step 2 of the Convert Text to Columns Wizard will appear.
If your file contains addresses that are separated by both commas and hyphens, it’s advisable to choose “Comma and hyphen” in the Delimiter section. You will then be able to view the separated values in the Preview section.
Now, click on the “Next” button to proceed.

Step 7: Define Column Data Format
In the ‘Convert Text to Columns Wizard’ Step 3 window, select the column data format as ‘General.’
Step 8: Set the Destination
Specify the destination for the separated data. In most cases, you’ll want to choose an empty cell in the same row as the original address.
Step 9: Review Data Preview
You’ll be presented with a data preview to confirm that the separation aligns with your desired outcome. Review it carefully.
Step 10: Finish and Name Columns
Finally, click ‘Finish’ to execute the separation.

As a finishing touch, ensure to name the newly created columns appropriately, such as ‘Street,’ ‘City,’ ‘State,’ and ‘ZIP Code.’

Additional Tips for Excel Power Users
Now that you’ve mastered the art of splitting addresses in Excel, consider these additional tips to further enhance your Excel skills:
- Custom Formulas: Excel’s real power lies in its formula capabilities. Learn to create custom formulas to manipulate your data precisely.
- Conditional Formatting: Use conditional formatting to highlight specific data points based on predefined conditions, making your data visually insightful.
- Data Validation: Ensure data accuracy by implementing data validation rules, and preventing errors and inconsistencies.
- Pivot Tables: Master pivot tables to quickly summarize and analyze large datasets.
- Automation with Macros: Explore Excel’s macro functionality to automate repetitive tasks, saving you time and effort.
The Bottom Line
In conclusion, separating addresses in Excel is a simple yet immensely powerful skill that can facilitate easier data analysis, boost accuracy, improve communication, and help you get the most out of your contact information. By leveraging Excel’s ‘Text to Columns’ tool and following the steps outlined above, you can swiftly split full addresses into individual components with just a few clicks.
Whether you’re managing customer records, optimizing mailing lists, or cleaning your contact database, this guide will equip you to structure addresses efficiently. With properly organized address data, you can reach new heights of productivity, efficiency, and success across all your endeavors.