Microsoft Excel is undoubtedly the most widely used spreadsheet program today, equipped with a diverse range of features to help users organize, analyze, and present data efficiently. Among its many capabilities, Excel allows for splitting text within a column into multiple columns, which can be immensely valuable for handling certain datasets.
This article provides a comprehensive guide to harnessing Excel’s Text to Columns feature to seamlessly divide text-based data into separate columns. It will walk through what the tool enables, how it can be leveraged for common use cases, the step-by-step process for implementation, and an example to demonstrate its practical application.
Whether you need to split full names, addresses, or any other text strings, this guide aims to help both novice and experienced Excel users master this useful functionality to take their data manipulation to the next level.
Why Text Splitting Matters
Text splitting in Excel plays a pivotal role in data management, and its importance cannot be overstated. It enables you to break down complex information into more manageable components, facilitating better analysis and decision-making. Whether you’re working with a list of customer names, addresses, or any other type of data, the ability to split text can save you time and ensure accuracy in your tasks.
Understanding Text to Columns
As the name suggests, Text to Columns is a versatile tool in Excel that allows you to split a column of text into multiple columns with user-specified controls. Whether you need to divide names, addresses, or any other text-based data, Text to Columns can make the process seamless.
How to Split Text in Excel Using Text to Columns
Let’s dive into the steps to split text in Excel using the Text to Columns feature. In this example, we will be using a comma as the delimiter.
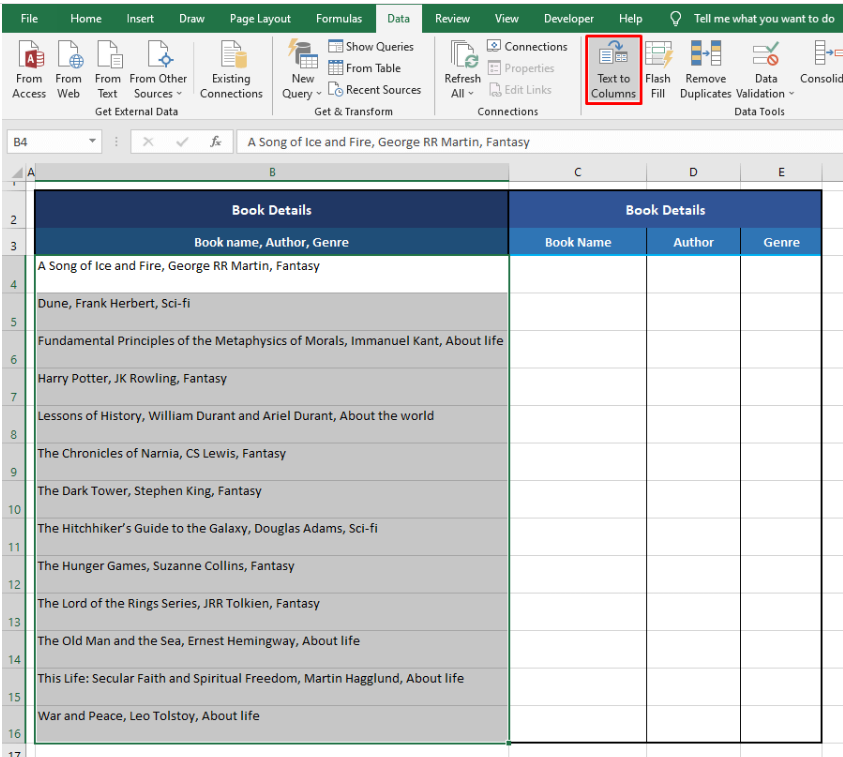
Step 1: Select the Data
Begin by selecting the data that you want to split. Click and drag your cursor to highlight the specific column you wish to work with.
Step 2: Access the Text to Columns Feature
Next, navigate to the Data tab in Excel. Look for the “Data Tools” section, and you’ll find the “Text to Columns” icon. Click on it to initiate the text-splitting process.
Step 3: Choose Delimited Data
In the Text to Columns wizard, you’ll be presented with two options: “Delimited” and “Fixed Width.” Select the “Delimited” option, as we are working with data that has a specific character as the delimiter.
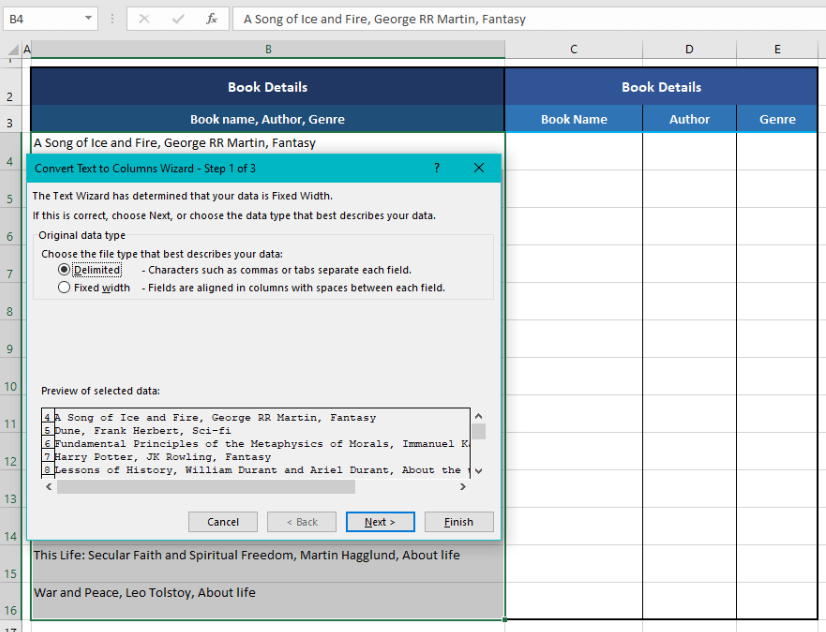
Step 4: Specify the Delimiter
Now, in the “Delimiters” section, choose the delimiter you want to use for splitting the text. In our case, it’s a comma. Ensure that the “Comma” option is selected.

Step 5: Configure Destination
Click “Next” to proceed. You will be prompted to choose where you want the split text to appear. Click on the “Destination” field and then select the cell on the worksheet where you want the split text to begin. This cell will be the starting point for your split data.

Step 6: Finish the Process
Once you’ve configured the destination, click “Finish” to initiate the splitting process. Excel will perform the text splitting based on the delimiter you specified.

Advanced Techniques for Text Splitting
Excel offers advanced techniques that go beyond the standard “Text to Columns” feature. These methods can be especially helpful when dealing with more complex data-splitting requirements.
Using Formulas
In some cases, you might need to create a custom formula to split text based on specific criteria. Functions like “LEFT,” “MID,” and “RIGHT” can be your best allies in such scenarios. These functions allow you to extract a portion of text from a cell based on the starting position and length.
Flash Fill
Excel’s “Flash Fill” is another powerful tool for text splitting. It automatically detects patterns in your data and generates a split without the need for complex formulas. Simply start typing the desired split in the adjacent column, and Excel will predict and complete the splitting for you.
Common Use Cases
Text splitting in Excel finds applications in various fields and scenarios, including:
- Data Cleanup: When dealing with messy data, text splitting can help you organize information into structured columns.
- Address Formatting: Splitting addresses into separate columns for street, city, state, and postal code can be invaluable for mailings and location analysis.
- Parsing Names: Extracting first and last names from a single cell is essential in customer relationship management.
- Categorizing Data: Splitting data into categories based on specific keywords or values can streamline decision-making.
Tips and Best Practices
To make the most of text splitting in Excel, consider these essential tips and best practices:
- Data Consistency: Ensure that your data is consistently structured for optimal results.
- Backup Data: Before performing any text splitting, create a backup of your dataset to avoid unintended data loss.
- Testing: Experiment with different splitting methods and test the results to ensure accuracy.
- Automation: If you frequently split text in a specific way, consider automating the process with Excel macros.
Conclusion
In conclusion, mastering the art of splitting text in Excel can significantly improve your data management and analysis capabilities. The Text to Columns feature is a valuable tool for this purpose, allowing you to divide text into multiple columns effortlessly. However, it’s essential to choose the right delimiter based on your data’s specific needs. If your data contains delimiters within the text strings, alternative methods may be more suitable.
Excel’s versatility and user-friendly features make it a go-to choice for data manipulation, and with the knowledge of splitting text, you’re one step closer to becoming an Excel pro. Start practicing and exploring the countless possibilities that Excel offers for enhancing your data handling skills.