Numbering columns in Excel is a valuable yet often underutilized skill for organizing and analyzing data. Whether you need to create a clear sequence for invoices, assign ID numbers to database entries, or simply keep a worksheet tidy, mastering column numbering unlocks new possibilities. In this comprehensive guide, we’ll explore the ins and outs of four key techniques for auto-numbering columns in Excel.
We’ll start with quick formulas like =ROW() and =OFFSET() for basic sequencing, then build up to advanced customization with utilities like Kutools for Excel. We’ll also cover simpler options like Excel’s built-in AutoFill to suit users at any skill level. Follow along as we break down each method with step-by-step instructions and illustrations. Soon, you’ll wield numbering not just as a formatting flourish but as a transformative tool for Excel excellence.
Method 1: Using the =ROW() Formula
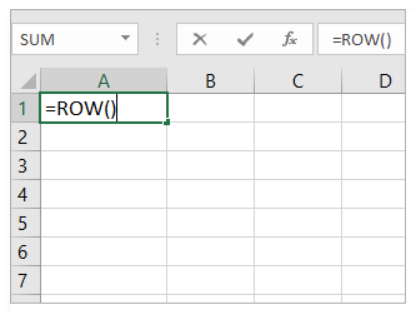
If your goal is to number the column based on row numbers, the =ROW() formula is your go-to tool. The =ROW() formula numbers cells based on their row number in the worksheet. Here’s how to use it:
Step 1: Type “=”ROW()” (without quotes) into the desired start cell for your numbered sequence.

Step 2: Hit Enter to see the row number appear.
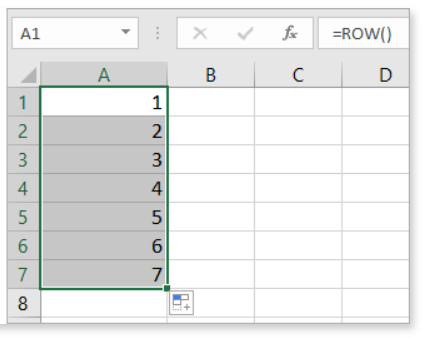
Step 3: Click on the bottom right corner of the cell and drag down to select the range to number. This will auto-increment the number in each column.

That’s it! The =ROW() formula is ideal when you want to quickly number rows in order. But it does rely on new row numbers if you insert or delete rows. So it’s best suited for simple, stable data sets.
Method 2: Advanced Auto Numbering with =OFFSET()
For a more advanced approach that doesn’t rely on row numbers, the =OFFSET() formula comes into play.
Step 1: Type “=OFFSET(A2,-1,0)+1” into the desired start cell for your sequence. This will increment the number in the cell above it.

Step 2: Hit Enter, then drag the autofill handle down to apply this formula across other cells.
Step 3: Notice if you insert rows, it will automatically re-number without breaking the sequence!

Note: Ensure that the cell above the starting cell is either blank or contains 0 for this formula to work correctly.
Method 3: Inserting Custom Sequence Numbers with Kutools for Excel
For truly advanced column sequencing, Kutools for Excel provides deep customization via its Insert Sequence Number utility:
Step 1: Download and install Kutools for Excel (free trial available)
Step 2: Go to Kutools > Insert > Insert Sequence Number
Step 3: Click “New” and configure options like Prefix, Suffix, Start value, Step value and more
Step 4: Click “Add” then select the column to populate the custom sequence
Step 5: Reuse and manage your personalized sequences anytime
Kutools makes numbering columns in complex formats a breeze. You can create invoice ID codes, product SKUs, unique identifiers, and more at scale.
Tips: The tool allows you to manage previous sequences, reset the sequence, and create additional sequences.
Method 4: Simplifying with AutoFill Function
For quick ad hoc numbering, Excel’s classic AutoFill feature gets the job done:
Step 1: Type “1” (or any start number) into a cell
Step 2: Drag the cell’s bottom-right corner to select the range to number

Step 3: Choose “Fill Series” from the pop-up prompt
Step 4: Watch 1,2,3 (or your chosen sequence) populate automatically!

While basic, AutoFill offers a fast way to manually number columns without formulas. It’s less dynamic than =ROW() or =OFFSET() but easier for one-off tasks.
Note: Deleting a number won’t disrupt the sequence of remaining numbers.
Conclusion
As you can see, Excel offers immense flexibility for numbering columns – you just need to know which method suits your unique needs. Whether it’s quick sequencing with =ROW(), dynamic expanding with =OFFSET(), fully customized numbering via Kutools, or simple ad hoc series with AutoFill, mastering these techniques unlocks new dimensions of spreadsheet functionality.
The organizational and analytical advantages of numbered columns make them a non-negotiable skill for any Excel user. From dynamically updating invoice records to streamlining product catalogs to simplifying budgets – the use cases are endless.
Now that you understand the core options for numbering columns, how will you put them to use? What tedious tasks can you simplify? What insights can you uncover? Harness these tips on your journey to Excel mastery today!
