Mastering data organization and manipulation in Excel is a must for anyone who utilizes spreadsheets for analytics, reporting, or data-driven decision-making. Among the most valuable yet overlooked skills in Excel is the ability to cleanly delimit and separate concatenated data into usable columns.
While delimitation may sound highly technical, it is a simple and accessible technique that allows Excel users to swiftly transform disorganized data into structured datasets primed for insights. This comprehensive guide will break down the fundamentals of delimitation while providing expert tips for applying and optimizing delimitation in Excel.
Whether you are a spreadsheet novice or a Power Excel user, this guide will equip you with the knowledge to masterfully delimit data and take your analytics to the next level. So if you are struggling with messy, difficult-to-analyze data, take a few minutes to enhance your skills and join the ranks of delimitation experts.
What is Delimitation and Why Does it Matter?
Delimitation refers to separating concatenated or continuous data into distinct columns or values. For example, a spreadsheet may contain a column with full names like “John Smith” that needs to be split into separate first and last name columns. Mastering delimitation is crucial for organizing messy imported data into a readable and structured format.
When you import data from external sources, it often comes concatenated into a single column. Delimitation allows you to divide this messy data into individual columns that make sense for your spreadsheet. Delimitation also allows you to split columns that contain multiple values into separate columns for easier analysis. For example, a column containing full addresses could be delimited into street address, city, state, and zip code columns.
This level of organization is extremely beneficial for effectively analyzing and visualizing your data. Delimitation also improves overall spreadsheet performance by dividing data and intensive formulas into smaller, more manageable columns.
A Step-by-Step Guide to Delimiting Data in Excel
Follow these simple yet comprehensive steps to quickly and accurately delimit your data in Excel:
1. Identify the delimiter character in your data
Carefully examine your spreadsheet data to determine the specific character used to separate the values in concatenated or continuous columns. Common delimiters include commas, tabs, semicolons, or custom characters like pipes (|), but your data could contain any delimiter. Identifying the correct delimiter is crucial for accurately splitting your data into columns.
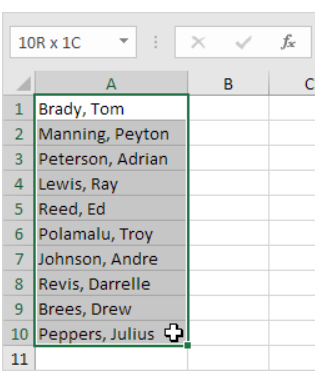
2. Select the entire column or row you want to delimit
Once you’ve identified the delimiter, highlight the full column or row you want to delimit. Make sure you select the entire column from top to bottom, or the entire row from left to right. Proper selection is important to correctly apply delimitation across all of your data.
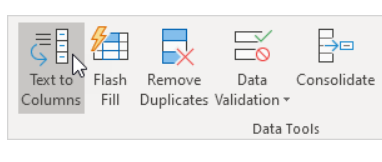
3. Launch Excel’s Text to Columns wizard
Go to the Data tab and click the “Text to Columns” button to launch the Text to Columns wizard. This will guide you through the straightforward delimitation process.
4. Choose the “Delimited” option
In the first step of the Text to Columns wizard, select the “Delimited” option to specify you want to delimit by a separator character. Then click Next to proceed.

5. Indicate the delimiter in your data
In the next step, make sure to accurately indicate the delimiter character used in your data, whether comma, tab, semicolon, or another character entirely. Excel will immediately provide a preview with your data split into columns based on the delimiter specified.

6. Optionally set the format of the new delimited columns
Once your data is accurately delimited into columns, you can optionally set the format of each new column, like General, Text, Date, etc based on your needs.
7. Finish delimitation and confirm the new columns are correct.
Carefully verify the delimited columns accurately break out your data as needed. Once confirmed, click Finish to complete the delimitation process.

Your data is now neatly separated into usable columns!

Expert Tips for Efficient Delimitation in Excel
Follow these pro tips to get the most out of the delimitation process:
- First, always copy your original data to a new sheet before delimiting it to preview the results safely without risking your original data. Delimitation irrevocably alters data, so this protects your original spreadsheet.
- Before delimiting, clean your data by removing any inconsistencies or extra unnecessary spaces. Properly formatted data helps ensure accurate delimitation.
- Combine delimitation with Excel’s powerful functions like CONCAT, LEFT, RIGHT, and others for even more flexibility to transform your delimited data.
- For advanced data sets, create a custom delimiter like a pipe (|) or hash (#) for complex separating needs. Unique delimiters help accurately split intricate data.
- Always check periodically for new Excel updates to take advantage of the latest delimitation features and functionality as they are released.
Conclusion
By mastering the comprehensive delimitation steps outlined above, you can efficiently organize messy, concatenated data for streamlined analysis and insights. While the process is straightforward, the impact on your spreadsheet workflow and capabilities will be immense. Sharpen your delimitation skills today and take your Excel data manipulation to the next level.