One of Microsoft Excel’s most useful yet often overlooked features is the ability to hide entire workbooks from view. Whether utilized for security, simplicity, or organizational purposes, hidden Excel files can be accessed and managed by mastering a few key techniques. In this comprehensive guide, we will provide an in-depth look at unhiding workbooks in Excel, enabling you to reveal these concealed files with just a few clicks.
We will examine why users hide workbooks, covering common use cases like restricting access to sensitive data, streamlining complex projects, and structuring dashboards or reports. Next, we will walk step-by-step through the process of unhiding a workbook using Excel’s intuitive View tab options.
With visual examples and easy-to-follow instructions, you’ll be able to unhide workbooks in seconds regardless of your Excel skill level. We’ll also explore expert strategies like leveraging VBA macros for advanced workbook management and protecting hidden files with passwords. By the end of this guide, you’ll have the knowledge to efficiently unhide, secure, and organize your Excel workbooks like a pro.
Understanding Hidden Workbooks
Before diving into the steps to unhide an Excel workbook, it’s essential to understand why and how workbooks become hidden in the first place. Excel allows users to hide worksheets or entire workbooks for various reasons, including:
- Confidential Information: Users may hide workbooks to protect sensitive or confidential data from unauthorized access.
- Organizational Structure: In large Excel files with numerous worksheets, hiding irrelevant ones can help streamline the workspace, making it easier to navigate.
- Temporary Actions: Workbooks might be hidden temporarily for specific tasks, such as data validation or debugging.
- Presentation Purposes: Hidden workbooks can be utilized to create interactive dashboards or reports, where only specific information needs to be visible.
Unhiding a Workbook in Excel
To unhide a workbook, follow these simple steps:
Step 1: Open Excel: Launch Microsoft Excel and open the workbook where you suspect a hidden workbook exists.
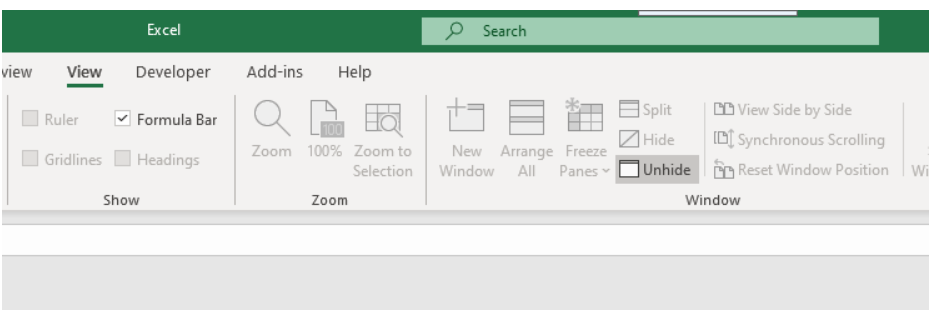
Step 2: Navigate to the View Tab: In the Ribbon at the top of the Excel window, locate the “View” tab. Click on it to reveal a set of options.
Step 3: Unhide the Workbook: Within the “View” tab, you’ll find the “Unhide” option. Click on it.

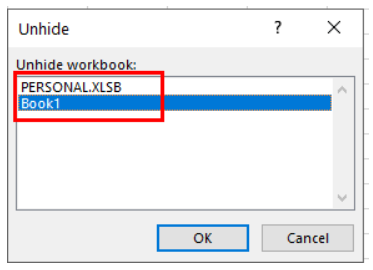
Step 4: Choose the Workbook: A dialog box will appear, showing a list of all the hidden workbooks in your current Excel session. Select the workbook you wish to unhide. If you have previously recorded macros and stored them in the personal macro workbook, you might also see the “PERSONAL.XLSB” workbook.

Step 5: Confirm Your Selection: After choosing the workbook you want to unhide, click the “OK” button.
Voila! The hidden workbook will reappear, ready for you to access its content and make any necessary changes.

Why Hide and Unhide Workbooks?
Hiding workbooks in Excel can be a useful practice for several reasons:
1. Organizational Efficiency
By hiding workbooks, you can keep your workspace tidy and focused on the task at hand. This is particularly helpful when you’re working with multiple spreadsheets simultaneously.
2. Enhanced Security
Sensitive information can be tucked away in hidden workbooks, providing an extra layer of security against prying eyes.
3. Macros Management
If you’ve recorded macros and stored them in the personal macro workbook, hiding and unhiding workbooks is essential for accessing and editing these macros.
4. Data Simplification
Hiding workbooks with reference or auxiliary data can simplify your spreadsheet, making it easier to navigate and work with.
Advanced Techniques for Managing Hidden Workbooks
While the above steps are sufficient for most users, Excel offers advanced techniques for managing hidden workbooks:
Using Visual Basic for Applications (VBA)
For users comfortable with coding, Visual Basic for Applications (VBA) provides extensive control over hidden workbooks. You can write VBA macros to automate the unhiding process, making it more efficient for complex Excel projects.
Protecting Hidden Workbooks
To add an extra layer of security, you can password-protect hidden workbooks. This prevents unauthorized access even if someone manages to unhide the workbook using the steps mentioned earlier.
Conclusion
In this comprehensive guide, we’ve walked you through the process of unhiding an Excel workbook. Understanding why workbooks get hidden and knowing how to reveal them is essential for Excel users of all levels. Whether you’re managing sensitive data or simply trying to streamline your workspace, these steps will empower you to work effectively with hidden workbooks.
Remember, Excel’s flexibility and robust features make it a powerful tool in various industries. Unhiding workbooks is just one of the many skills that can enhance your proficiency with this software. So, the next time you find yourself in need of unhiding a workbook, you’ll do it with ease and confidence, boosting your Excel productivity.
