In the world of spreadsheets and data analysis, Microsoft Excel stands out as one of the most powerful tools available. Whether you’re managing project timelines, tracking work hours, or calculating time-based metrics, Excel can be your go-to solution.
However, when it comes to summing hours in Excel, it’s not as straightforward as adding regular numbers. In this article, we’ll guide you through various methods of how to sum hours in Excel and help you become an Excel time-master.
The Importance of Summing Hours
Summing hours in Excel is a crucial task for many professionals. Whether you’re a project manager tallying up the total work hours, an HR specialist calculating employee timecards, or even a student managing your study time, accurately totaling hours is essential.
Excel offers a variety of methods to achieve this, catering to different scenarios and user preferences.
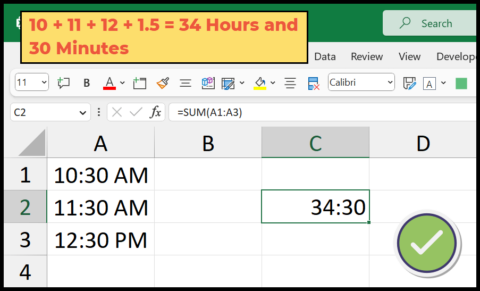
Method 1: Using the SUM Function
The SUM function in Excel is one of the most basic and widely used methods to add up numbers, including hours. Here’s how you can use it:
- Prepare Your Data: Start by organizing your hours data in a single column or row. Each cell should contain a time value, and it’s important to format them correctly. Excel should recognize these values as time, not plain text or numbers. Use the “hh:mm” or “h:mm AM/PM” format to enter time values.
- Select the Cell for the Total: Choose the cell where you want the total hours to appear.
- Enter the SUM Formula: In the selected cell, type =SUM( and then select the range of cells containing your time values. Ensure that you close the parentheses. For example, if your hours are in cells A1 to A10, your formula should look like this: =SUM(A1:A10).
- Press Enter: After entering the formula, press the “Enter” key. Excel will calculate the total hours for the selected range and display the result in your chosen cell.
This method is simple and effective for summing time values in Excel, but it has limitations when dealing with very large datasets or when you need more advanced calculations.
Method 2: Using Custom Formatting
If you’re looking for a way to display the total hours in a more user-friendly format, custom formatting can be a great choice. This method does not affect the underlying calculations but enhances the visual representation of the time total.
- Follow Steps 1 and 2: Just like the SUM function method, prepare your data and select the cell for the total.
- Enter the SUM Formula: Use the SUM function as explained in the previous method to calculate the total hours.
- Apply Custom Formatting: Right-click on the cell with the total hours, and choose “Format Cells” from the context menu. In the “Number” tab, select the “Custom” category.
- Create a Custom Format: In the “Type” field, enter the custom format you desire. To display the total hours and minutes, you can use the format h “hours” m “minutes”. Click “OK” to apply the custom format.

Now, your total hours will be displayed in a more user-friendly format, making it easier for others to understand at a glance.
Method 3: Using the Text Function
The TEXT function in Excel allows you to convert a numeric value into a specific text format. This method can be useful if you want to manipulate the total hours further or display it differently.
- Prepare Your Data: As always, organize your time values and select the cell for the total.
- Enter the SUM Formula: Use the SUM function to calculate the total hours.
- Use the TEXT Function: In another cell, enter a formula using the TEXT function to convert the total hours into the desired format. For example, if your total is in cell B1, you can use a formula like =TEXT(B1, “h:mm”) to display the total hours and minutes.
- Press Enter: After entering the formula, press “Enter,” and the cell will display the total hours in the format you specified.

This method is particularly handy when you want to combine the total hours with additional text or symbols.
Method 4: Using PivotTables
PivotTables are a powerful feature in Excel for summarizing and analyzing data. While they are typically associated with more complex tasks, they can be a great choice for summing hours, especially when dealing with large datasets.
- Prepare Your Data: Ensure that your time values are organized, and you have headers for your columns.
- Create a PivotTable: Select any cell within your data range and go to the “Insert” tab. Click on “PivotTable” and follow the PivotTable creation wizard.
- Set Up the PivotTable: In the PivotTable Field List, drag your time values to the “Values” area. By default, Excel will sum these values.
- Customize the Formatting: If you want to apply custom formatting to the total hours, you can do so in the “Value Field Settings.” Click on the “Number Format” button and select your preferred format.

PivotTables are versatile and can handle complex data structures, making them a valuable tool when you need to summarize hours from extensive sources.
Conclusion
Summing hours in Excel is a crucial skill for a variety of personal and professional tasks. Whether you’re dealing with work hours, project timelines, or any other time-related data, Excel provides several methods of how to sum hours in Excel. From the straightforward SUM function to advanced User-Defined Functions, you can choose the method that best suits your needs and expertise level.
When summing hours in Excel, it’s essential to keep your data organized and correctly formatted. Additionally, you can enhance the visual representation of your total hours using custom formatting, or take advantage of PivotTables for more complex analyses.