Microsoft Excel is a powerful tool that helps individuals and businesses manage and analyze data effectively. One common task that many Excel users encounter is the need to split a column into multiple columns.
Whether you have a column with data that needs to be separated or want to extract specific information from a column, knowing how to split a column in Excel can be incredibly useful.
In this comprehensive guide, we’ll walk you through the step-by-step process of splitting a column in Excel, covering various methods and scenarios to suit your needs.
Why Split a Column in Excel?
Before we dive into the details of splitting a column, let’s understand why you might need to perform this operation. There are several situations where splitting a column can be beneficial:
1. Data Cleanup
In many cases, data imported into Excel may be poorly formatted, with multiple pieces of information crammed into a single column. Splitting the column allows you to clean up your data and make it more organized and presentable.
2. Extracting Specific Information
You may have a column that contains mixed data, such as names and email addresses. Splitting the column enables you to extract just the email addresses or any other specific information you need.
3. Preparing Data for Analysis
When working with large datasets, splitting columns can help you prepare the data for analysis. This is especially useful for tasks like pivot tables, filtering, and sorting.
4. Customizing Data Presentation
Splitting a column can also be handy when you want to customize the way data is presented. You can create new columns to display data in a format that suits your needs.
Now that we understand the why, let’s move on to the how.
How to Split a Column in Excel
1. Using Text to Columns
One of the most common methods to split a column in Excel is by using the “Text to Columns” feature. Here’s how to do it:
Step 1: Select the Column
Begin by selecting the column you want to split. Click on the column header to highlight the entire column.
Step 2: Access “Text to Columns”
Go to the “Data” tab in the Excel ribbon. Under the “Data Tools” group, you’ll find the “Text to Columns” button. Click on it.
Step 3: Choose a Delimiter
In the “Text to Columns Wizard,” you’ll be prompted to choose a delimiter that separates the data in the column. Common delimiters include commas, semicolons, and spaces. Select the appropriate option or specify a custom delimiter.
Step 4: Define the Destination
Specify where you want the split data to appear. You can either choose to overwrite the existing column or select a new location for the split data.
Step 5: Finish the Process
Review your selections and click “Finish.” Excel will split the column based on your chosen delimiter, creating new columns as needed.
2. Using Formulas
If you prefer a more dynamic approach to split a column, you can use Excel formulas. Here’s an example of how to split text data using formulas:
Step 1: Determine the Splitting Criteria
Identify a unique character or pattern in the text data that will serve as the splitting criterion. For instance, if you want to split names into first and last names, you can use a space as the criterion.
Here is an example of splitting addresses
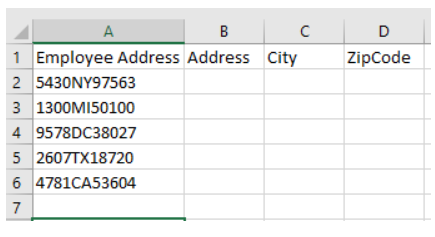
Step 2: Create New Columns
In adjacent columns, use formulas like “LEFT,” “MID,” or “RIGHT” to extract the relevant portions of the data. For our example, you would use the “LEFT”
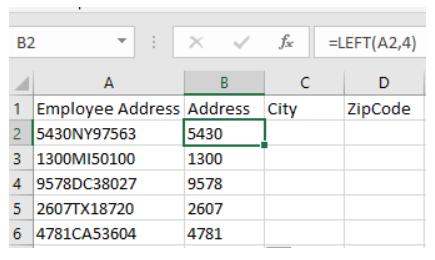
and “RIGHT” and “MID” functions to separate the addresses, Cities and ZipCodes.

Step 3: Review and Adjust
Check the results and adjust your formulas if necessary. Excel will automatically update the split data if the original column changes.
3. Using Flash Fill
Excel’s Flash Fill feature is a handy tool for splitting columns with a clear pattern. Here’s how it works:
Step 1: Start Typing
In a new column next to the one you want to split, start typing the desired format for the split data. Excel will suggest a pattern based on your input.

Step 2: Accept the Suggestion
Press “Enter” to accept Excel’s suggestion, and it will automatically populate the entire column with the correctly split data.

Conclusion
Splitting a column in Excel is a crucial skill that can make your data management tasks much more efficient. Whether you need to clean up messy data, extract specific information, prepare data for analysis, or customize data presentation, Excel offers multiple methods to accomplish this task.
By following the steps outlined in this guide, you’ll become proficient in splitting columns in Excel, allowing you to work with your data more effectively and make the most out of this versatile spreadsheet software. Happy data managing!