Sorting data by date is a fundamental skill for anyone working with spreadsheets. The ability to organize information chronologically can provide valuable insights, identify trends, and facilitate data analysis.
In this comprehensive guide, we will delve into the intricacies of sorting data by month in both Excel and Google Sheets. Whether you’re a beginner seeking a solid foundation or an experienced user looking to refine your skills, this tutorial will equip you with the knowledge and techniques to master date sorting like a pro.
Section 1: Sorting by Month as Text
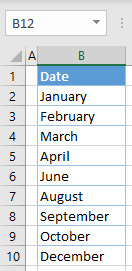
Sorting your list of textual months in chronological order is crucial for analyzing data accurately. Follow these simple steps to achieve this in Excel and Google Sheets:
Step 1: Selecting the Range
Start by selecting the range of cells containing the months you want to sort. Include the header as well for a comprehensive sorting process.
Step 2: Custom Sort
In Excel, navigate to the “Home” tab, find the “Sort & Filter” option in the Ribbon, and choose “Custom Sort” from the drop-down menu. Google Sheets users can locate the “Data” tab, click on “Sort Range,” and select “Custom Sort.”
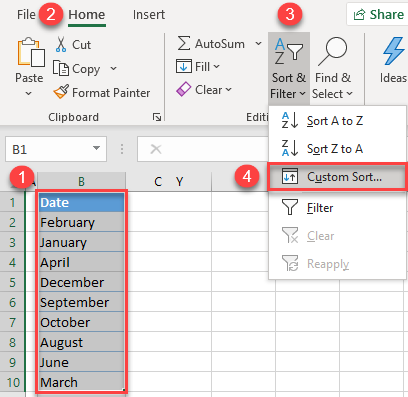
Step 3: Configuring the Custom Sort
A sort window will appear. Under the “Order” section, select “Custom List.”
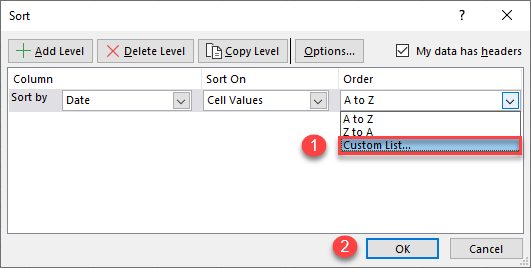
In Excel, the “Custom Lists” screen will pop up, allowing you to choose the list of months like “January, February, March, …” and click “OK.” In Google Sheets, you can skip this step as it doesn’t have a built-in custom list feature.
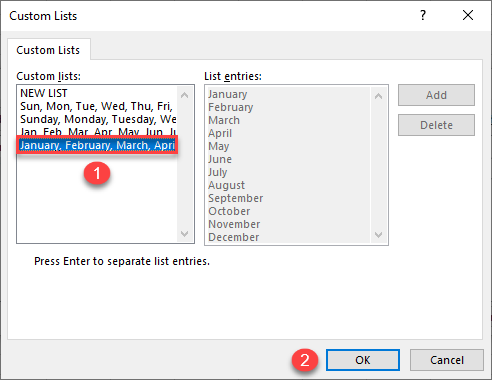
Step 4: Applying the Sort
Click “OK” to finalize the custom sort.
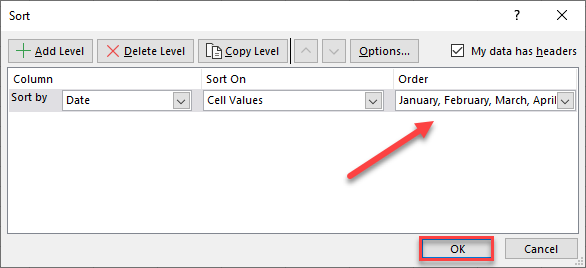
The months in your selected range will now be sorted chronologically, from oldest to newest.
Section 2: Sorting Dates by Month
Sorting your dates by month can help identify trends and seasonal patterns in your data. Follow the below given steps to sort your dates by month in both Excel and Google Sheets:
Step 1: Creating a Helper Column
To begin, create a helper column next to your date column. This column will assist in extracting the monthly numbers.
Step 2: Entering the Formula
In the first cell of the helper column, enter the formula “=MONTH(B2).” This formula extracts the month number from the corresponding date in column B. The B2 reference can be adjusted based on the location of your data.
Step 3: Applying the Formula
Drag the formula down to fill the helper column with month numbers for all the dates in your range.
Step 4: Selecting and Sorting
Select both the date column and the helper column, including the header row. Then, proceed to the sorting process.
Step 5: Sorting Smallest to Largest
In Excel, go to the “Home” tab, click on “Sort & Filter,” and choose “Sort Smallest to Largest.” For Google Sheets users, find the “Data” tab, click on “Sort Range,” and select “Sort Sheet Z-A.”
Step 6: Finalizing the Sort
Choose “Expand the selection” in the pop-up window (Excel) or select the desired options for sorting (Google Sheets). Click “OK” to complete the sorting process.
Section 3: Sorting Months as Text in Google Sheets
Google Sheets lacks a built-in custom list feature. However, you can still sort months as text using an array formula. Follow these steps to achieve this in Google Sheets:
Step 1: Entering the Array Formula
In an empty cell, such as C2, enter the formula “=SORT(B2:B10,MONTH(B2:B10&1),1).” This formula utilizes the SORT and MONTH functions to sort the months as text.
Step 2: Sorting Months
The MONTH function takes a range of cells as input and returns an array of numbers representing each month. The SORT function then sorts this array in ascending order.
Step 3: Enjoying the Results
You will now have all the months from column B sorted in column C, from oldest to newest. Enjoy the convenience of sorted textual months in Google Sheets!
Section 4: Sorting Dates by Month in Google Sheets
Harnessing the Power of Sorting: Dates Sorted by Month in Google Sheets
In Google Sheets, you can sort dates by month using a similar approach to Excel. Here’s how:
Step 1: Creating a Helper Column
Insert a helper column next to your date column to accommodate the sorting process.
Step 2: Applying the Formula
In the first cell of the helper column (C2), enter the formula “=SORT(B2:B,MONTH(B2:B),TRUE).” This formula sorts the dates in column B by month, from oldest to newest.
Step 3: Sorting Dates
The MONTH function extracts the month numbers from the dates, and the SORT function generates a new array in column C based on the sorted month numbers.
Step 4: Completing the Process
Congratulations! Your dates in column B are now sorted by month in column C, providing you with a well-organized dataset.
The Bottom Line
Mastering date sorting techniques in Excel and Google Sheets is an essential skill for anyone working with data. By understanding how to sort data by month, you’ll be equipped with a powerful tool for uncovering trends and patterns that may have otherwise gone unnoticed.
Whether you’re analyzing sales data, tracking project milestones, or organizing personal information, the ability to sort data chronologically will streamline your workflow and enhance your decision-making capabilities.
With the knowledge gained from this guide, you can confidently tackle date sorting challenges, optimizing your data analysis processes and achieving remarkable results. Start applying these techniques today and unlock the full potential of data sorting in Excel and Google Sheets!

