Setting rows as print titles in Excel is a valuable skill that allows you to control how your data is printed and ensure that important information, like column headers, remains visible on each page.
This article will guide both beginners and expert users through the process of how to set rows as print titles in excel, exploring its significance and providing detailed step-by-step instructions.
Significance of Setting Rows as Print Titles
When you print a large dataset that spans multiple pages, it’s essential to maintain clarity and readability. Setting rows as print titles ensures that specific rows, typically containing headers or labels, are repeated at the top of each printed page.
This feature is particularly useful when printing lengthy spreadsheets, reports, or tables, as it helps in identifying column headings and maintaining context across multiple pages.
For example, in a sales report, having the column headers (like “Date,” “Product Name,” “Sales Amount,” etc.) appear at the top of every page can greatly enhance readability and make the printed document more professional.
Step-by-Step Guide: How to Set Rows as Print Titles
For Beginners:
-
Open Excel and Select Your Worksheet:
Launch Microsoft Excel and open the worksheet that you want to print.
-
Identify the Rows to Repeat:
Decide which rows contain the titles or labels you want to repeat at the top of each printed page.
-
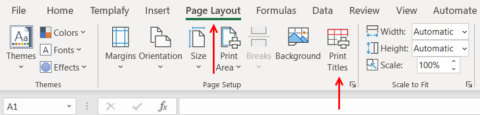
Go to Page Layout Tab:
Click on the “Page Layout” tab in the Excel ribbon.
-
Select Print Titles:
In the Page Setup group, click on “Print Titles.”
-
Choose Rows to Repeat:
In the Page Setup dialog box that appears, under the “Sheet” tab, click on the small icon next to “Rows to repeat at top.”
-
Select Rows to Repeat:
Click and drag to select the rows you want to repeat. The row numbers will appear in the text box. Click “OK” to confirm.
-
Preview and Adjust:
You can preview how the printed page will look by going to the “File” tab, selecting “Print,” and using the Print Preview feature. Adjust as needed.
For Expert Users:
-
Using the Ribbon:
Navigate to the “Page Layout” tab and click on “Print Titles” in the Page Setup group.
-
Page Setup Dialog Box:
In the Page Setup dialog box, go to the “Sheet” tab.
-
Specifying Rows:
Click on the icon next to “Rows to repeat at top.” This will allow you to select the specific rows you want to repeat.
-
Defining the Print Area:
You can also set a print area by selecting cells that you want to include in the printout. This ensures that only the selected area will be printed.
-
Advanced Settings:
Explore other options in the Page Setup dialog box, such as adjusting margins, orientation, and scaling, to further customize your print settings.
-
Checking the Result:
Use the Print Preview feature (under the “File” tab) to check how the printed document will look before printing.

Additional Tips and Considerations
-
Multiple Rows:
You can set multiple rows to repeat at the top by selecting a range of rows in the “Rows to repeat at top” dialog box.
-
Header Row vs. Top Row:
Ensure that you are selecting the correct row(s) to repeat. This is typically the row that contains column headers or labels.
-
Page Breaks:
Excel automatically inserts page breaks based on the print area and settings. Adjust page breaks if needed to optimize printing.
Conclusion:
Mastering the technique of how to set rows as print titles in Excel is essential for anyone working with large datasets and needing to produce professional-looking printouts.
Whether you’re a beginner or an advanced user, these steps will help you enhance the readability and presentation of your printed Excel documents.
By following this guide, you can efficiently manage and customize your print settings to produce clear and organized reports, tables, and spreadsheets.