Microsoft Excel is a powerful tool that helps us organize, analyze, and present data effectively. While Excel provides a default font for worksheets, you may find yourself wanting to personalize the appearance of your spreadsheets by changing the default font to one that better suits your preferences or matches your company’s branding.
In this blog post, we will walk you through the step-by-step process of setting the default font in Excel, enabling you to create professional-looking and consistent documents effortlessly.
Whether you’re a beginner or an experienced user, this guide will equip you with the knowledge to customize your Excel experience to suit your needs. Let’s dive in and discover how to make Excel reflect your unique style!
Understanding the Importance of Default Fonts
The default font in Excel serves as the baseline for all text within your spreadsheets. It affects not only the content you enter but also the data labels, axis labels, and other textual elements. Consistency in font style across different worksheets and workbooks ensures a professional and polished appearance for your Excel documents. Additionally, selecting an appropriate default font can improve readability and enhance the overall user experience.
Step-by-Step Guide to Set Default in Excel
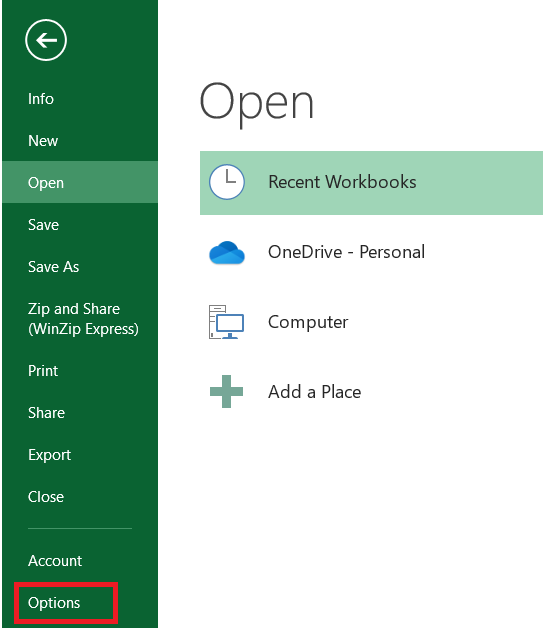
Step 1: Access the File Tab
To begin, you need to access the File tab, which is located in the top left corner of the Excel window. Locate and click on it to proceed.
Step 2: Open Excel Options
After clicking on the File tab, a drop-down menu will appear. Look for and click on the option labeled “Excel Options.”
This will open the Excel Options window.
Step 3: Navigate to General Options
Inside the Excel Options window, you will find various tabs on the left-hand side. Locate and click on the tab labeled “General.” This tab contains options to configure general settings for Excel. Within the General tab, you can customize the default font for new workbooks. Look for the section titled “When creating new workbooks”.
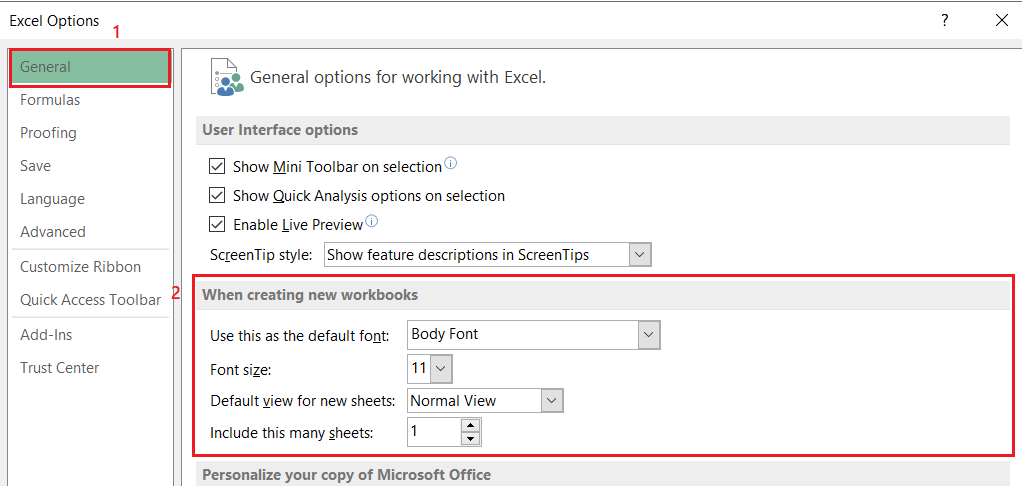
Step 4: Set the Default Font
Right below the “When creating new workbooks”, you’ll see the option “Use this as a default font.” Click on it to proceed.

Step 5: Adjust the Font Size
In addition to selecting the default font, you can also modify the font size. Find the option labeled “Font size” within the “When creating new workbooks” section and click on it. A drop-down menu will appear, allowing you to choose the desired font size.

Step 6: Save the Changes
Once you have selected your preferred font and adjusted the font size, it’s time to save the changes. Locate and click the “OK” button at the bottom of the Excel Options window. This will keep the settings you have chosen.
Step 7: Restart Excel
To apply the new default font to future workbooks, you need to restart Excel. Close the application entirely and then reopen it. After restarting, the selected font and font size will be the default settings for any new workbooks you create.
It’s important to note that these changes only affect new workbooks and will not alter existing files that are already saved. The customization of the default font in Excel allows you to tailor your spreadsheets to your preferences and maintain a consistent appearance throughout your work.
Best Practices for Default Font Selection
When selecting a default font for your Excel documents, it is essential to consider readability and aesthetics. Here are a few best practices to keep in mind:
- Choose a font that is legible in both printed and digital formats.
- Avoid using decorative or script fonts for large blocks of text.
- Opt for a font size that is comfortable to read without straining the eyes.
- Test the font on different devices and screen sizes to ensure compatibility.
Tips for Improved Readability
To enhance readability within your Excel spreadsheets, consider implementing the following tips:
- Use consistent font sizes and styles throughout the document.
- Break down complex information into smaller sections with clear headings.
- Ensure sufficient spacing between rows and columns.
- Avoid overcrowding cells with excessive text or data.
- Use bullet points and numbered lists for better organization
The Bottom Line
By following this step-by-step guide, you can easily set the default font in Excel and improve the visual appeal of your spreadsheets. Experiment with different fonts and font sizes to find the combination that suits your needs best. Enhance your Excel experience and take your productivity to new heights!
Remember, customizing the default font is just one aspect of Excel’s extensive customization options. Explore further to discover the full range of possibilities and unlock the full potential of this powerful spreadsheet software.