Microsoft Excel is a powerful tool that allows users to organize data, perform calculations, and present information visually. When working with Excel, you may have encountered borders around cells or ranges. While borders can be useful for highlighting data, there are instances where you may want to remove them. This article will guide you through the process of removing borders in Excel, helping you create clean and visually appealing spreadsheets.
Understanding Borders in Excel
Borders are lines that appear around cells or ranges, defining their boundaries. They play a significant role in enhancing the visual appeal and organization of your spreadsheets. However, to truly harness the power of borders, it is crucial to understand their various aspects and how to manage them effectively.
The Role of Borders in Excel
Borders serve as a visual aid, making it easier to distinguish and separate different sections of data within your worksheet. By applying borders strategically, you can create a well-structured and professional-looking spreadsheet. Whether you want to highlight specific data points, create tables, or group related information, borders offer a versatile tool to accomplish these tasks.
Types of Borders in Excel
Excel provides a range of border styles that you can apply to your cells and ranges. These include solid lines, dotted lines, dashed lines, and double lines. Each style brings its unique touch to the appearance of your data. Additionally, you can customize the color of the borders to add even more visual emphasis.
Removing Borders: When Less is More
While borders can be beneficial, there are instances when their presence might detract from the overall clarity of your spreadsheet. In such cases, knowing how to remove borders is equally important. By selectively removing borders, you can create a cleaner and more streamlined look, enabling your data to stand out without distractions.
Removing Borders from Cells
To remove borders from specific cells in Excel, follow these simple steps:
- Select the cell or range from which you want to remove the borders.

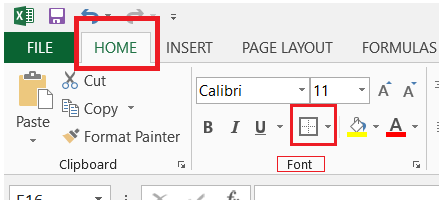
- Go to the “Home” tab in the Excel ribbon.
- Look for the “Font” group and click on the “Borders” icon.

- A drop-down menu will appear with border options.
- Select “No Border” to remove all borders from the selected cells.

Clearing All Borders from a Worksheet
If you want to remove borders from an entire worksheet, Excel provides a quick way to do this:
- Click the “Select All” button located at the top-left corner of the worksheet (the triangle between the row and column headers).

- Navigate to the “Home” tab and click on the “Borders” icon in the “Font” group.

- Choose “No Border” from the dropdown menu to clear all borders from the worksheet.

Tips to Simplify Border Removal
Here are some additional tips to make border removal in Excel more efficient:
Utilize the “Format Painter” Tool: Excel’s “Format Painter” tool is a hidden gem when it comes to removing borders. Simply select a cell with the desired border style, click on the “Format Painter” icon (a paintbrush) in the “Home” tab, and then apply the format to other cells by clicking and dragging over them. This nifty feature enables you to copy border formats seamlessly from one cell to another without the need for repetitive manual adjustments.
Master the Keyboard Shortcut: Boost your productivity with the handy keyboard shortcut. By pressing “Ctrl + Shift + _” (underscore) while selecting the cells, you can instantly remove borders from the chosen area. It’s a quick and convenient way to achieve a neat and borderless look for your data.
Effortlessly Erase Multiple Borderlines: When dealing with several borderlines that need to be removed at once, Excel offers a time-saving solution. Select the “Draw Border” option, which can be found in the “Borders” icon menu under the “Home” tab. Then, click on the existing borderlines you wish to erase, and like magic, they vanish simultaneously. This method ensures a swift and efficient way to remove multiple borderlines in one go.
Conclusion
Borders can be a helpful visual aid when working with Excel, but sometimes, they can make your spreadsheets look cluttered. Knowing how to remove borders efficiently allows you to maintain a clean and professional appearance for your data. Whether you want to clear borders from specific cells or an entire worksheet, Excel provides various options to accomplish this task easily. By following the step-by-step guide in this article, you can master the art of removing borders in Excel and creating visually appealing spreadsheets.
