Working with sensitive data in Excel? Need to lock certain cells while keeping the worksheet editable for other users? Protecting cells while leaving the sheet unprotected gives you more flexible control over access.
Protecting cells allows securing formulas or hiding sensitive information from accidental changes, without restricting edit access to the entire sheet. This comes in handy when collaborating with others on a worksheet.
In this guide, you’ll learn how to protect cells in Excel without protecting the entire sheet.
Lock Cells While Keeping the Worksheet Fully Editable
The key to protecting cells while keeping the sheet accessible is using cell-level protection locks instead of sheet protection.
Sheet protection blocks all editing on the worksheet until a password is entered to unprotect it. But cell-level protection only locks specific cells marked as locked, leaving all other cells editable.
So protecting cells gives granular control over access without fully restricting the sheet. For example:
- Secure specific cells like formulas or data tables by locking them
- Keep worksheet freely editable by others except for locked cells
- No need for a password to edit unlocked cells
This makes sharing and collaborating on worksheets easier. Next, let’s see how to apply this cell-level protection in practice.
Step-by-Step Guide to Locking Cells
Protecting cells while keeping the sheet unprotected only takes a few clicks. Follow these simple steps:
- Select the cells you want to lock

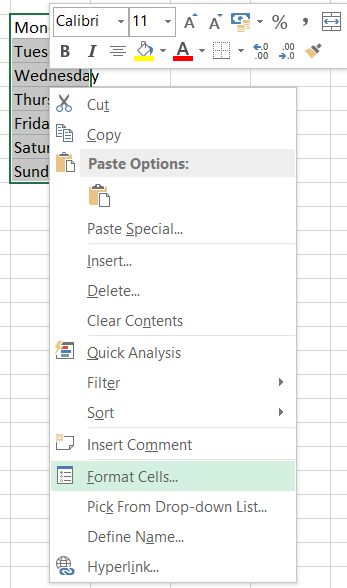
- Right-click and choose Format Cells
- Go to the Protection tab

- Check the box for Locked

- Click OK

That’s all it takes to activate protection directly on those cells!
Now let’s examine what each of these steps does:
Select Cells to Lock
First, select the cells you want to protect on the worksheet. You can select:
- A single cell like A1
- A row like 1
- A column like A
- A block range like A1:B10
- Multiple ranges by holding Ctrl
Make sure only your intended cells are selected or they will get locked too.
Open Format Cells Menu
- Right-click on the selected cells and choose the Format Cells option from the menu:
- This opens the powerful Format Cells dialog box.
Here you can customize all sorts of cell formatting like font, alignment, borders, fill, and importantly – protection.
Check Protection > Locked
On the Format Cells dialog, go to the Protection tab:
- Then check the box next to Locked under Cell options:
- The Locked setting protects cells from being edited
- When applied, users cannot modify locked cells without unprotecting sheet
- But other non-locked cells remain freely editable
- Once checked, click OK to apply.
Confirm Cell is Marked as Locked
After closing Format Cells, you’ll see a special indicator in the corner of cells marked as locked:
- This tiny green triangle confirms protection is now enabled for those specific cells.
- The worksheet itself remains completely editable otherwise. Only locked cells become uneditable.
Now let’s look at best practices when locking cells in Excel.
Tips for Locking Cells in Practice
Locking some cells while keeping the full sheet editable enables flexible protection. Here are key tips for using cell locking effectively:
Highlight Cells Visually
It can be unclear at a glance which cells are locked. Use formatting to visually indicate protected cells:
- Cell fill color – Mark locked cells with solid fill so they stand out
- Font color – Make text in locked cells a different color
- Borders – Outline locked cell boundaries to differentiate them
This allows quick visual identification of editable vs locked areas.
Lock All Hidden Formula Cells
If the worksheet contains formulas that should remain hidden, lock all those cells:
- Select the entire sheet with Ctrl+A
- Hide rows/columns with formulas using the right-click menu
- Lock the entire selection with Format Cells to prevent formula tampering
This way users see workbook data rather than underlying formulas powering it.
Use Validation to Guide Inputs
Instead of locking a cell, use Data Validation rules to allow only certain inputs:
- Restrict invalid entries in a cell without fully locking it
For example, force selection from a dropdown list of options
- Allows editing while constraining to permitted inputs
- More flexible than locking cells in some cases.
Assign Permissions with Cell Colors
Use cell fill colors to define functional permissions:
- Green fill = cells editable by anyone
- Orange fill = cells editable by managers only
- Red fill = cells locked for administrators only
Lets users understand editing permissions at a glance.
When Not to Use Cell Locking
While cell locking is very useful, it isn’t a cure-all solution. Avoid relying solely on it when:
- Almost the entire sheet requires locking – use sheet protection instead
- Confidential info like SSNs require locking – use permissions instead
- User role management is complex – develop permission levels
In these cases, cell locking can become tedious or fail to provide adequate protection on its own.
With this, you’ve seen detailed steps for locking cells in Excel while keeping the worksheet freely editable and open for collaboration!
Conclusion
Protecting cells while keeping the overall Excel sheet editable provides more granular control over worksheet permissions. Unlike full sheet protection using passwords, cell locking allows securing sensitive areas like formulas or data tables without restricting access to the entire document.
This balances protection for key cells while maintaining collaboration abilities for other users. Formatting also enables clearly distinguishing locked versus editable regions at a glance based on visual indicators like colors and borders.
In summary, Excel’s cell-level locking functionality lets you apply focused protection only where needed instead of limiting the full sheet. So unlock better sharing and editing abilities in your spreadsheets by only locking specific cells!