In today’s data-driven world, Microsoft Excel stands as one of the most essential tools for managing and analyzing information. Whether you’re a seasoned professional or just getting started, there are numerous features and functions that can streamline your Excel experience and enhance your productivity. Among these features, the ability to pin a row in Excel can prove to be incredibly useful, especially when working with large datasets.
In this comprehensive guide, we will delve into the nuances of pinning a row in Excel, providing you with step-by-step instructions and valuable insights to help you become a proficient Excel user.
Understanding the Importance of Pinning Rows
Before we dive into the nitty-gritty details of how to pin a row in Excel, it’s crucial to understand why this feature is so valuable. Pinning a row, also known as freezing a row, allows you to keep specific rows visible at the top of your Excel sheet, even as you scroll down through your data. This can be a game-changer when dealing with extensive spreadsheets that require constant reference to headers or key information.
Step-by-Step Guide to Pinning a Row in Excel
Now, let’s get to the heart of the matter and learn how to pin a row in Excel effectively. Follow these steps to master this invaluable skill:
Step 1: Open Your Excel Spreadsheet
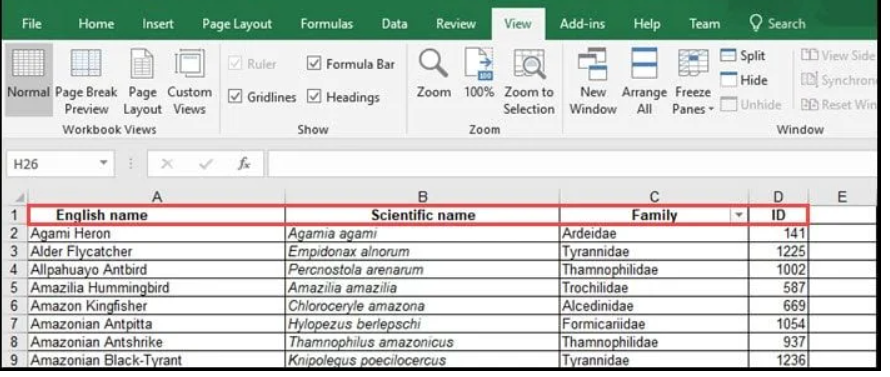
Start by opening the Excel spreadsheet that contains the data you want to work with. Ensure that you have your spreadsheet organized in a way that makes it necessary to pin a specific row, such as a header row.
Step 2: Identify the Row to Be Pinned
Next, identify the row that you want to pin. Typically, this would be the row containing headers or labels that you want to keep visible as you scroll through your data.
Step 3: Select the Row
Click on the row number to select the entire row. You can do this by clicking on the row number located on the left-hand side of the Excel sheet. This action highlights the entire row.
Step 4: Freeze the Row
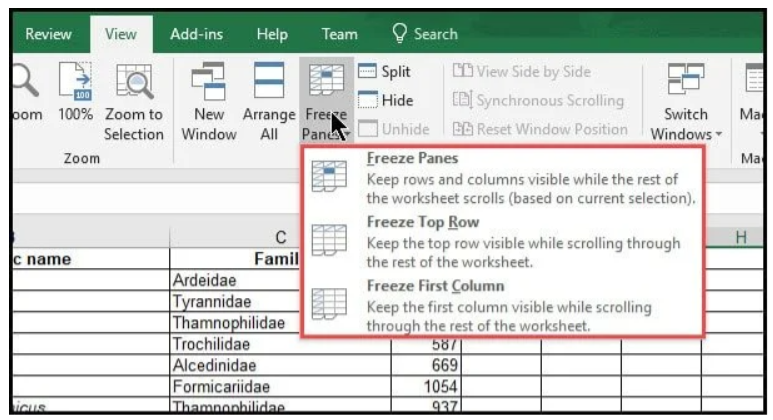
To freeze the selected row, navigate to the “View” tab in the Excel ribbon. Under the “View” tab, you will find the “Freeze Panes” option. Click on it to reveal a dropdown menu, and then select “Freeze Top Row.”
Step 5: Confirm the Freeze
Once you’ve selected “Freeze Top Row,” you’ll notice that the chosen row remains visible at the top of your Excel sheet, even as you scroll down. This ensures that your headers or labels are always accessible.
Step 6: Unfreeze the Row
Should you ever need to unfreeze the row, simply return to the “View” tab, click on “Freeze Panes” again, and this time select “Unfreeze Panes.” This will revert your spreadsheet to its normal scrolling state.
Additional Tips and Tricks
Pinning a row is a fantastic way to keep your data organized, but there are some additional tips and tricks you should be aware of to make the most of this feature:
1. Freezing Multiple Rows or Columns
While we’ve focused on pinning a single row, Excel also allows you to freeze multiple rows or columns simultaneously. To do this, select the row below the last one you want to freeze or the column to the right of the last one you want to freeze, and then choose “Freeze Panes.”
2. Using Split Panes
Excel provides another useful feature called “Split Panes.” This feature allows you to split your spreadsheet into separate panes, each with its own set of frozen rows and columns. To use split panes, navigate to the “View” tab, select “Split,” and customize the panes according to your needs.
Conclusion
In conclusion, mastering the art of pinning a row in Excel is a fundamental skill that can greatly enhance your productivity when working with large datasets. By following the step-by-step guide outlined in this article, you’ll be able to keep your headers or labels in view at all times, making your data manipulation tasks more efficient and error-free.
Remember, Excel is a powerful tool with a multitude of features waiting to be explored. Pinning rows is just one of them, but it’s undoubtedly a game-changer in terms of data organization and accessibility. Now that you’ve learned how to pin a row in Excel, go ahead and explore other Excel features to further boost your efficiency and proficiency in data management.