Data security is of paramount importance in today’s digital age. Whether you’re a student working on a sensitive school project, a professional handling confidential business data, or simply someone who wants to protect their personal information, password-protecting your Excel files is a crucial step in safeguarding your data.
In this comprehensive guide, we will explore various methods of how to password-protect an Excel file from opening unauthorized access. These methods provide multiple layers of protection to ensure that your data remains secure.
Method 1: Using Excel’s Built-in Password Protection
Step 1: Open Your Excel File: To begin, open the Excel file you want to protect.
Step 2: Click on ‘File’: In the top-left corner of your Excel window, click on the ‘File’ tab. This will open the Backstage view.
Step 3: Choose ‘Info’: Within the Backstage view, select ‘Info’ from the list on the left-hand side.
Step 4: Click on ‘Protect Workbook’: Under ‘Info,’ you’ll find various options. Click on ‘Protect Workbook’ and then choose ‘Encrypt with Password.’

Step 5: Set a Password: A dialog box will appear, prompting you to enter a password. Choose a strong password that combines uppercase and lowercase letters, numbers, and symbols for better security. Confirm the password, and click ‘OK.’

Step 6: Save Your File: After setting the password, you’ll need to save the file to apply the protection. Click ‘File’ and then ‘Save’ or ‘Save As.’ Your Excel file is now password-protected.
Method 2: Using Excel’s Workbook Structure Protection
Step 1: Open Your Excel File: Open the Excel file you wish to protect.
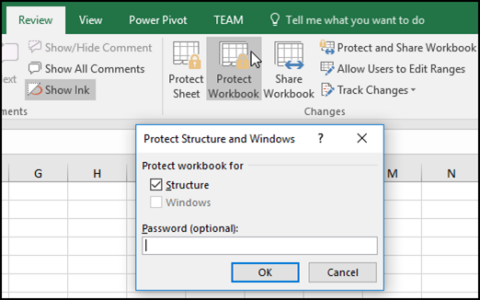
Step 2: Click on the ‘Review’ Tab: Navigate to the ‘Review’ tab on the Excel ribbon.
Step 3: Choose ‘Protect Sheet’: In the ‘Review’ tab, click on ‘Protect Sheet.’
Step 4: Set Your Password: A dialog box will appear, allowing you to set a password for sheet protection. Enter the password and choose the actions you want to allow for this sheet. You can control various aspects, such as selecting locked cells, editing objects, and more. Once you’ve configured the settings, click ‘OK.’
Step 5: Reconfirm the Password: To ensure there are no typos, Excel will ask you to re-enter the password. Do so, and click ‘OK.’
Step 6: Save Your File: After setting the sheet protection password, save your Excel file to apply the protection.
Method 3: Using Third-Party Software
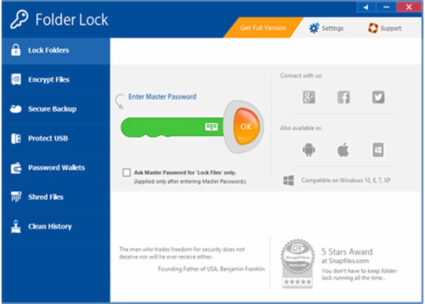
If you want an extra layer of security or more advanced features, you can opt for third-party software. One popular choice is ‘Folder Lock,’ which not only helps protect your Excel files but also encrypts and hides them.
Step 1: Download and Install Folder Lock: Start by downloading and installing ‘Folder Lock’ on your computer. Follow the installation instructions provided by the software.
Step 2: Open Folder Lock: Once installed, open ‘Folder Lock’ on your computer.
Step 3: Create a New Locker: In ‘Folder Lock,’ create a new locker. A locker is essentially a protected folder where you can store your confidential files, including Excel files.
Step 4: Add Your Excel Files: Once your locker is created, add your Excel files to it. Folder Lock will automatically encrypt and protect these files.
Step 5: Set a Password: In ‘Folder Lock,’ set a strong password for your locker. This password will be required to access the contents of the locker, including your protected Excel files.
Step 6: Lock the Locker: Lock the locker using the software, which will apply the protection to your Excel files.
Method 4: Using a ZIP Utility
Step 1: Gather Your Excel Files: Compile all the Excel files you want to protect in a single folder.
Step 2: Install a ZIP Utility: If you don’t already have a ZIP utility installed on your computer, consider downloading and installing one. 7-Zip and WinRAR are popular options.
Step 3: Create a ZIP Archive: Right-click on the folder containing your Excel files and select ‘Add to archive’ (for 7-Zip) or ‘Add to a .rar archive’ (for WinRAR).
Step 4: Set a Password: In the archive creation dialog, look for the option to set a password. Enable password protection and enter a strong password. Confirm the password.
Step 5: Create the Archive: Click the ‘OK’ or ‘Create’ button to create the password-protected ZIP or RAR archive.
Step 6: Delete the Original Files: For added security, consider deleting the original Excel files, leaving only the password-protected archive. This ensures that your data remains secure even if someone gains access to your computer.
Conclusion
Securing your Excel files with a password is a fundamental step in safeguarding your data. Whether you choose to use Excel’s built-in features, third-party software, or a ZIP utility, each method offers a level of protection against unauthorized access.
Remember to use strong, unique passwords for your files and update them regularly to maintain the highest level of security. By following these step-by-step instructions, you can protect your sensitive information and have peace of mind in an increasingly digital world.