In the fast-paced world of data management, Microsoft Excel remains an indispensable tool for professionals across a myriad of industries. From complex financial analyses to simple data organization, Excel’s versatility is unmatched. However, with great power comes great responsibility, especially when it comes to safeguarding the accuracy and integrity of your work.
Whether you’re creating a comprehensive financial report, a critical business proposal, or a collaborative project spreadsheet, there’s a common challenge that often arises: how to ensure that your meticulously crafted workbook remains unaltered by others once it’s ready for distribution. This is where the “Mark as Final” feature in Excel comes into play—a feature designed to provide an additional layer of protection to your workbooks.
In this comprehensive guide, we will delve into the intricacies of using this feature effectively, allowing you to confidently share your Excel creations while maintaining control over their content. Join us as we explore the step-by-step process, and benefits of marking a workbook as final, empowering you with the knowledge to safeguard your data and collaborate with assurance.
Understanding the Importance of Marking a Workbook as Final
Before we delve into the step-by-step process, let’s explore why marking a workbook as final is essential. Imagine spending hours meticulously creating a financial report or a project proposal, only to have it altered accidentally by a colleague or team member. Such incidents can lead to errors, miscommunication, and even financial losses. By marking a workbook as final, you lock the document from any further editing, ensuring that your data remains accurate and secure.
Step-by-Step Guide to Marking a Workbook as Final
Step 1: Open the Workbook
Begin by opening the Excel workbook that you intend to mark as final. This can be a new workbook or an existing one that contains the data you wish to protect.
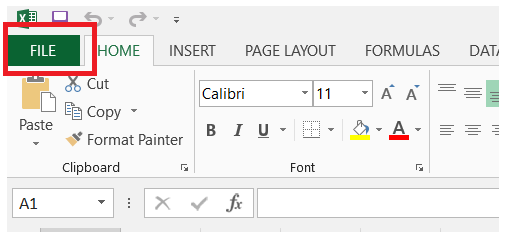
Step 2: Click on the “File” Tab
In the top-left corner of the Excel window, locate and click on the “File” tab.
Within the File Tab, click on the Info Option.
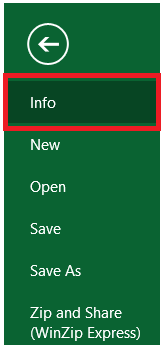
This will open a menu with various options.

Step 3: Select “Protect Workbook”
Within the “Info” Options menu, navigate to the “Protect Workbook” option.

Clicking on this option will reveal a sub-menu with additional choices.

Step 4: Choose “Mark as Final”
From the “Protect Workbook” sub-menu, select the “Mark as Final” option.

Excel will then display a dialog box asking you to confirm the marking of the workbook as final.
Step 5: Confirm the Marking
Carefully read the information provided in the dialog box before marking the workbook as final. Once you are certain, click on the “OK” button to proceed.

Step 6: Save the Workbook
After marking the workbook as final, it’s important to save your changes. To do this, simply go to the “File” tab once again and select “Save” or “Save As” if you want to save a copy with the changes.
Benefits of Using the “Mark as Final” Feature
- Data Integrity: By marking a workbook as final, you prevent accidental changes, maintaining the accuracy and integrity of your data.
- Version Control: When collaborating with others, marking a workbook as final helps in version control, as everyone can refer to the approved version without risking modifications.
- Time Efficiency: You save time and effort by avoiding the need to recreate or restore data that might have been unintentionally altered.
- Peace of Mind: Knowing that your important documents are secure from unintended changes brings peace of mind and confidence in your data.
Additional Tips for Excel Workbook Security
- Password Protection: In conjunction with marking a workbook as final, you can also consider adding a password to the workbook. This adds an extra layer of security and ensures only authorized individuals can make changes.
- Regular Backups: Regardless of the security measures in place, regular backups of your important workbooks are crucial. This ensures you have a safe copy to revert to in case of unexpected issues.
- User Permissions: If you’re working in a collaborative environment, utilize Excel’s user permissions settings to control who can access and modify specific parts of the workbook.
Conclusion
Marking a workbook as final in Excel is a powerful tool for protecting your data and ensuring its accuracy. By following the simple steps outlined in this guide, you can safeguard your important documents from unintended changes and errors. Remember that while this feature enhances security, regular backups and other security measures are also important for comprehensive data protection.