Excel is a powerful tool for organizing and analyzing data, but sometimes you may need to limit the number of characters in a cell. Whether you’re working on a spreadsheet for data validation or simply want to control the length of text entries, knowing how to limit characters in Excel can be a valuable skill. In this article, we will provide you with a step-by-step guide on how to accomplish this task effectively. So, let’s get started!
Why Limit Characters in Excel?
Limiting characters in Excel can help you maintain consistency, ensure data accuracy, and optimize your spreadsheet’s performance. By restricting the length of text entries, you can prevent errors, standardize data formats, and avoid issues with cell overflow or printing. Whether you’re working with names, addresses, or any other type of textual information, character limitation is an effective technique to enhance the quality of your Excel worksheets.
Steps to Limit Characters in Excel
Step 1: Select the Cell or Data Range
To begin, select the cell or data range where you want to apply the character limit. For instance, let’s say we choose cell B2. This is where the restriction will be enforced.
Step 2: Access Data Validation
In the Ribbon at the top of your Excel window, navigate to the “Data” tab. From there, click on the “Data Validation” option. This will open a Data Validation window with various settings.

Step 3: Configure Text Length
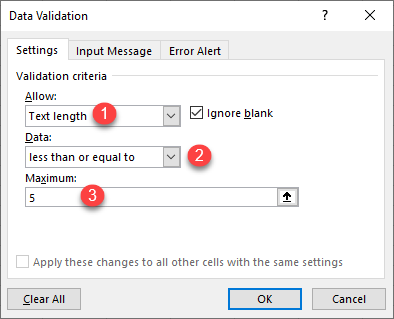
Within the Data Validation window, go to the “Settings” tab. In the “Allow” drop-down menu, choose “Text length” as the validation criteria. Next, select “less than or equal to” from the “Data” menu. This ensures that the entered text does not exceed the specified character limit.
Step 4: Set Maximum Character Limit
Now, it’s time to set the maximum character limit. Simply enter the desired limit in the provided field. For example, if you want to restrict the input to a maximum of 5 characters, enter “5” in the designated box.

Step 5: Customize Error Message
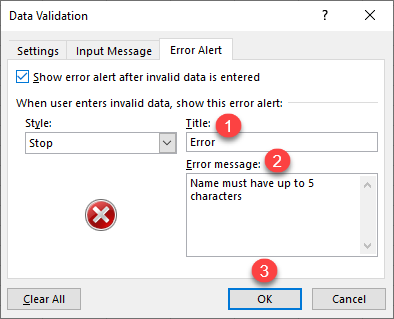
- To enhance user experience, you can customize the error message that appears when the entered text exceeds the character limit. Switch to the “Error Alert” tab in the Data Validation window. Here, you can make the error message more informative and user-friendly.
- Provide a title for the error message. For instance, you can use “Error” or “Invalid Entry” as the title.
- Enter the message text that will be displayed when the character limit is exceeded. For example, you can use “Name must have up to 5 characters” to indicate the maximum character limit for a name. After customizing the error message, click “OK” to save the changes.

Testing the Character Limit
Congratulations! You have successfully created a data validation rule for the selected cell or data range (B2 in our example). Now, let’s put it to the test.
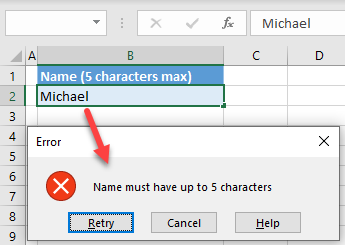
Enter a name that exceeds the character limit specified (e.g., “Michael,” which has 7 characters). As soon as you try to input the name, the error message you customized will be displayed, alerting you that the entered text exceeds the allowed character limit.

By following these steps, you can efficiently limit the number of characters in Excel, ensuring the integrity and consistency of your data.
Tips for Managing Character Limitations
When implementing character limitations in Excel, consider the following tips to ensure effective management:
- Define clear rules for character limitations based on your data requirements.
- Test the limitations thoroughly to ensure they function as intended.
- Document the limitations and provide instructions to users for data input.
- Regularly validate and clean your data to maintain consistency.
Common Errors and Troubleshooting
While working with character limitations in Excel, you may encounter some common errors. Here are a few troubleshooting tips to help you overcome them:
- Verify that the formulas or functions are correctly written and referenced.
- Check for any hidden characters or leading/trailing spaces in the original text.
- Ensure that the cells are formatted correctly to display the limited text.
Best Practices for Character Limitations in Excel
To ensure efficient character limitation in Excel, follow these best practices:
- Regularly review and update your character limitations to adapt to changing requirements.
- Consider the impact of character limitations on related formulas, functions, or data analysis.
- Apply consistent character limitations throughout your Excel worksheets.
- Document your character limitations for future reference and knowledge sharing.
Conclusion
By following the step-by-step instructions provided in this article, you can effortlessly implement character restrictions, ensuring data accuracy and preventing input errors. By setting a maximum character limit and customizing the error message, you empower yourself with a powerful tool that maintains the integrity of your data.
Whether you’re managing names, addresses, or any other textual data, this technique will help you maintain consistency and streamline your workflow. So, take control of your Excel spreadsheets today and unlock the full potential of your data. Embrace the power of character limitations and enjoy the benefits of concise, error-free information that will enhance your productivity and decision-making processes.

