Excel is a powerful tool for data management and analysis, but it’s not just about numbers and formulas. Adding visuals to your Excel spreadsheets can help convey information more effectively and make your data come to life.
Whether you want to include charts, graphs, or simply add a bit of visual flair to your workbook, one fundamental skill you’ll need to master is how to insert a picture in Excel. In this guide, we’ll walk you through the step-by-step process of adding images to your Excel worksheets, so you can create more engaging and informative documents.
Inserting a Picture in Excel: The Basics
Open Your Excel Workbook: To get started, launch Microsoft Excel and open the workbook in which you want to insert a picture. Make sure you are on the worksheet where you intend to place the image.
Select the Cell: Click on the cell where you want to position your picture. This cell will serve as the anchor point for your image. Ensure that the cell is large enough to accommodate the picture without distortion.
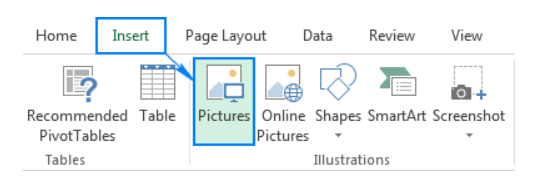
Navigate to the ‘Insert’ Tab: At the top of the Excel window, you will find the ‘Insert’ tab. Click on it to reveal a set of options for inserting various objects, including pictures, shapes, and charts.
Choose ‘Picture’: Under the ‘Insert’ tab, select the ‘Picture’ option. This action will open a dialog box that allows you to browse and select the image you wish to insert from your computer’s files.
Insert the Picture: Locate and select the desired image file from your computer, then click the ‘Insert’ button within the dialog box.
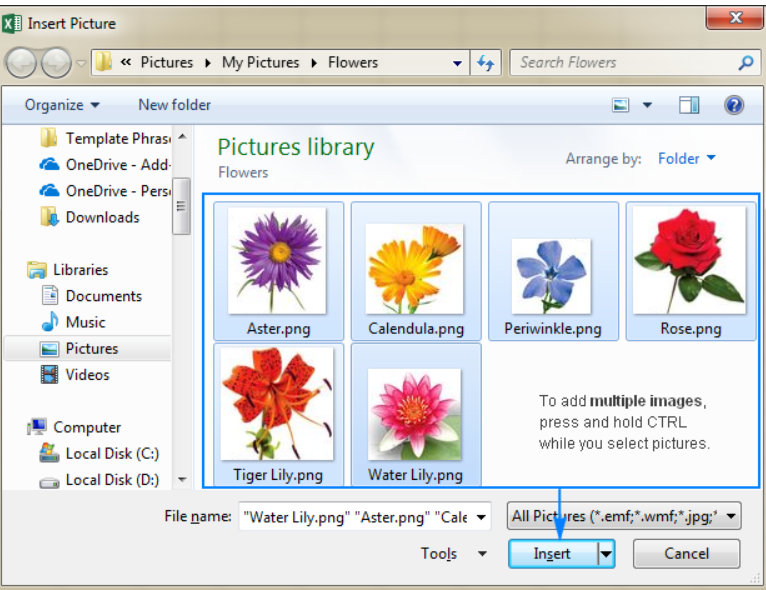
Your chosen picture will now appear in the selected cell, and you can adjust its size and position as needed.

Advanced Techniques for Working with Pictures in Excel
While the basic steps above will help you insert pictures into Excel, there are several advanced techniques and features you can leverage to enhance the visual appeal and functionality of your spreadsheets.
1. Resizing and Formatting
Excel provides robust tools for resizing and formatting inserted pictures. You can easily adjust the size of your image by clicking and dragging its corners. To maintain aspect ratio while resizing, hold down the ‘Shift’ key. Moreover, you can add borders, apply artistic effects, and even crop pictures to fit your specific needs.
2. Picture Alignment
Precise alignment of pictures within Excel cells is crucial for a professional appearance. Utilize the alignment options under the ‘Format’ tab to control the placement of your images. You can align pictures to the top, bottom, center, left, or right of a cell, ensuring they are perfectly positioned.
3. Picture Styles to Enhance Visual Appeal
To make your pictures stand out and enhance the visual appeal of your Excel worksheet, take advantage of the ‘Picture Styles’ feature. Excel offers a variety of predefined styles that you can apply to your images with a single click. These styles can add shadows, reflections, and other effects to make your pictures pop.
4. Hyperlinking Images
Want to make your Excel workbook more interactive? You can hyperlink your images to external websites, other worksheets within the workbook, or even specific cells. This is particularly useful for creating navigation menus or providing additional information related to the images.
5. Using Images in Charts and Graphs
Excel allows you to incorporate images into charts and graphs, making your data presentations more visually engaging. For example, you can insert a company logo into a chart’s title or add product images to a sales report. This can help convey information more effectively and leave a lasting impression on your audience.
6. Picture Transparency
Sometimes, you may need to overlay images on top of other Excel elements, such as text or shapes. The ‘Picture Transparency’ feature lets you adjust the opacity of your pictures, allowing underlying content to show through. This can be a powerful tool for creating visually appealing layouts and designs.
Best Practices for Using Pictures in Excel
While inserting and manipulating pictures in Excel is a valuable skill, it’s essential to follow some best practices to ensure your spreadsheets remain organized and user-friendly:
1. Optimize Image Size
Before inserting pictures, consider their size and resolution. Overly large images can significantly increase the file size of your Excel workbook, leading to performance issues. Resize and compress images when necessary to maintain optimal file size.
2. Use Descriptive File Names
When selecting images to insert, give them descriptive file names. This makes it easier to identify and manage images, especially when working with multiple pictures in a single worksheet.
3. Keep Consistency
Maintain a consistent style when using pictures throughout your workbook. This includes using the same picture size, alignment, and formatting for a cohesive and professional look.
4. Test Hyperlinks
If you’ve added hyperlinks to images, test them to ensure they lead to the intended destinations. Broken links can frustrate users and reduce the effectiveness of your Excel workbook.
5. Document Your Workbook
Consider adding a separate worksheet or cell comments to document the purpose and source of inserted pictures. This can be helpful when collaborating with others or revisiting the workbook at a later date.
Conclusion
In this comprehensive guide, we’ve explored the ins and outs of inserting and working with pictures in Microsoft Excel. From the basic steps of insertion to advanced techniques like image formatting and hyperlinking, you now have the knowledge and tools to create visually appealing and informative Excel workbooks.
By following best practices and leveraging Excel’s features, you can use pictures to enhance your data presentations, reports, and projects. Remember that a well-crafted Excel spreadsheet, enriched with carefully placed images, can leave a lasting impression and effectively convey your message.