Microsoft Excel is a powerful spreadsheet tool used for organizing and analyzing data. One essential skill every Excel user must possess is the ability to insert and manage columns efficiently. Whether you want to add a single column or multiple columns at once, Excel provides various options to streamline your workflow. In this article, we will explore the step-by-step process of inserting multiple columns in Excel, along with some handy tips and best practices.
Understanding Excel Spreadsheets
Before diving into the specifics of inserting columns, let’s briefly understand the basic structure of an Excel spreadsheet. Excel works in a grid format, with rows represented by numbers and columns represented by letters. Each cell in the grid can store data, perform calculations, or hold formulas. Columns are vital for categorizing data and enhancing the overall readability of your spreadsheet.
Inserting Columns in Excel
Inserting a Single Column
If you need to add a single column to your existing Excel sheet, follow these straightforward steps:
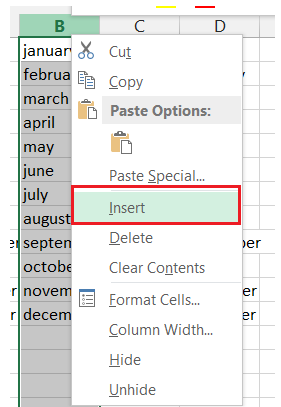
- Select the Column: Click on the column letter where you want to insert the new column. This will highlight the entire column.

- Right-Click and Choose “Insert”: After selecting the column, right-click on it, and from the context menu, choose “Insert.” Excel will insert a new column to the left of the selected column.
Inserting Multiple Columns
Inserting multiple columns can be done using a similar method but with a slight modification. Here’s how:
- Select Multiple Columns: To insert multiple columns, select as many columns as you want to insert. Click and drag your mouse over the column letters to highlight them.

- Right-Click and Choose “Insert”: Once you’ve selected the desired columns, right-click on any of the selected columns, and from the context menu, choose “Insert.” Excel will insert new columns to the left of the selected columns simultaneously.

Utilizing Excel’s Features
Formatting Columns
After inserting new columns, you might want to format them to match the rest of your data. Excel offers various formatting options, such as adjusting column width, changing font styles, and applying colors to cells.
To format a column, follow these steps:
- Select the Column: Click on the column letter to select the entire column.
- Format Options: Use the “Format” option in the Excel ribbon to modify the column’s appearance.
Filling Data in New Columns
Inserted columns are often empty, and you may need to populate them with data. You can manually enter the data, drag existing data from adjacent cells, or use Excel’s AutoFill feature to fill the new columns automatically.
To use AutoFill:
- Enter Data: Enter data in the first cell of the new column.
- AutoFill Handle: Hover over the small square at the bottom right corner of the cell until the cursor changes to a crosshair.
- Drag Downward: Click and drag the AutoFill handle downwards to fill the adjacent cells with the same data.
Using Formulas in Inserted Columns
Excel’s real power lies in its ability to perform calculations using formulas. You can use formulas in the inserted columns to derive results based on existing data.
To add a formula:
- Select the First Cell: Click on the first cell of the new column where you want to display the formula result.
- Enter the Formula: Type the formula, incorporating cell references, mathematical operators, and functions.
- Press Enter: Hit the Enter key to apply the formula to the selected cell. Excel will automatically calculate and display the result.
Tips for Efficient Data Management
Managing data effectively is crucial to working efficiently with Excel. Here are some tips to help you maintain your spreadsheets:
- Consistent Data Entry: Ensure consistent data entry to avoid errors and inconsistencies.
- Use Data Validation: Utilize data validation to restrict input to specific criteria, reducing data entry errors.
- Sort and Filter Data: Use Excel’s sorting and filtering capabilities to organize and analyze data effortlessly.
Best Practices for Excel Users
To become proficient in Excel, consider the following best practices:
- Keyboard Shortcuts: Learn essential keyboard shortcuts to speed up your work.
- Regular Backups: Save backups of your Excel files regularly to prevent data loss.
- Named Ranges: Use named ranges to simplify formulas and improve readability.
Conclusion
Mastering the skill of inserting multiple columns in Excel is essential for effective data management and analysis. With the step-by-step guide provided in this article, you can confidently add and manage columns in your Excel spreadsheets. Remember to utilize Excel’s formatting, AutoFill, and formula features to streamline your workflow. By following best practices, you can become a proficient Excel user and handle data efficiently.