Inserting an Excel table into a Word document can be a great way to combine data and text. With just a few clicks, you can copy a table from Excel and paste it into Word while maintaining the formatting. This allows you to leverage the power of Excel for calculations and data organization, and the formatting capabilities of Word for creating polished, professional documents.
Why Insert Excel Tables into Word
There are several reasons you may want to insert Excel tables into Word:
Present Data Alongside Text – Including tables is an effective way to present data to complement and support the text content of your Word document. You can weave insights from Excel seamlessly into your narrative.
Maintain Data Organization – Excel offers powerful tools for arranging, calculating, and displaying data in tables. By copying these over to Word, you can maintain that organized structure without having to reformat.
Keep Formulas Linked – With the “linked” paste options in Word, any updates made to the original Excel table can flow through to the Word document. This saves time compared to copying and pasting values only.
Enhance Visuals – Using Word’s formatting tools, you can augment the look of tables copied over from Excel with borders, shading, text formatting, etc.
Leverage Both Programs’ Strengths – Combining data-centric Excel with text-focused Word gives you the best of both applications in one document.
Methods to Insert an Excel Table into Word
There are a few different options for bringing Excel data across to Word. Which method you choose depends on how much formatting you want to retain and whether you want the tables linked or static.
Basic Copy and Paste
The most straightforward way to insert an Excel table into Word is:
- Open both the Excel workbook and Word document.

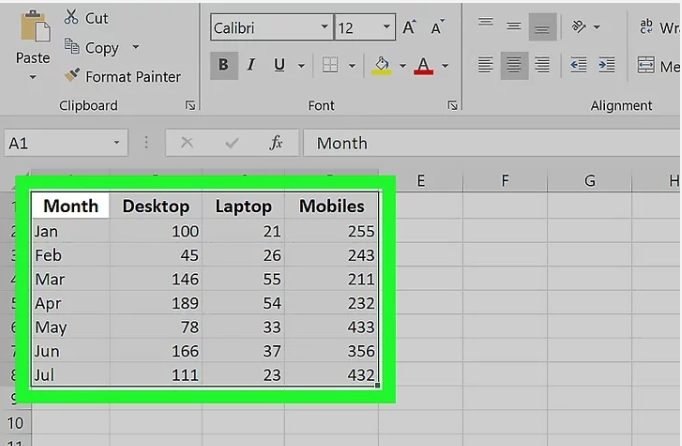
- In Excel, select the cells you want to copy.

- Copy the selection (Ctrl+C on Windows, Cmd+C on Mac).

- Switch to the Word document and place the cursor where you want the table to be inserted.

- Position your cursor where you want to paste your data

- Paste the copied cells (Ctrl+V or Cmd+V).

This will embed the Excel data as a static table in Word, cutting ties with the original Excel spreadsheet. Any later changes to the Excel data will not carry over after pasting this way.
Paste and Link
If you want any changes in Excel to update in the Word document, use the “Paste and Link” options:
- Copy the Excel selection as above.
- In Word, paste the selection.
- Click the down arrow next to “Paste Options”

- and select “Paste Link & Keep Source Formatting” or “Paste Link & Use Destination Styles” depending on if you want to retain Excel formatting or match Word style.

Now the table in Word will remain dynamically connected to the Excel spreadsheet. As you edit the Excel file, the table in Word will update.
Copy and Paste Special
For more control over formatting, you can copy and paste the Excel data as a Word table:
- In Excel, select the cells to copy as before.
- Instead of Ctrl/Cmd-C, use Copy and Paste Special (found in the Home tab of the ribbon in both programs).
- Select “Microsoft Word Table” and copy.
- In Word, choose Paste Special, then select “Microsoft Excel Worksheet Object” to paste.
This gives options to link the table for updates or paste as a static copy. You also get to choose from Word table styles for formatting.
Convert Excel File to Word
To insert the full Excel spreadsheet as a Word table:
- Open the Excel file. Use Save As to convert it to .docx or .doc file format.
- Open the converted Word file. The workbook will now appear as an embedded Word table.
With this method, you can include multiple Excel sheets by converting the entire workbook. The sheets will appear as separate tables that can be moved around independently.
Choosing Your Insertion Method
The best technique depends on your specific needs:
- For a simple one-time insertion, basic copy and paste is quick and easy.
- To retain updates from Excel, use Paste Link to dynamically connect tables.
- For greater style control, Copy and Paste Special gives you formatting options.
- To embed the full spreadsheet, Save As and convert the Excel file itself to Word format.
In most cases, linked tables provide the best flexibility – leveraging Excel’s data functions while giving Word control of text and layout. Test different methods to find the right fit.
Pasting Excel Tables into Word with VBA Macros
For frequent Excel to Word table transfers, you can automate insertion through VBA macros. This allows inserting linked tables with a single click.
Record a Macro in Word
- Open Word and begin recording a macro. Select View > Macros > Record Macro. Give it a name like “InsertExcelTable”.
- Switch to Excel, select a table, and copy it.
- Go back to Word and paste using Paste Link.
- Click to stop recording the macro.
Now you can run the macro anytime to quickly paste linked Excel tables into Word.
Add a Button to the Word Ribbon
To simplify the process, you can add a button to the ribbon that runs your insertion macro:
- Right-click on the Word ribbon and select “Customize the Ribbon”.
- Click New Group and give it a name like “Excel Tables”.
- Select Macros from Choose Commands, find your recorded macro, and add it.
- Click OK to add the custom group with your macro button.
With this setup, inserting linked Excel tables requires just one click of your new ribbon button.
Formatting Considerations When Inserting Excel Tables in Word
Once your Excel table is in Word, you may want to adjust formatting for consistency and readability. A few things to consider:
- Remove gridlines if they clash with Word body text.
- Align column widths and reformat text for optimal fit.
- Check headings are styled correctly and table width fits page layout.
- Add borders, shading, fonts, colors etc. to match Word design.
- Position the caption above or below table body content as needed.
- Break a large table into smaller sections if it spans multiple pages.
Take time to refine the visual presentation of inserted Excel tables. This helps seamlessly blend them with surrounding document content for a professional look.
Modifying Linked Excel Tables in Word
If you use linked tables that update from Excel, you may still want to tweak them in Word:
- Resize columns and rows in Word without affecting Excel.
- Change text formatting like fonts, colors and alignment independent of Excel.
- Add or modify borders, shading and other table styles.
- Insert or delete Word table rows and columns without changing Excel data.
- Add captions, headings or text wrapping without impacting Excel.
You have full control over table visuals in Word, even while preserving the link to Excel for data updates.
Exporting Word Table Data to Excel
You can also go the other direction – inserting Word tables into Excel:
- In Word, select the table and copy it.
- In Excel, paste into a worksheet using Paste Special > Microsoft Excel Worksheet Object.
- This inserts the table while maintaining Word formatting and layout.
Once in Excel, you can work with the table data using all of Excel’s tools and formulas. And if you paste linking the objects, any changes in Word will flow through to Excel.
The ability to move tables back and forth allows combining data manipulation power of Excel with text and layout capabilities in Word.
Conclusion
Inserting tables, charts, and data from Excel into Word documents opens up new opportunities for enriching text content. With a deep understanding of the range of insertion methods, you can achieve the right balance of linked data and customized formatting.
Mastering the techniques outlined here allows you to integrate the strengths of both programs – Excel for organized calculations and Word for polished document creation. By skillfully blending spreadsheet-based tables into text documents, you can craft high-impact reports, proposals, content, and more.
So next time you want to include dynamic data alongside text, don’t re-create tables and charts from scratch in Word. Tap into the power of Excel using the simple steps covered above. Insert linked Excel tables with ease to instantly take your documents to the next level.
