Embedding a calendar right in your Excel worksheets provides an intuitive way for users to quickly enter dates. Rather than typing dates manually, a dropdown calendar allows visually selecting the desired date.
This guide will walk through the entire process of inserting a calendar in Excel using the built-in Date Picker control.
Benefits of Adding Calendars in Excel Worksheets
Here are some of the biggest benefits Excel calendars provide:
- Makes selecting dates fast & easy
- Prevents invalid date entries like 2/30/2022
- Provides an intuitive visual date interface
- Familiar calendar design users already know
- Reduces errors from manual date typing
- Captures selected dates live for analysis
- Simplifies inputting date ranges
- Inserts calendars exactly where needed on sheets
- Customizable to fit your specific needs
A spreadsheet calendar delivers a foolproof and user-friendly method for populating date values in Excel.
How the Excel Date Picker Calendar Works
Excel provides a dynamic calendar control that displays a popup window for picking dates:
- The user clicks the calendar icon to open it
- Month and year buttons allow navigation
- Click a day number to set the date
- The selected date automatically populates the linked cell
- Easy to embed calendars anywhere on the sheet
This provides an interactive in-sheet calendar for fast date selection.
Step-by-Step Guide to Insert a Calendar in Excel
Here is the full process for adding a calendar with the date picker:
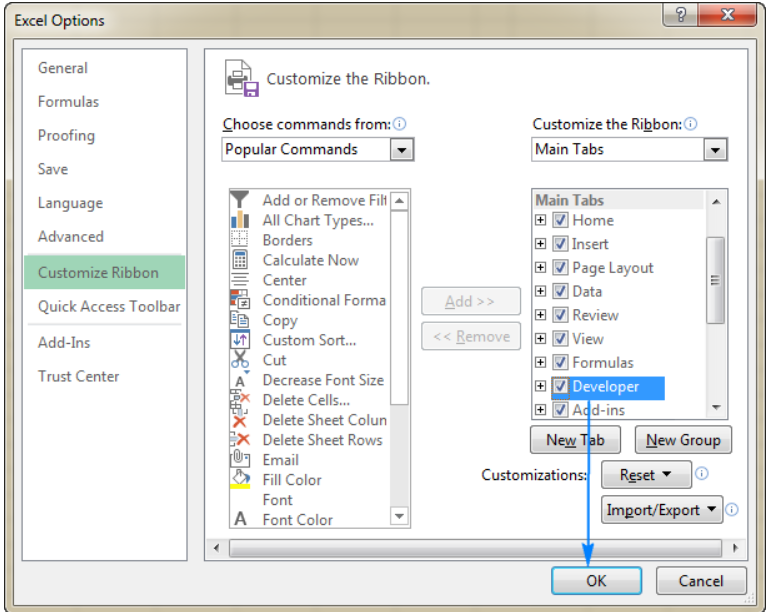
1. Enable Developer Tab
The date picker resides on the Developer tab, hidden by default. To enable it:
- Right-click the ribbon and select Customize Ribbon
- Check the box for Developer
- Click OK
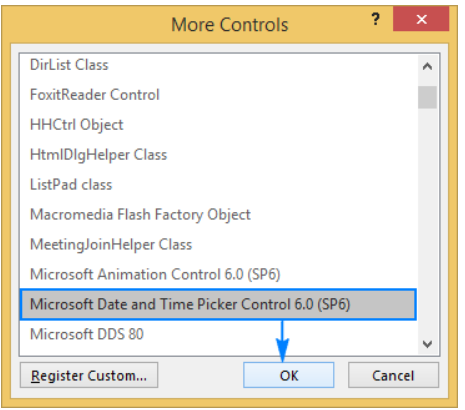
2. Insert Date Picker Control
On the Developer tab:
- Click Insert > More Controls

- Select Microsoft Date and Time Picker Control 6.0
- Click OK
3. Draw the Calendar on the Sheet
Click and drag to draw the date picker on the desired cell.

4. Customize the Excel Calendar
Adjust properties like:
- Size
- Font
- Date format
- Cell link
5. Link the Calendar to a Cell
In Properties, set LinkedCell to capture dates.
That’s it! Now you have an Excel calendar for easy date selection.
Customize the Excel Calendar Control
Once inserted, customize the calendar properties:
Size and Position
Resize and drag it anywhere on the sheet as needed.
Font and Colors
Update fonts, colors, and borders for appearance.
Date Formats
Set display formats like M/D/YYYY, D-MMM, etc.
Restrict Dates
Limit to past or future dates only.
Format the calendar for your data needs and visual preferences.
Link the Excel Calendar to Active Cells
For the calendar to pass dates into your sheet, link it to a cell:
- With the calendar selected, open Properties
- Set LinkedCell to a cell reference like A3

- Now selected dates will populate the linked cell

The cell link enables the use of the calendar dates in your Excel formulas.
Adjust Other Excel Calendar Properties
Fine tune calendar behavior with properties like:
- Value – sets a default date
- MaxDate – limits to future dates
- MinDate – limits to past dates
- OLEDropMode – configures date restrictions
- Enabled – toggles date selection on/off
Refine properties until the calendar meets your exact requirements.
Use Multiple Calendars in Excel
Easily add several synced date pickers:
- Insert two calendar controls
- Link to different cells like Start Date and End Date
- Position controls on the sheet as needed
With two calendars, dynamically capture any date range.
Date Picker Alternatives for Excel 64-bit
The default ActiveX date control only works for Excel 32-bit versions.
For Excel 64-bit, use:
- Form Control calendar
- VBA UserForm calendar
- Third-party date picker add-ins
These all provide calendar features in 64-bit Excel.
Troubleshooting Excel Calendar Issues
Some common calendar bugs and fixes:
- Not showing – Ensure the Developer tab enabled
- Errors – Use 32-bit Excel only
- Not saving dates – Double check cell link configured
- Disappeared – Re-add the date control
Carefully Inserting the calendar control avoids most issues.
Create Calendars in Excel Without Add-Ins
If needed, build a simple calendar picker without ActiveX:
- Data validation dropdown for dates
- Table with date hyperlinks
- Excel formulas like EDATE()
- VBA form for visual calendar
These options get the job done without a date picker.
Use the Excel Calendar for Date Entry
The primary benefit of an Excel calendar is easing date selection:
- Visually pick any date needed
- Eliminate invalid date entries
- Reduce errors from manual typing
- Auto-populate linked cells
- Intuitive interface users already understand
The end result is more accurate, high-quality data values with less effort.
Enable Date Analysis with Excel Calendars
With calendars speeding update entry, the focus shifts to exploiting those dates:
- Timelines and schedules
- Attendance and timesheets
- Date comparisons, trends, forecasts
- Due dates and reminders
- Date reporting and visualizations
- Calculating date intervals
- Date-based data validation
Calendar-enabled date selection sets the stage for in-depth data analytics.
Conclusion
The process of inserting a calendar control directly into your Excel worksheets provides an easy way to visually pick dates on the fly. Simply enable the Developer tab, insert the Microsoft Date Picker control, customize it to your needs, and link it to a cell to capture the selections. This calendar allows fast, foolproof date entries reducing manual input errors. Whether you need a single calendar for date selection or a pair for date ranges, Excel’s built-in date picker delivers an intuitive calendar interface for effortless data entry.