In the world of spreadsheet applications, Excel reigns supreme as a powerful tool for managing and analyzing data. When it comes to organizing and presenting information, increasing indentation in Excel is a fundamental skill that enhances readability and structure. Indentation plays a crucial role in enhancing readability, structure, and hierarchy within a worksheet.
Whether you are working on a complex financial model, creating an organized project plan, or preparing a professional-looking report, knowing how to increase indent in Excel is a skill that can greatly impact the visual appeal and accessibility of your work. In this step-by-step guide, we will explore various techniques to effortlessly increase indent in Excel, enabling you to optimize data presentation and streamline your workflow.
Whether you’re a novice or an Excel pro, this comprehensive guide will equip you with the knowledge and tools to elevate your proficiency. Let’s delve into the secrets of increasing indent in Excel and unlock its full potential!
Understanding Indentation in Excel
Indentation refers to the space between the cell border and the data within it. It allows you to visually separate and organize your data, especially when dealing with nested lists, outlines, or hierarchical structures. By increasing the indent, you push the content further toward the right, creating a clear distinction between different levels of information.
Increasing Indent Using the Ribbon
To increase the indent using the Ribbon in Excel, follow these steps:
- Select the cell or range of cells you want to indent.
- Navigate to the “Home” tab in the Excel Ribbon.
- In the “Alignment” group, locate the “Increase Indent” button.
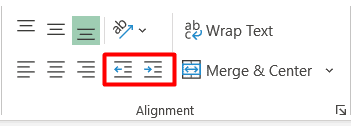
- Click on the “Increase Indent” button to increase the indent of the selected cells.

Using Keyboard Shortcuts to Increase Indent
Excel provides convenient keyboard shortcuts to increase the indent without using the Ribbon or dialog boxes. Here’s how you can do it:
Increase Indent: Alt ➜ H ➜ 6
Decrease Indent: Alt ➜ H ➜ 5
Tips and Tricks for Effective Indentation
- Use indentation to create visually appealing and well-structured worksheets.
- Combine indentation with other formatting features like font styles, colors, and borders for enhanced readability.
- Avoid excessive indentation levels to prevent overcrowding and confusion.
- Experiment with different indentation techniques to find the one that suits your data best.
- Regularly review and adjust indentation levels to maintain consistency and clarity.
Using Indentation for Hierarchical Data
Indentation is particularly useful when working with hierarchical data, such as outlines or project structures. Here’s how you can use indentation for hierarchical data:
- Define the parent-child relationship in your data.
- Apply increasing indentation levels to indicate different hierarchy levels.
- Collapse or expand the indented sections using Excel’s outlining features for better organization and visibility.
Maintaining Consistent Indentation in Excel
To ensure consistent indentation throughout your Excel worksheets, follow these best practices:
- Use Excel’s formatting features like cell styles or templates to define consistent indentation rules.
- Create a formatting guide or template for your worksheets to share with others for consistent formatting across the team.
- Regularly review and adjust the indentation to maintain a consistent visual structure.
Common Mistakes to Avoid
- Overusing indentation leads to a cluttered and confusing worksheet.
- Neglecting to review and adjust indentation levels, resulting in inconsistent formatting.
- Forgetting to apply indentation to related data, making it difficult to understand the relationships.
Troubleshooting Indentation Issues
If you encounter any issues while trying to increase indent in Excel, consider the following troubleshooting tips:
- Check if the worksheet or workbook is protected, as this may restrict certain formatting options.
- Ensure that the cells or ranges you want to indent are not locked.
- Verify that you have the necessary permissions to modify the worksheet.
Conclusion
By following the step-by-step guide provided, you now have a comprehensive understanding of the techniques and methods available to increase indentation levels in cells and columns. Whether you’re working on complex financial models, project plans, or professional reports, utilizing proper indentation will make your data more readable and structured.
Excel’s versatility as a data management tool is further magnified when you have the skills to optimize data presentation and streamline your workflow. So, go ahead and apply the knowledge gained from this guide to take your Excel proficiency to new heights.
With increased indenting, you’ll be able to create professional-looking spreadsheets that are not only visually appealing but also easy to navigate. Unlock the true potential of Excel by harnessing the power of indentation and watch your data come to life with clarity and precision.