In today’s fast-paced business environment, effective data management and analysis are crucial for making informed decisions. Salesforce, a leading customer relationship management (CRM) platform, offers a wide array of tools and features to help businesses streamline their operations.
One of these features is the ability to generate and export reports, which can then be further analyzed in Microsoft Excel for deeper insights. In this comprehensive guide, we will walk you through the step-by-step process of exporting a Salesforce report to Excel, empowering you with the knowledge to harness your data effectively.
Understanding the Importance of Salesforce Reports
Before we dive into the export process, let’s first understand why Salesforce reports are so essential. Reports allow you to visualize and analyze your data, enabling you to identify trends, track key performance indicators (KPIs), and make data-driven decisions.
These reports can encompass various data sets, from leads and opportunities to customer service metrics and sales performance. By exporting these reports to Excel, you unlock the potential for advanced analysis and visualization that Salesforce’s native reporting tools might not provide.
Exporting Salesforce Reports to Excel: Step-by-Step Guide
We’ve broken down the procedure step by step for each version of Salesforce’s user interface, ensuring you can smoothly export your reports without any hassle.
Exporting Reports to Excel in Salesforce Lightning
Exporting your reports to Excel through Salesforce Lightning is a breeze. Here’s a comprehensive breakdown of the process:
Step 1: Log into Your Salesforce Account and Access Home Setup
Begin by logging into your Salesforce account. Once logged in, click on the gear icon, which represents the settings, and select “Setup.”
Step 2: Navigate to Reports via App Launcher
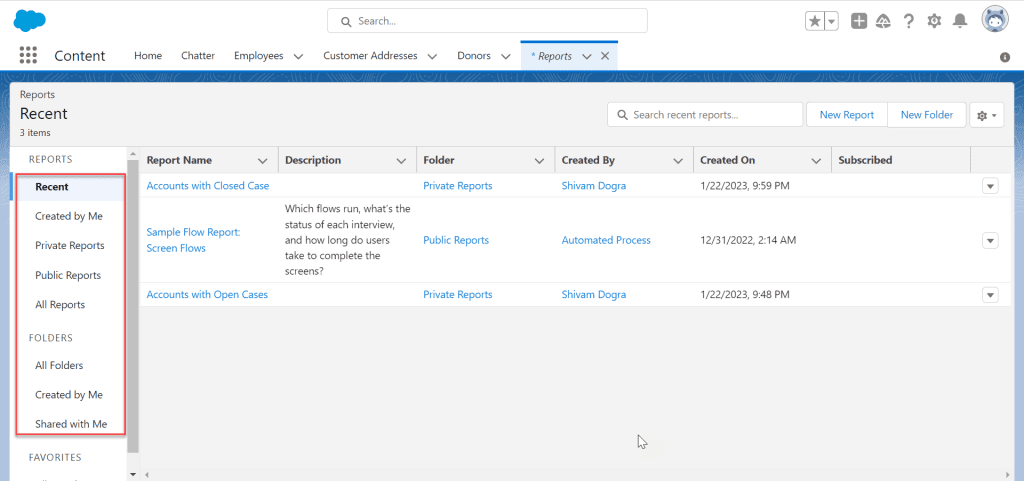
In the top-left corner of the interface, click on the App Launcher icon. Search for “Reports” and open it within Salesforce Lightning. This action takes you to the recent reports page.
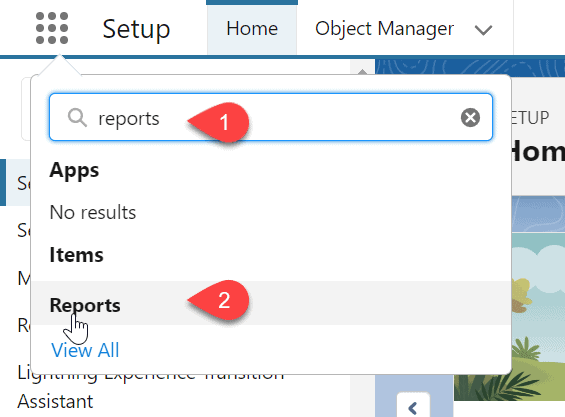
Important: You have the flexibility to select any report category from the left menu.
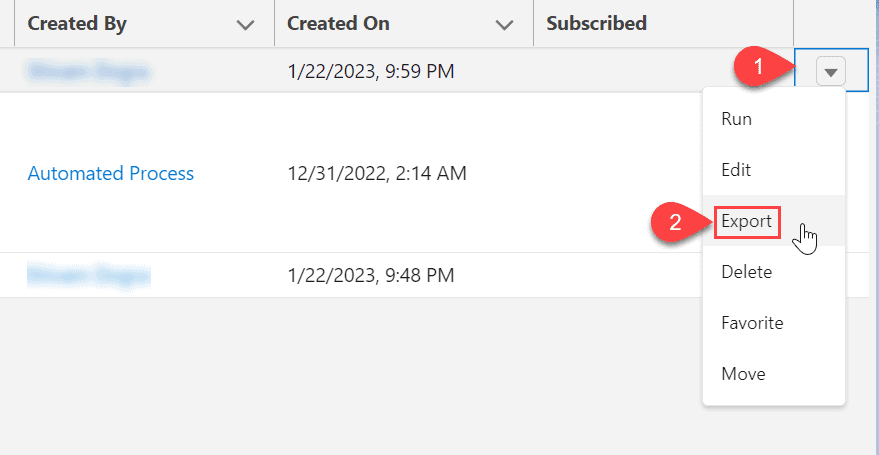
Step 3: Choose a Report and Initiate Export
Click on the dropdown icon located next to your desired report. From the dropdown menu, select “Export.”
Step 4: Configure Export Settings
Once the “Export” option is chosen, you’ll be directed to the Export page. At this point, two export options are available:
- Formatted Report: This option includes the report’s header, grouping, and filter information. The exported file will be saved in .xlsx format.
- Details Only: Opt for this choice to export raw data rows without any formatting. This is particularly helpful for later spreadsheet calculations.

Note: If “Formatted Report” is chosen, encoding preferences can be selected. On the other hand, the “Details Only” option does not require encoding selection.
Step 5: Initiate Export
Select your preferred Excel format and encoding settings. Once done, click the “Export” button, and the Excel file will be automatically downloaded.

And there you have it! With these easy steps, you’ve successfully exported your report to an Excel file (in .xlsx format) using Salesforce Lightning.
Exporting Reports to Excel in Salesforce Classic
If you’re utilizing Salesforce Classic, exporting your reports to Excel is equally straightforward. Follow these steps:
Step 1: Log into Your Salesforce Account and Access Home Setup
Simply log in to your Salesforce account and click on the “Home” tab located in the navigation bar.
Step 2: Access Reports via Plus Icon
Look for the plus icon and select “Reports” from the provided list of objects. This will direct you to the Reports page within Salesforce Lightning.

Step 3: Initiate Export
On the Reports page, locate the dropdown icon aligned with your chosen report under the “Action” column. Click on it and select “Export.”

Step 4: Configure Export Settings
The export page will open. Here, opt for the “Excel Format .xls” as your preferred encoding and file format.
Step 5: Complete Export
- Confirm your chosen format and encoding, then click the “Export” button.
- The report will commence downloading in Excel format.

By following these uncomplicated steps, you’ve effectively exported your Salesforce report to an Excel file (in .xls format) within Salesforce Classic.
Leveraging Excel for Advanced Analysis
With the Salesforce report successfully exported to Excel, you now have the power to perform advanced analysis, create custom visualizations, and derive deeper insights from your data.
Excel’s extensive range of functions, pivot tables, and charting capabilities enable you to uncover trends, correlations, and patterns that might otherwise go unnoticed.
Conclusion
In today’s data-driven landscape, extracting meaningful insights from your CRM data is paramount. Salesforce reports offer a powerful toolset for organizing and analyzing your data, and by exporting them to Excel, you amplify their potential.
This comprehensive guide has walked you through the process, from accessing and customizing the report to performing advanced analysis in Excel. Armed with this knowledge, you are better equipped to make informed decisions that can drive your business forward.