Are you grappling with the annoyance of blank cells in your Excel worksheet? Fear not, as we’ve got you covered with a comprehensive guide on how to efficiently delete these empty cells. In this article, we’ll delve into the most effective methods to streamline your data and enhance your Excel experience.
Why Are Blank Cells a Problem?
Before we embark on our journey to eradicate blank cells from your Excel spreadsheets, it’s essential to understand why they pose a problem in the first place. Blank cells, or empty cells, can disrupt the flow of your data and impact your ability to perform calculations and generate meaningful insights. Here are some of the key issues associated with blank cells:
1. Data Inaccuracy:
Blank cells can lead to inaccurate calculations and analysis. When formulas encounter blank cells, they often return unexpected results, making it challenging to trust your data.
2. Reduced Readability:
A spreadsheet with numerous blank cells can become difficult to read and comprehend, especially as the data volume increases. Cluttered spreadsheets can lead to confusion and errors.
3. Missed Opportunities:
Data insights often hide within the numbers, waiting to be discovered. Blank cells can obscure valuable information, preventing you from making informed decisions.
Step-by-Step Guide to Removing Blank Cells in Excel
Now, let’s get down to business. Follow these steps to bid farewell to those pesky blank cells and make your Excel sheets more organized:
1. Create a Backup
Before making any changes, it’s wise to create a backup of your Excel worksheet. This precautionary step ensures that you can always revert to the original state in case something goes awry.
2. Select Your Data Range
Next, identify the range from which you wish to remove blank cells. To expedite this process, follow these steps:
- Click on the upper-left cell in your data range.
- Simultaneously press Ctrl + Shift + End to select all cells with data. This action extends the selection to the last used cell, saving you time and effort.
3. Access the ‘Go To Special’ Dialog Box
Now, it’s time to initiate the removal process. Follow these steps:
- Press the F5 key on your keyboard.
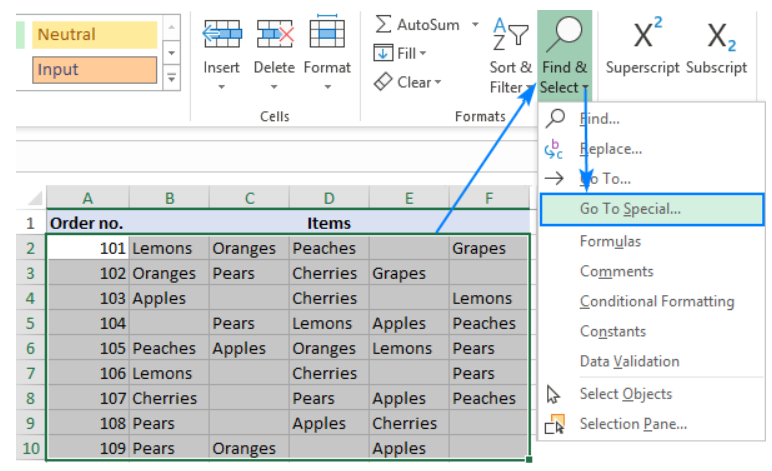
- In the menu that appears, click on “Special…” or navigate to the Home tab > Formats group and select “Find & Select,” then click “Go to Special.”
4. Select Blank Cells
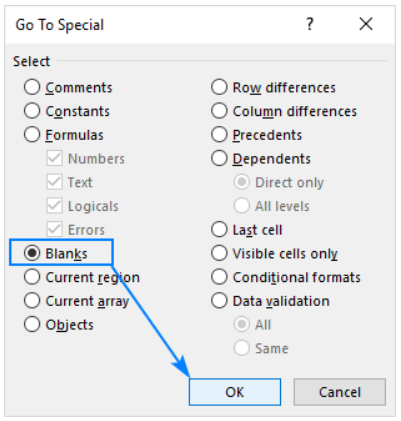
In the “Go To Special” dialog box, opt for the “Blanks” option and click “OK.” This action will instantly select all the blank cells within your chosen range.
5. Delete Blank Cells
With the blank cells now selected, it’s time to bid them farewell. Here’s how to proceed:
- Right-click on any of the selected blank cells.
- From the context menu, choose “Delete…”

6. Choose Cell Shifting Option
Depending on the layout of your data, you’ll have two options for deleting blank cells: shift cells left or shift cells up. Select the one that best suits your needs and click “OK.”

7. Admire the Results
That’s it! You’ve successfully eliminated those troublesome blank spaces in your Excel table. Your data is now free from unnecessary clutter, making it easier to work with and analyze.

Preventing Blank Cells in the Future
Prevention is often the best cure, and the same holds true for blank cells in Excel. To ensure your spreadsheets remain clean and free from blank cells, consider implementing the following best practices:
1. Data Validation:
Use data validation rules to restrict the input of blank cells in specific columns. This can be especially useful when multiple users are working on the same spreadsheet.
2. Regular Data Cleaning:
Make it a routine to clean your data regularly. Set up a schedule for reviewing and tidying your spreadsheets to catch and address blank cells before they become a problem.
3. Quality Assurance:
Implement quality assurance checks in your data entry process. Double-check data for completeness and accuracy before entering it into your Excel sheet.
Final Thoughts
Excel is an invaluable tool for managing and analyzing data, but it’s essential to keep your spreadsheets free from the hindrance of blank cells. Deleting blank cells is a fundamental step in data management that can lead to more accurate calculations, better insights, and improved decision-making.
By following the techniques and best practices outlined in this guide, you’ll be well-equipped to maintain clean and efficient Excel spreadsheets. Say goodbye to the chaos of blank cells and embrace the power of organized, data-rich sheets.