In the world of spreadsheets, Excel has long been hailed as the go-to tool for organizing, analyzing, and presenting data with unparalleled efficiency.
Whether you’re a seasoned Excel user or just starting out, there’s always something new to learn that can enhance your productivity. Today, we’re diving deep into a particular technique that will revolutionize the way you manipulate data: copying horizontally and pasting vertically in Excel.
This seemingly simple yet powerful maneuver can save you valuable time and effort, especially when dealing with large datasets or when you need to restructure your information. Join us as we explore step-by-step instructions, handy shortcuts, and practical tips to master this essential skill.
By the end of this blog post, you’ll have a firm grasp on how to flawlessly copy data horizontally and seamlessly paste it vertically, unlocking a whole new level of Excel proficiency. Let’s get started!
Step 1: Select and Copy the Data
Begin by identifying the row containing the data you wish to transpose. Let’s assume you have the data in Row 1, representing the days of the week. To proceed, follow these steps:
- Highlight the range of data that you want to transpose. This can be done by clicking and dragging the cursor across the desired cells.
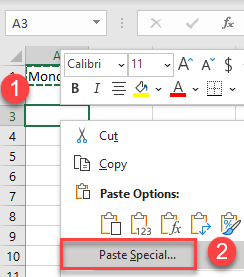
- Once you have selected the data, right-click within the selected range. A context menu will appear.
- From the context menu, choose the “Copy” option. Alternatively, you can use the CTRL + C shortcut on your keyboard to copy the data.

Step 2: Paste the Data Vertically
Now that you have copied the desired data, it’s time to paste it into the desired location in a vertical orientation. Excel offers two methods to achieve this:
Method 1: Using Paste Special
- Select the cell where you want to paste the transposed data. Ensure that the destination cell is in a suitable location and has enough space to accommodate the transposed data.
- Right-click the destination cell. A drop-down menu will appear.
- From the drop-down menu, choose the “Paste Special” option. This will open the Paste Special window, which provides various paste options.

- Within the Paste Special window, locate the “Transpose” option. This option allows you to change the orientation of the copied data from horizontal to vertical.
- Click on the “Transpose” option to select it.
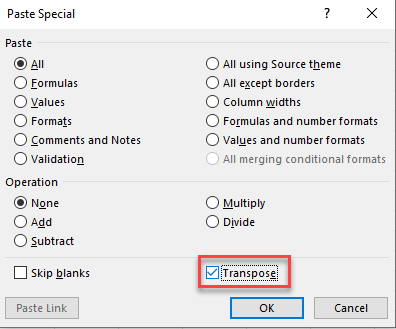
- After selecting the “Transpose” option, click the “OK” button. Excel will now paste the data in a vertical orientation, reflecting the transposed format.
Method 2: Utilizing the Transpose Icon
- Choose the cell where you intend to paste the transposed data. Ensure that the destination cell is appropriate for the transposed data and has enough space to accommodate it.
- Right-click the destination cell to bring up the context menu.
- Within the context menu, navigate to the “Paste Options” section. This section provides various paste options.
- Locate the Transpose icon within the Paste Options section. The Transpose icon is represented by two arrows, one pointing up and one pointing down.
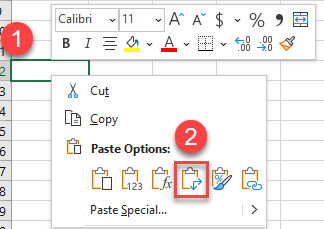
- Click on the Transpose icon to initiate the transpose operation. Excel will paste the copied data in a vertical orientation, transforming it from horizontal to vertical.

By following either of these methods, you will successfully convert your horizontal data into a vertical arrangement. This allows for a more convenient presentation and analysis of your information.
Remember, transposing data can be a useful technique when you need to reorganize and manipulate your data in Excel.
Whether you are working with weekly schedules, survey results, financial data, or any other data set, being able to change the orientation of your data swiftly can save you time and effort.
The Bottom Line
In conclusion, Excel’s ability to copy horizontal data and paste it vertically provides a simple yet effective solution for transforming your data into a more suitable format for analysis and visualization.
By implementing the methods outlined in this article, you can effortlessly transpose and restructure your information, harnessing the true power of Excel’s functionality.
So why settle for tedious manual data manipulation when you can optimize your data management capabilities with just a few clicks?
Embrace the versatility of Excel and elevate your productivity to new heights. Start applying these techniques today and witness the transformative impact they can have on your data-driven endeavors.