Creating sequentially numbered rows, lists, IDs, or other numbered labels in Excel provides important organization and reference capabilities for managing critical data. However, insertions or deletions within the dataset can quickly throw the carefully crafted numbering into disarray. Gaps appear when sequences break, and formulas referencing the numbers can catastrophically fail.
Fortunately, with the right approach, you can build Excel numbering schemes with dynamic smarts to automatically adjust when you alter the structure of your spreadsheet.
Through a combination of key functions like ROW() or TEXT, clever mixed references, and other numerical techniques, your numbering can become resilient, flexible, and practically unbreakable regardless of edits made to rows and columns. Let’s explore the top methods for achieving continuously updating numbering that never skips a beat.
Understand Excel’s Default Numbering Behavior
By default, Excel’s numbering feature functions like a basic “stamp”. For example, if you apply numbering to cells A1 through A10, Excel will stamp those cells with the numbers 1 through 10. If you later insert a new row within that numbered range, the new row does not automatically take on the next number. Instead, the original numbering remains static.
This can create gaps and inconsistencies in numbering when new rows are added. However, Excel provides functionality to dynamically continue numbering when changes occur.
Use the ROW Function to Generate Automatic Numbering
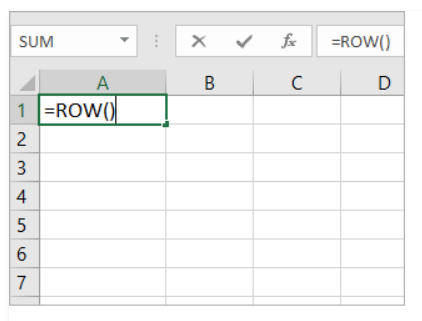
One easy way to achieve continuously updating numbering is to use Excel’s ROW function:
=ROW()
This will display the current row number automatically. The key benefit is that it updates itself if you add or remove rows in the spreadsheet.
For example, if ROW() is put in cell A1, A1 will display “1”. If a new row is inserted above row 1, the new cell A1 displays “1” and the old A1 updates to display “2”.
Here are the steps to apply automatic numbering with ROW():
- Select the cells you want to number (for example, A1:A7)
- In cell A1 enter: =ROW()
- Fill or copy the formula down through the range of cells
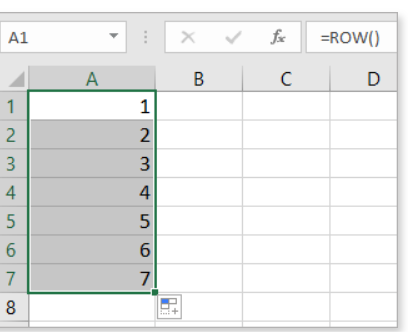
As long as the reference cell contains =ROW(), Excel will maintain sequential numbering even when shifting rows.
Use Relative References for Automatic Numbering
- Another approach is to use relative cell references to achieve dynamic numbering:
- Select the cells you want to number
- In cell A1 enter “1”
- In cell A2 enter: =A1+1
- Fill or copy this formula down through the desired range
Now cell A1 holds the initial number, and A2 increments that value by 1 in each subsequent cell.
The references automatically adjust when you insert new rows. For example, if you insert a new row 1, the new A1 changes to “1”, A2 updates to =A1+1 (2), A3 displays =A2+1 (3) and so on.
This allows the robust continuation of numbering.
Add Numbering with the OFFSET Function
You can also leverage Excel’s OFFSET function to precisely control numbering formats:
==OFFSET(A2,-1,0)+1

This converts the value in A1 to text and formats it as desired – in this case, prepending “0”. If you make a A1 reference to the ROW() formula from earlier, you can combine the concepts to achieve adjustable sequential numbering including prefix/suffix formatting.

Troubleshooting Tips
Numbers may revert to static if you completely delete rows that contain numbering formulas
- Check for accidental replacement of formulas with static values
- References can break if columns with numbering are inserted between rows
- Start numbering from earlier rows to allow additions at the top of your data set
Continuously Number and Monitor Large Data Sets
For robust solutions in large Excel data sets you may want to develop named ranges and reference those dynamically using INDIRECT. This keeps ranges adjustable when adding new rows even from other worksheets or workbooks. The key is building dynamic and relative references into your numbering approach.
In addition, display formulas and conditional formatting can help monitor that numbering updates correctly when rows change:
- Select cells with numbering formulas
- On the Home tab turn on “Show Formulas”
- Apply “New Rule” conditional format for when “Formula is” =FALSE
Finally, Excel also supports visual data validation cues and alerts when expected numbering schemes are altered or impacted by shifting data.
By taking full advantage of relative references, automatic functions, conditional rules, and validation techniques you can create Excel numbering schemes that stay sequential regardless of edits and changes to rows and cells in the spreadsheet. This allows you to save time, reduce errors, and improve usability when leveraging numerical ordering in Excel data sets.
Wrap Up
In summary, Excel provides several powerful techniques to create robust, self-updating numbering schemes. By utilizing the ROW() function, relative references, the TEXT function, named ranges, and other numerical methods, you can build flexible numbering sequences that automatically adjust when you add, delete, or rearrange rows in your spreadsheets.
This saves considerable time over manual renumbering, prevents errors from gaps or duplication’s, and enables easy analysis of properly sequenced data sets. With the right formulas, conditional formats, and data validation rules, you can generate bulletproof numbering that will maintain continuity regardless of changes to the structure of your Excel tables.
By mastering these numbering automation features, you can eliminate frustration, improve usability, and enable reliable data interactions in even extensive and actively edited Excel data sets.