As any seasoned Excel user knows, borders play a crucial role in enhancing the visual appeal and organization of spreadsheet data. Whether you’re creating financial reports, project timelines, or simply organizing data tables, knowing how to manipulate border colors can take your Excel skills to the next level.
In this blog post, we’ll delve into the various methods and techniques you can employ to change border color in Excel, allowing you to add a touch of creativity and professionalism to your work. We’ll explore different approaches, ensuring that you’re equipped with a diverse set of tools to accomplish your desired border color transformations.
So, whether you’re a beginner seeking to master the basics or an experienced user aiming to expand your Excel repertoire, read on and unlock the secrets to transforming your spreadsheet borders into captivating visual elements. Let’s dive in!
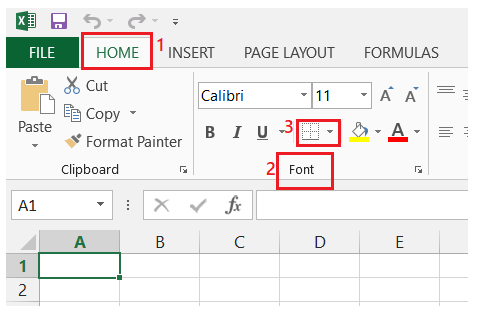
Changing Border Color Using the Ribbon
If you’re looking to modify the border color of cells in Excel, follow these detailed steps using the Ribbon method:
- Access the Home Tab: Begin by navigating to the Home tab in Excel.
- Locate the Font Group: Find the Font group within the Home tab.
- Utilize the All Borders Drop-down: Within the Font group, click on the all borders drop-down.
- Choose a Line Color: From the drop-down options, select the line color.
- Now a list of colors will appear on the screen. Take your time to explore the available choices.
- Make your Selection: Refer to the list of color options and carefully choose the hue that best matches your needs.
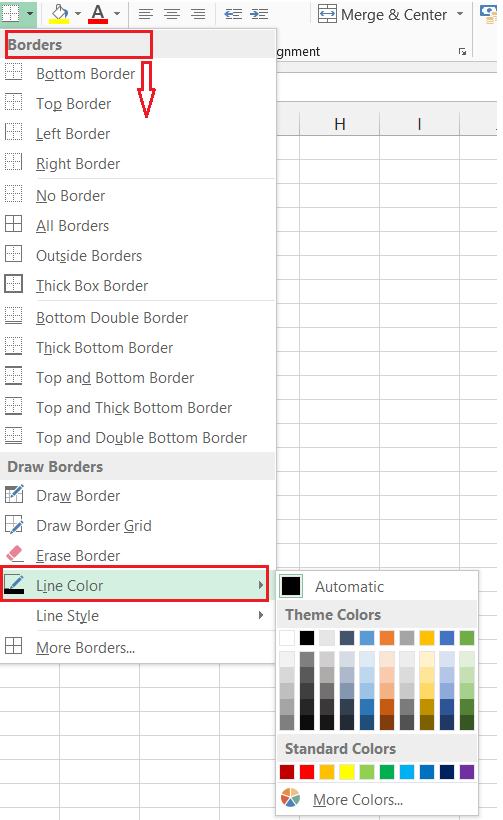
- Activate the Drawing Pencil: Once you’ve chosen a color, you’ll notice that your cursor transforms into a drawing pencil, indicating that you’re ready to proceed.
- Draw Borders: With the drawing pencil activated, you can now draw borders on the desired cells using the chosen color. Take your time to ensure precision and accuracy.

Changing Border Color Using the Format Cells Option
Alternatively, you can modify the border color in Excel by using the Format Cells dialog box. Follow these comprehensive steps to achieve the desired result:
- Select the Target Range: Begin by selecting the range of cells for which you want to modify the border color. Ensure that your selection encompasses all the relevant cells.
- Right-click on the Selected Cells: With the range selected, right-click on the cells to access a context menu.
- Access Format Cells: From the context menu, locate and choose the “Format Cells” option.

- This action will open the Format Cells dialog box.

- Navigate to the Border Tab: Once the Format Cells dialog box appears, navigate to the Border tab. Take a moment to familiarize yourself with the options available on this tab.
- Choose a Color: Within the Border tab, click on the color drop-down to explore a wide range of color options. This extensive palette allows you to select a color that aligns with your preferences and requirements.
- Take Your Time to Decide: Browse through the available colors, considering the visual impact and clarity you aim to achieve with your border color modification.

- Select a Border Style: In addition to choosing a color, you have the option to select a border style from the presets offered at the top of the dialog box. Evaluate the available styles and choose one that best complements your spreadsheet’s overall design and layout.
- Apply the Changes: Once you have customized the border and color settings to your satisfaction, click the OK button within the Format Cells dialog box to apply the modifications.

- Observe the Transformative Effect: Direct your attention to the selected cells within the selected column. Observe how the border color has transitioned from the original black to the newly selected color (e.g., red).

By following these detailed and straightforward steps, you can easily modify the border color in Excel, enhancing the visual appeal and organization of your spreadsheets. Experiment with different colors and border styles to achieve a personalized and professional touch.
Conclusion
In conclusion, changing the border color in Excel is a simple yet powerful way to enhance the visual appeal and organization of your spreadsheet. By following the step-by-step guide outlined in this blog post, you can easily customize the border color of cells, ranges, or tables to suit your specific needs.
Whether you want to create clear distinctions between different sections of your data or add a touch of creativity to your worksheets, mastering the art of changing border color opens up a world of possibilities.
With this newfound knowledge, you can take your Excel skills to the next level and create professional-looking spreadsheets that effectively communicate information and impress your colleagues or clients. So go ahead, experiment with different border colors, and watch as your Excel documents come to life with vibrant and visually appealing designs.