Inserting new cells in an Excel worksheet is a common task that allows you to add more rows or columns to your data set. Whether you need to make space to add additional data points, formulas, or other content, knowing how to properly insert cells in Excel is key. In this comprehensive guide, we’ll walk through the various ways you can insert cells in Excel across both Windows and Mac versions.
Insert Cells by Right Clicking the Mouse
One of the quickest and easiest ways to insert cells in Excel is by right-clicking with your mouse. This method allows you to insert an entire row or column in one click.
To start, right-click on the row number below or the column letter to the right of where you want to add cells and choose “Insert”.
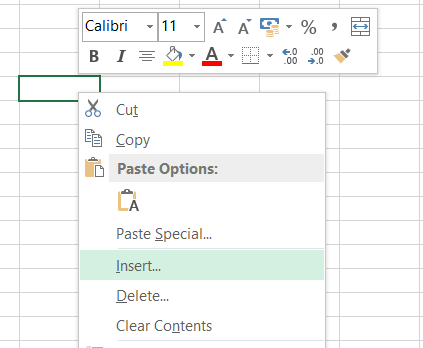
This will bring up the shortcut menu. Next select either “Entire row” or “Entire column” depending on if you need to shift cells down or to the right.
The main benefit of using this right-click technique is speed and simplicity. Rather than having to specify an exact cell range for the insertion like some other methods, you can instantly insert a full row or column in one step. This makes it fast for bulk adding lots of new cells at once.
Use the Ribbon to Insert Cells, Rows, or Columns
Alternatively, you can utilize the Insert buttons on the Home tab of the Excel ribbon to insert new cells. This allows you to specify exactly how many cells, rows, or columns you need to add at once.
To start, navigate to the Cells group on the Home tab. Click the “Insert” drop-down button and select either “Insert Cells…”, “Insert Row”, or “Insert Column” depending on your needs.

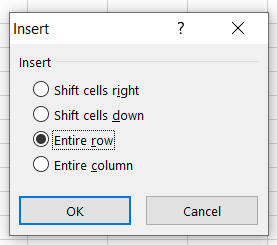
If inserting specific cells, the Insert dialog box will appear.

Here you can pick whether to shift cells right or down, and define the number of cells to insert. When adding full rows or columns, simply specify the number you need and click OK.

This will insert new cells to your dataset

The main perk of using the ribbon is having nuanced control over precisely where and how many cells get inserted. This helps optimize the workbook layout and formatting.
Insert Cut or Copied Cells
You can also insert cells in Excel by cutting or copying a cell or cell range and then pasting the selection back into your worksheet at the desired location. The benefit here is quickly duplicating elements across your workbook.
First, select the cell or cell range to copy or cut. Next, right-click and choose either “Copy” or “Cut” depending on if you want to remove the original cells. Click on the new cell where you want the top left of your copied range to be inserted.

Finally, go to the Home tab on the ribbon and click the down arrow under “Paste”. Alternatively, right-click where you want to paste the copied cells. Choose “Paste Special” and then select “Insert copied cells”.

This will shift cells down and to the right to fit the copied range into the new location.
Use this method when you need to duplicate formulas, formatting, or data from one place to another in Excel. The copied cells will retain all their properties.
Insert Cells by Dragging With the Mouse
If you have an Excel table, you can quickly insert one or more new rows by clicking and dragging cells down with your mouse or trackpad. This intuitive, visual method is perfect for expanding tables on the fly.
To start, locate the bottom-most row of cells in your Excel table. Next, place your mouse pointer over the bottom edge until it becomes a thick vertical line with an up and down arrow. Then, click and drag down to highlight the approximate area for new rows you want to insert.
When you release the mouse button, Excel will automatically shift all the cells below downward, leaving a blank row for you to populate with data. Repeat as needed to keep inserting ample rows this way.
The main advantage here is speed and visibility when expanding tables that need additional rows in the midst of existing data. The drag-and-drop process makes it easy.
Use Keyboard Shortcuts to Quickly Insert Cells
For those who prefer keyboard shortcuts, Excel provides some handy options here as well. Using the Ctrl + Shift keys along with the arrow keys allows swift cell insertion.
- To insert an entire new row, place your cell cursor in the row below where you want to add cells and press Ctrl+Shift++
- To insert an entire column, place your cell cursor in the column to the right and press Ctrl+Shift+>
Similar to the right-click trick, these hotkeys instantly insert full rows or columns, shifting all other cells down or to the right automatically. It’s perfect for rapid bulk inserting cells across large Excel data sets.
Add Cells by Merging and Centering
Need to append additional content within a row? You can also insert cells in Excel by merging and centering cells together horizontally first.
For this method, start by selecting the cell range in the row where you want new cells added that equals the amount you want to insert. So if adding 3 new cells, select 3 current cells. Next, on the Home tab of the ribbon click “Merge & Center”.
This will combine and center the contents of selected cells. Then with that new merged cell highlighted, go to the Insert tab on the ribbon and choose “Insert Cells…”. Pick to shift cells right and enter the number of cells needed.
When done, go back and unmerge the original merged cell. This will leave you with your new added blank cells within that row, shifting everything else in that row over to the right.
Leverage the Insert Sheet Rows Building Block
Another lesser-known option is taking advantage of Excel’s collection of building blocks. These contain predefined templates for frequently used tasks and content – including inserting rows on a sheet.
To access, go to the Insert tab on the ribbon and choose “Building Blocks” then “Quick Parts”. Pick “Sheet Parts” in the left menu and you’ll now see the “SheetRows” option in the main window area.
Click on “SheetRows” and it will automatically insert 10 new rows. You can then right-click the highlighted rows and update how many totals get inserted on the fly by adjusting the “Insert” row count.
This handy built-in tool makes inserting lots of rows effortless without having to do each one manually. Definitely take advantage of rapidly expanding data sets!
Conclusion
As you can now see, Excel provides an array of options when you need to insert new cells. Whether adding rows or columns across an entire sheet or inserting spaces amidst current data sets, having flexibility here is crucial.
Hopefully, the tips and methods above give you a full toolkit to easily insert cells on the fly in Excel. From simple right-clicks to specialized built-in templates, make sure to leverage the techniques that work best for your data workflows and analysis needs! Proper cell insertion will keep your critical Excel spreadsheets neatly organized.