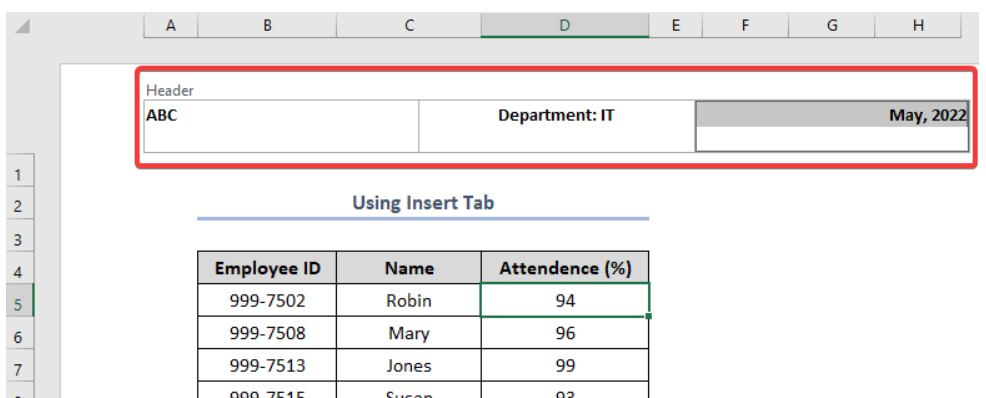
The header in Excel refers to text or images that appear at the top of each printed page of a spreadsheet. Headers can display useful information like the file name, page numbers, dates, title, author and more. By default, Excel simply inserts the file name in the header space. But you can customize the header to include whatever content you want.
With some simple tweaks to the header, you can transform Excel output from a plain printout into professional, polished documents ready for official reports, client deliverables, printed handouts, and more. So, let’s get started with the basics of updating header content
Why Add or Change the Excel Header
Before diving into the how-to steps, it helps to understand why you’d even want to change the Excel header in the first place.
Here are some of the top reasons to customize it from the default:
- Add unique titles or headings – Get your reports looking official by inserting titles, document names, or department headers
- Include key metadata – Details like author name, file path, or creation date can add helpful context
- Insert page numbers – Essential for longer printed reports spanning multiple pages
- Differentiate special pages – Format the first page or odd/even pages differently
- Enhance branding – Use your logo, color scheme or headers to showcase organizational branding
- Increase professionalism – Polished headers make documents look clean, official & business-appropriate
- Improve usability – Insert details the reader needs to effectively navigate printed sheets
As you can see, headers offer a prime location to insert various metadata that can aid both aesthetics and utility.
Access the Header & Footer Menu
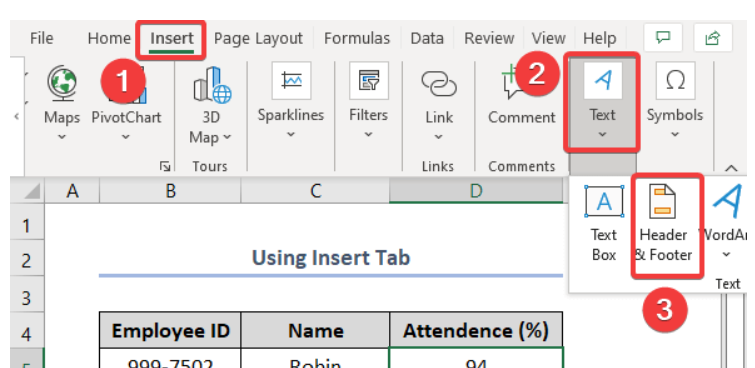
The header tools in Excel are found on the Header & Footer menu. To access this:
- Select the Insert tab on the Excel ribbon
- Click the Header & Footer button within the Header & Footer group

This will make the header menu overlay appear.
Alternatively, you can double click in the top margin of any printed page preview to launch the Header & Footer interface.

The header and footer menu is where all your header editing magic will happen.
When opened, you’ll see header sections for:
- First Page Header
- Even Page Header
- Odd Page Header
You can customize them separately as needed.
There’s also a footer section at the bottom you can edit in the same way.
Add Header Content
Once you’ve opened the Header & Footer menu, you can start inserting and editing header content right away.
Here are the basic steps:
- Click inside the header area of the appropriate section – First Page, Even Page, or Odd Page

- This will place the cursor for typing

- Input whatever text or numbers you want for that header
- Use the tools to format the text as desired
For example, you may want the First Page header to show a report title:
“Sales Performance Report”
And you want the Even Pages to show:
“Report Author: Jane Smith”
- Simply click in each header, type the desired text, center or right-align if preferred, change fonts, etc.
- All your edits will instantly update in the sheet preview.

Insert Fields Like Page Number, Date or File Path
In addition to regular text, Excel allows you to insert special fields into the header area, including:
- Page Number
- Total Page Count
- Current Date
- File Name with Path
- Worksheet Name
- Workbook Name
And more.
These fields automatically populate relevant metadata.
For example, add the Page Number field to easily insert visible page numbers on each printed sheet without having to manually type a number or code.
Here’s how to insert fields:
- While editing a header, select the Insert tab
- Click the button for the field type you want to add
- The field code will be entered at the cursor location in {} brackets
- The field result will populate live in the header
So if you insert the Page Number code, the field code looks like {PAGE} but displays as 1, 2, 3, etc on the rendered pages.
Fields are enormously helpful for dynamically adding professional document elements that update on their own.
Create Different First Page Headers
Often, the first page of a printed report should show alternative header content than other pages.
Like displaying a title on page 1, but nothing in the header space for pages after.
You can set this up in Excel by enabling separate first page headers:
- In the Header & Footer menu, check the box for Different First Page
- Click in the First Page Header section
- Customize the text/fields for only the first page
- Click in the Odd & Even Page Header section
- Customize the common header you want on all other pages
Now page 1 headers can be completely distinct from page 2 onward!
Customize Odd and Even Page Headers Separately
In some cases, you’ll want different content showing on odd vs even pages after the first page.
Like displaying the author on odd pages, and title on even pages.
Excel makes this possible too:
- In the Header & Footer menu, enable the option for Different Odd & Even Pages
- Insert desired text/fields into Odd Page Header
- Insert alternative text/fields into Even Page Header
This allows totally customizable content on odds vs evens!
Align, Format or Delete Header Content
The Header & Footer menu offers additional tools to tweak the look and placement of header contents:
- Click the alignment buttons to left, center or right align added text and fields
- Select inserted text and use font tools to alter style, size or color
- Add graphical touches like horizontal lines above or below
- Insert decorative icons, shapes or images
- Click existing header content and hit delete to remove anything not wanted
- For advanced users, modify or input custom &[Code] commands
Don’t be afraid to leverage these formatting options to maximize aesthetics!
Close the Header & Footer Menu When Done
After getting your Excel headers looking just right, finish by closing the Header & Footer interface:
- Click away onto the worksheet itself OR
- Press the escape button on your keyboard
This will finalize any changes made in the session. The customized headers will now appear on any new printouts.
To reopen and edit again later, simply access the Header & Footer menu again.
Conclusion
As you can see, Excel makes it simple to overwrite the default header output with custom text, fields and formatting. Leverage headers to insert page numbers, titles, metadata, branding, specialized first page or odd/even treatments, and other elements that increase document polish and professionalism.
The next time you go to print an Excel sheet, don’t submit plain unattractive outputs. Use this guide to ramp up the quality through tailored headers!
