When it comes to working with spreadsheet software like Microsoft Excel, it’s like exploring a digital world full of possibilities. One super important skill in this digital adventure is knowing how to select multiple rows at once.
Whether you’re organizing data, doing math, or just keeping things neat and tidy, being able to grab a bunch of rows is a must. In this easy-to-follow guide, we’ll show you the ropes of row selection in Excel. By the end, you’ll have a bunch of tricks up your sleeve to make working with data a breeze. So, let’s get started on this Excel journey and learn how to select rows like a pro!
Why is Selecting Multiple Rows Important?
Before we delve into the how-to, it’s crucial to understand why knowing how to select multiple rows in Excel is so important. Excel is renowned for its ability to handle vast amounts of data, making it a staple in various industries, from finance to marketing and beyond. Often, you’ll find yourself working with extensive datasets that require careful manipulation. By mastering the art of selecting multiple rows, you can:
1. Expedite Data Entry and Formatting
Imagine having to apply a uniform format to hundreds of rows in Excel. Without the ability to select multiple rows at once, this task could be time-consuming and prone to errors. Selecting multiple rows allows you to apply formatting changes, such as font style, alignment, or cell shading, in one fell swoop.
2. Simplify Data Analysis
When you’re dealing with extensive datasets, extracting meaningful insights can be a daunting task. Selecting multiple rows facilitates the process of creating charts, pivot tables, or conducting complex calculations. This efficiency can be a game-changer in a competitive business environment.
3. Enhance Data Cleaning
Data cleanliness is essential for accurate analysis. By selecting multiple rows, you can easily identify and rectify discrepancies, remove duplicates, or fill in missing values. This ensures that your data remains reliable and trustworthy.
4. Streamline Reporting
Creating reports often involves selecting specific rows of data that meet certain criteria. The ability to select multiple rows efficiently enables you to generate accurate reports with minimal effort, saving you time and reducing the chances of errors in your final output.
Various Methods to Select Multiple Rows in Excel
Now that you understand the significance of selecting multiple rows let’s explore the various methods and techniques at your disposal:
1. Using the Shift Key
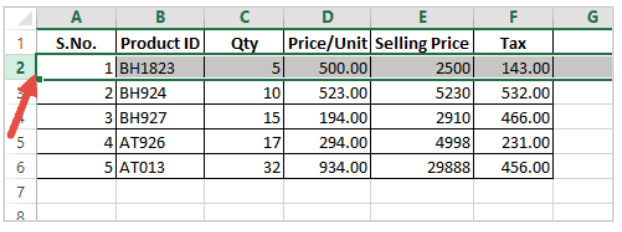
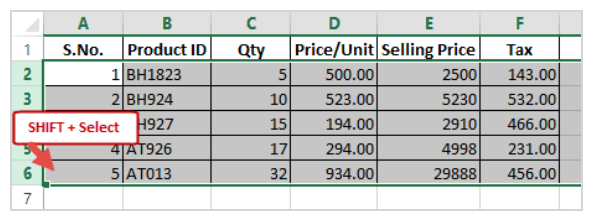
One of the most straightforward ways to select multiple rows in Excel is by using the Shift key. Follow these steps:
- Click on the first row you want to select.

- Hold down the Shift key.
- Click on the last row you want to select.

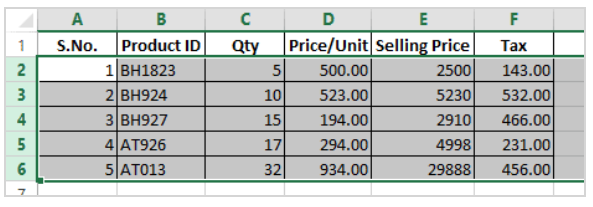
- This action will highlight all rows between the first and last one you clicked, allowing you to manipulate them collectively.

2. Utilizing the Ctrl Key
For a more versatile approach, you can use the Ctrl key to select non-contiguous rows. Here’s how:
- Click on the first row you want to select.

- Hold down the Ctrl key.
- While holding Ctrl, click on the other rows you wish to select.

- This method is particularly useful when you want to select rows that aren’t adjacent to each other.

3. Selecting Entire Rows
Excel provides a quick way to select entire rows or columns:
- To select an entire row, simply click on the row number on the left-hand side.
- To select an entire column, click on the column letter at the top.
- This method is efficient when you need to apply changes to entire rows or columns within your spreadsheet.
4. Using the Name Box
The Name Box in Excel allows you to select specific rows quickly. Here’s how:
- Click on the Name Box located on the left of the formula bar.

- Enter the row numbers you want to select, separated by a colon. For example, “2:6” will select rows 2 through 6.

- This method is handy for selecting a range of rows scattered throughout your worksheet.

5. Filter and Select
If your Excel spreadsheet contains filters, you can utilize them to select multiple rows based on specific criteria. Follow these steps:
- Enable filters by clicking on the “Filter” button in the Data tab.
- Apply your desired filters to display the rows you want.
- Select the visible rows by clicking the checkbox in the header row.
- This approach is excellent for data analysis, as it allows you to work with subsets of your data effortlessly.
Conclusion
In the realm of data management and analysis, efficiency is paramount. Knowing how to select multiple rows in Excel is a skill that can save you time, reduce errors, and enhance your overall productivity. By mastering the various methods and techniques outlined in this comprehensive guide, you’ll become a proficient Excel user capable of handling even the most extensive datasets with ease.
Remember, Excel is a powerful tool that offers numerous features and functionalities. The ability to select multiple rows is just one of the many ways you can harness its potential to streamline your work and achieve remarkable results.
