In today’s digital age, where emails and text messages have become the norm for communication, sending traditional mail can still hold a special charm. Whether you’re sending wedding invitations, holiday cards, or business correspondence, a neatly printed envelope can make a significant impression.
Microsoft Excel, a versatile spreadsheet application, can be a powerful tool for addressing and printing envelopes, saving you time and effort. In this comprehensive guide, we will explore various methods on how to print envelopes from Excel, ensuring your envelopes look polished and professional.
Method 1: Using Microsoft Word’s Mail Merge Feature
One of the most common and efficient ways to print envelopes from Excel is by utilizing Microsoft Word’s Mail Merge feature. Here’s how to do it:
- Organize Your Excel Data:
- Start by creating an Excel spreadsheet with two columns: one for recipient names and another for addresses. Ensure that your data is well-organized and free from any errors.
- Open Microsoft Word:
- Launch Microsoft Word and create a new document.
- Access the Mailings Tab:
- Click on the “Mailings” tab in the Word toolbar.
- Select Start Mail Merge:
- Click “Start Mail Merge” and choose “Envelopes.”

- Select Recipient List:
- Click “Select Recipients” and choose “Use an Existing List.” Browse your computer to select the Excel spreadsheet containing your recipient data.

- Insert Merge Fields:
- Click “Insert Merge Field” to insert the recipient name and address fields where they should appear on the envelope.
- Preview Your Envelopes:
- Click “Preview Results” to ensure that the fields are correctly merged with your data.
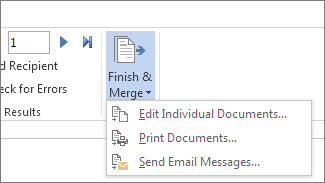
- Complete the Merge:
- Click “Finish & Merge” and choose “Print Documents.” Select the appropriate printer settings and print your envelopes.’
Method 2: Excel’s Envelopes and Labels Feature
If you prefer staying within Excel for the entire process, you can use Excel’s built-in “Envelopes and Labels” feature to print envelopes. Here’s how to do it:
- Prepare Your Excel Spreadsheet:
- Create a spreadsheet with recipient names and addresses, ensuring that your data is error-free.
- Open Excel’s Envelopes and Labels Dialog:
- Select the range of cells that contain the recipient’s name and address.
- Access the Envelopes and Labels Dialog:
- Go to the “Mailings” tab (in newer Excel versions) or the “Tools” menu (in older versions) and choose “Envelopes and Labels.”

- Set Up the Envelope Options:
- In the dialog box, select the “Envelopes” tab. Enter the recipient’s address in the “Delivery Address” field.
- Insert the Recipient’s Name:
- If needed, you can add the recipient’s name in the “Return Address” field.

- Preview and Print:
- Click the “Options” button to select your envelope size and customize settings. Finally, click “Add to Document” to insert the envelope on a new sheet. You can then preview and print your envelopes.
Method 3: Using Envelope Templates
Another convenient method to print envelopes from Excel is to use pre-designed envelope templates. Here’s how:
- Find a Suitable Envelope Template:
- Look for a downloadable envelope template that matches your preferred envelope size and style. Many websites offer free templates compatible with Microsoft Word.
- Organize Your Excel Data:
- Prepare your Excel spreadsheet with recipient names and addresses.
- Open Microsoft Word:
- Open Microsoft Word and create a new document.
- Insert the Envelope Template:
- Insert the downloaded envelope template into your Word document.
- Insert Merge Fields:
- Follow the template’s instructions to insert merge fields for recipient names and addresses.
- Link with Excel Data:
- Use Word’s Mail Merge feature, as described in Method 1, to link the envelope template with your Excel spreadsheet.
- Preview and Print:
- Preview the envelopes to ensure accuracy, and then print them.
Method 4: Envelope-Printing Software
For those who print envelopes regularly or desire more advanced features, dedicated envelope-printing software can be a valuable tool. There are various software options available, and they often offer more customization and automation. Here’s how it typically works:
- Install Envelope-Printing Software:
- Download and install a reputable envelope-printing software package.
- Import Excel Data:
- Import your Excel data into the software. Most software allows you to import data from Excel with ease.
- Select Envelope Size and Style:
- Choose the envelope size and style that matches your needs.
- Design Your Envelopes:
- Customize the envelope layout, font, and any additional design elements if desired.
- Link Data to Envelopes:
- Use the software’s data merging feature to link your Excel data with the envelope design.
- Preview and Print:
- Preview the envelopes to ensure everything is in order, and then print them.
Conclusion
Printing envelopes from Excel can be a straightforward task if you use the right method for your needs. Whether you prefer the simplicity of Microsoft Word’s Mail Merge, Excel’s built-in features, pre-designed templates, or dedicated envelope-printing software, there’s a solution that suits your preferences.
By following the steps outlined in this comprehensive guide, you can create professional-looking envelopes that leave a lasting impression, whether you’re sending personal invitations or important business correspondence. So, go ahead and give it a try – and let your envelopes shine!