When printing extensive Excel worksheets, it can be frustrating when header rows only appear on the first printed page. This leaves the remaining pages devoid of crucial identifying labels, hampering readability. Fortunately, with a simple setting adjustment, you can configure Excel to repeat header rows on every printed page – a feature that vastly improves printed outputs.
In this quick guide, you’ll learn how to repeat row headers for superior printed Excel worksheets. Follow these simple steps to enhance your Excel printing experience and generate professional, easy-to-read printouts. By mastering repeat row headers, you can produce printed Excel reports that maximize clarity for the reader.
Understanding the Importance of Repeating Header Rows
Enhanced Data Clarity
In the realm of data analysis and spreadsheet management, maintaining clarity and organization is paramount. Repeating header rows ensures that the column labels or field names remain visible as you scroll through your data. This simple yet crucial feature prevents confusion, reduces errors, and ultimately enhances data comprehension.
Improved Data Accessibility
Repeating header rows simplifies data navigation by keeping essential information within view at all times. Whether you’re working with a small or extensive dataset, this feature eliminates the need to continuously scroll back to the top of your spreadsheet, saving you precious time and effort.
Streamlined Data Entry
Efficiency is key when working with Excel. Repeating header rows allows you to enter data seamlessly, as the column labels are readily available for reference. This not only accelerates data input but also minimizes the chances of inaccuracies during data entry.
How to Repeat Header Rows in Excel | Step-by-Step Guide
Accessing the Worksheet
The first step is to open the Excel worksheet that you intend to print. Ensure that you have your document ready before proceeding with the following steps.
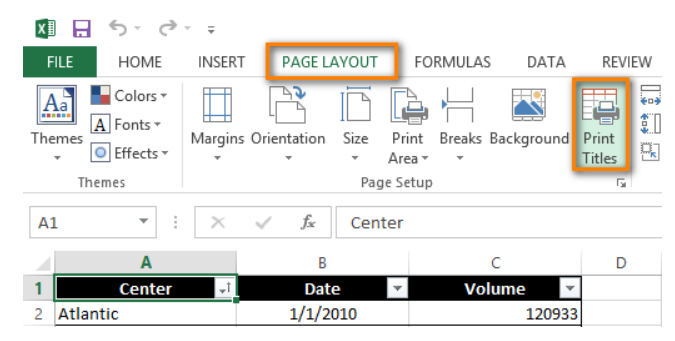
Navigating to Page Layout
- Switch to the PAGE LAYOUT tab.
- Click on “Print Titles” located in the Page Setup group. This action will open the Page Setup dialog box.
Setting Up the Page
- Once in the Page Setup dialog box, make sure you are on the Sheet tab. This is where you’ll configure your printing settings.
Specifying Rows to Repeat at the Top
- In the “Print titles” section, you’ll find the option to “Find Rows to repeat at the top.” Click on it.
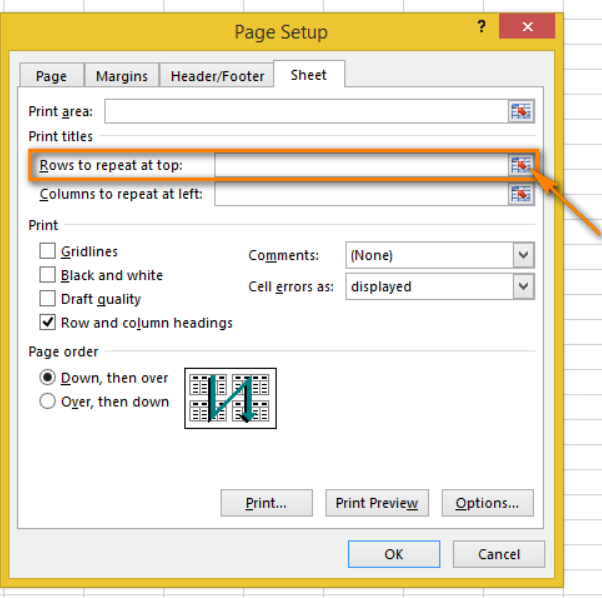
Selecting Rows
- A dialog will appear. Click the “Collapse Dialog” icon, which will allow you to return to the worksheet and select the rows that you want to print on every page. While doing this, you’ll notice that your cursor changes to a black arrow, simplifying the process of choosing entire rows with just one click.

- To select multiple rows, click on the first row, press and hold the mouse button, and drag your selection to the last row you wish to include.
- After selecting your desired rows, click “Enter” or the “Collapse Dialog” button to return to the Page Setup dialog box.

Confirm Your Selection
- In the “Rows to repeat at top” field, you will now see your chosen rows displayed. This means that the first row you’ve selected will be printed on every page.

- Note that you can skip steps 6-8 if you prefer to enter the range using your keyboard. However, be cautious when doing so. You must use the absolute reference, denoted by the dollar sign ($). For instance, if you want to repeat the first row on every printed page, your reference should look like this: $1:$1.
Preview Your Print
- Click on “Print Preview” to get a glimpse of how your document will look before printing it. This step helps you ensure that your Page Setup adjustments are just as you desire.

Practical Applications
Repeating header rows in Excel can be immensely valuable in a variety of scenarios:
1. Financial Analysis
In financial modeling, where complex spreadsheets are the norm, maintaining clarity and data accessibility is crucial. Repeating header rows simplifies tasks such as cash flow projections, balance sheet analysis, and financial statement preparation.
2. Inventory Management
For businesses handling inventory, an organized spreadsheet with repeated header rows can streamline stock tracking, order management, and sales analysis. This feature simplifies data retrieval, making your inventory management more efficient.
3. Academic Research
Students and researchers can benefit from this feature when organizing research data, survey results, or academic records. It allows for better tracking and interpretation of research findings.
The Bottom Line
Mastering the art of repeating header rows in Excel is a game-changer for professionals in various fields. This simple but effective feature significantly enhances data clarity, accessibility, and data entry efficiency. Whether you’re a financial analyst, a small business owner, or a student, this Excel function is a valuable tool that can elevate your productivity to new heights.
Start implementing repeated header rows in your Excel spreadsheets today, and experience the difference for yourself. Your data-driven tasks will become more efficient, and your decision-making processes more informed.