Adding a watermark to your Excel spreadsheets can be a great way to brand your work, prevent unauthorized use, or mark a document as a draft. Excel makes it easy to insert a text or image watermark behind your data, allowing you to customize its appearance while protecting the actual content.
In this tutorial, I’ll walk you through the simple steps for inserting, formatting and editing watermarks in Excel. Whether you want to add a delicate logo to your financial models or stamp “Confidential” in bold red letters across your sensitive data, watermarks in Excel give you an efficient way to label your spreadsheets.
Understanding the Importance of Watermarks
Before we dive into the technicalities, let’s briefly discuss why adding watermarks to your Excel files is essential. Watermarks serve various purposes, including:
- Security: They can discourage unauthorized sharing or distribution of your documents.
- Branding: Watermarks can reinforce your brand identity by displaying your company logo or name.
- Copyright Protection: They can help protect your intellectual property by indicating ownership.
- Document Classification: You can categorize your documents with watermarks like “Draft” or “Confidential.”
Now, let’s proceed with the step-by-step instructions on how to add a watermark in Excel.
Steps to Add Watermark in Excel
Step 1: Open a Blank Workbook
Open Microsoft Excel and create a new blank workbook where you want to add the watermark.

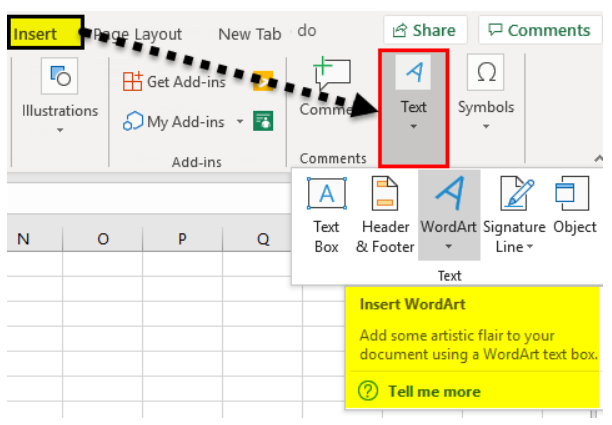
Step 2: Insert WordArt
Navigate to the “Insert” tab and select the “WordArt” option from the “Text” column.
Step 3: Choose a WordArt Style
Click on the “WordArt” option, and you’ll see a variety of colorful alphabets in a box. Choose a style that suits your preferences.

Step 4: Add Text
Click on a color or style that you like, and it will create a text box with your chosen WordArt style. Enter the text you want to use as the watermark.

Step 5: Resize and Rotate
Now, it’s time to make your watermark look visually appealing. Right-click on the text box to resize and rotate it as needed.
Step 6: Copy the Image
After you’ve customized your watermark, right-click on the image and select “Copy.”

Step 7: Paste into Word
Open Microsoft Word and paste the copied image as a picture. You can further adjust the image size if necessary.

Step 8: Save the Image
Right-click on the image in Word and save it as a picture on your computer.

Step 9: Insert the Watermark
Your watermark image is now ready to be added to your Excel workbook. Return to Excel.
Step 10: Insert Header & Footer
Go to the “Insert” tab in Excel and select the “Header & Footer” option.

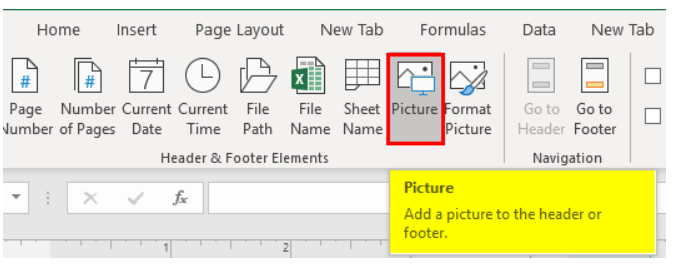
Step 11: Add the Watermark
Within the Header & Footer section, click on “Picture” and insert the watermark image you saved earlier.
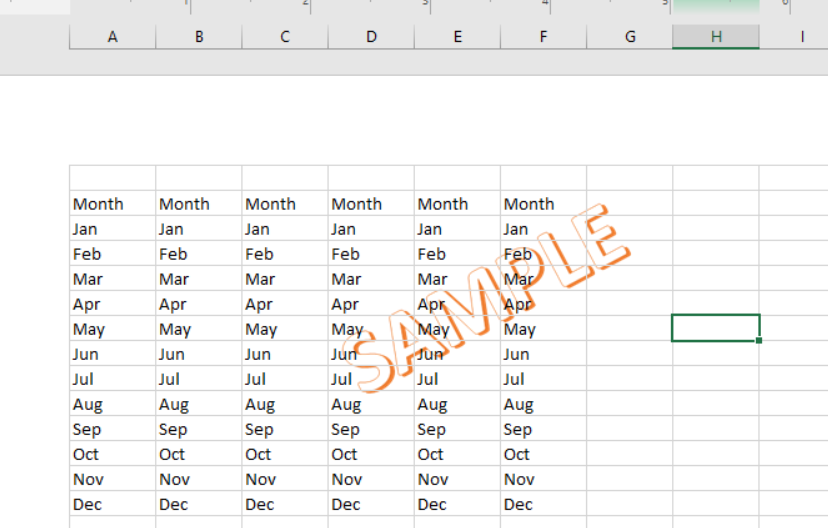
Step 12: Review Your Watermark
The watermark is now visible in your Excel sheet. Review it to ensure it looks the way you want.
Step 13: Save Your Document
Finally, save your Excel document to preserve the watermark settings.
Congratulations! You’ve successfully added a watermark to your Excel file. You can use this feature to enhance the security and professionalism of your spreadsheets, whether for personal or business use.
Tips for Effective Watermarks
To make the most out of your watermarks, here are some additional tips:
- Opacity: Adjust the opacity of the watermark to make it more subtle or prominent.
- Position: Experiment with different positions for your watermark, such as diagonal or centered.
- Color: Choose colors that complement your document’s theme and are easy to read.
The Bottom Line
With the ability to insert text or images and adjust transparency, size, and layout, watermarks in Excel provide a handy tool for distinguishing your work. They allow you to brand spreadsheets, mark confidential data, and label drafts without obstructing the important information in the foreground. While inserting a basic watermark is quick and easy, you can customize it to fit your specific needs.
So if you ever need to differentiate your Excel files or prevent unauthorized use, just follow these simple steps to add a watermark. Whether subtle or pronounced, it will enable you to control how your spreadsheets are seen and used.