Creating checklists in Excel can help you stay organized and track progress on tasks. Whether it’s for your personal to-do list, shopping list, or work project management, Excel provides an easy way to make interactive checklists.
In this comprehensive guide, you’ll learn how to make a checklist in Excel in just 5 simple steps. From inserting checkboxes to formatting and linking them to cells, you’ll be able to create functional and aesthetically pleasing checklists in Excel.
Detailed Step-by-Step Guide
For more details on enabling Developer tab, inserting and formatting checkboxes, and using your new Excel checklist, read on:
Enable The Developer Tab
The Developer tab is where you’ll access the checkbox control, but it’s not enabled by default in Excel. Here’s how to turn it on:
Excel 2010 or Later:
- Go to File > Options.
- On the left side, click Customize Ribbon.
- Under Main Tabs, check the box next to Developer.
- Click OK.
The Developer tab will now appear in the ribbon at the top.

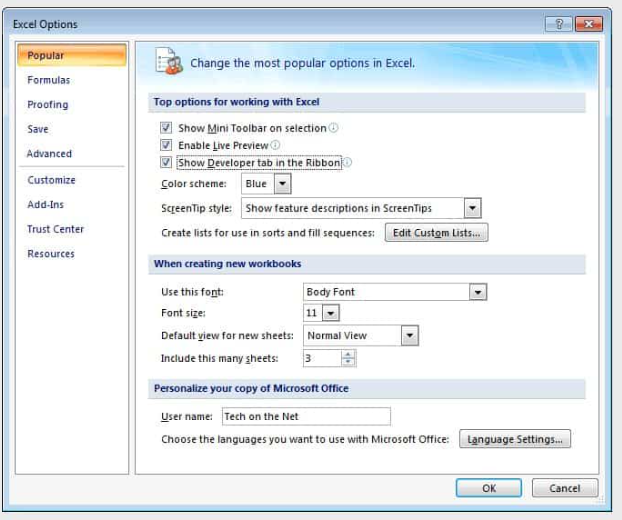
Earlier Versions of Excel:
- Go to File > Options.
- Click Popular in the left sidebar.
- Check the box next to the “Show Developer Tab in the Ribbon”.
- Click OK.
Now you can access the developer tools.
Insert Checkboxes
To add checkboxes to your checklist:
- Go to the Developer tab > Insert > Check Box (Form Control).
- Click and drag to draw a checkbox inside a cell next to the first task.
- Right-click the checkbox and choose Format Control.
- In the Control tab, link the checkbox to the adjacent cell.
- Click OK. This links it so TRUE/FALSE displays based on checked/unchecked.
- Copy or drag the checkbox down to add one next to each task.

Now you can check and uncheck to track progress!
Format Checkboxes
Once inserted, right-click a checkbox and choose Format Control to customize:
- Size: Change height and width or scale to fit the cell.
- Colors and Styles: Choose color fills, outlines, lines, and more. Match your checklist’s style.
- Default State: Set to checked, unchecked, or mixed by default.
- Cell Link: Linking to a cell allows you to check/uncheck dynamically based on TRUE/FALSE.

Format to suit your purposes and make your checklist aesthetically pleasing!
Use Your Excel Checklist
Once set up, start using your Excel checklist to manage tasks and track progress:
- Check/uncheck boxes manually or link to cells
- Sort or reorder tasks as needed
- Add conditional formatting like color coding
- Print and check on paper if desired
- Easily update and reuse the template
Here is a sample of the checklist we created for this blogpost:

Some examples of how to utilize your checklist:
- To-do list: Check off daily tasks to feel productive.
- Grocery list: Check items as you add to the cart to ensure you don’t forget anything.
- Travel checklist: Check steps as you prepare for a trip and pack.
- Work or School project: Track assignment progress and completion.
The possibilities are endless! Excel makes it easy to create checklists to organize any scenario.
Advantages of Excel Checklists
Here are some of the top benefits of using Excel for creating interactive checklists:
- Easy to create: Simple checkboxes and no formatting needed
- Familiar platform: Useful if you already use Excel regularly
- Customizable: Format and design however you like
- Interactive: Check/uncheck boxes live
- Shareable: Easily collaborate if using the cloud
- Reusable templates: Make checklists for anything
- Analyzable: Link to cells and formulas
- Automatic save: Don’t lose progress
- Accessible: Use on all devices with Excel installed
For personal organization or work collaboration, Excel provides an easy way to manage checklists digitally.
Tips for Excel Checklists
Follow these tips for getting the most out of your Excel checklists:
- Add color coding for visual organization (e.g. green = complete)
- Sort and reorder tasks as needed
- Break into sections with dividers or formatting
- Use Conditional Formatting to automatically highlight complete items
- Share read-only if collaborating so everyone can check/uncheck
- Link to cells to dynamically check if TRUE and add formulas
- Make multiple tabs for different checklist types
- Freeze panes so the header row remains visible when scrolling
With the right setup, an Excel checklist can become an indispensable organizational tool!
Conclusion
Learning how to create interactive checklists in Excel is a great skill for personal and professional organization.By following the simple steps to insert and format checkboxes, you can start building task trackers, to-do lists, and more to boost your productivity. Use this guide to start creating Excel checklists to streamline your workflows and ensure you cross every task off your list.
Don’t let things slip through the cracks again! With some formatting tricks and creative usage, you can customize Excel checklists to suit every type of project and scenario imaginable. So try it out — make an Excel checklist template for your next goal and see how it helps you stay on top of your tasks. You may be amazed how much simpler it makes life!