In the world of spreadsheet software, Microsoft Excel stands as a behemoth, serving as the go-to tool for countless individuals and businesses to manage, analyze, and organize their data. Whether you’re a seasoned professional or just starting your journey with Excel, you’ll undoubtedly encounter the need to number rows for various reasons.
In this comprehensive guide, we, as experienced SEO and copywriting experts, will provide you with a step-by-step tutorial on how to number rows in Excel. By the end of this article, you’ll be equipped with the knowledge to efficiently label your Excel rows and boost your productivity.
Understanding the Importance of Numbering Rows in Excel
When working with extensive data sets or collaborating on spreadsheets with multiple team members, it becomes crucial to have a systematic way of identifying and referencing individual rows. Numbering rows in Excel offers several advantages:
1. Enhanced Data Organization
Numbering rows allows you to create a logical and structured layout for your spreadsheet. This makes it easier to locate and update specific data points, resulting in improved overall organization.
2. Efficient Data Retrieval
With row numbers in place, you can swiftly navigate through your spreadsheet, saving valuable time when searching for specific information or conducting data analysis.
3. Error Reduction
By labeling rows, you minimize the risk of errors such as duplication or data entry mistakes, ensuring the accuracy and integrity of your spreadsheet.
Now that we’ve established the significance of numbering rows, let’s delve into the practical steps to accomplish this task.
How to Number Rows in Excel
Method 1: Using the Excel AutoFill Feature
One of the easiest ways to number rows in Excel is by utilizing the AutoFill feature. Follow these steps:
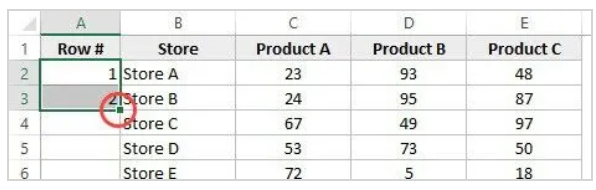
Step 1: Select the cell in the first row where you want the numbering to begin.
Step 2: Enter the initial number (e.g., 1 and 2) in the selected cell.
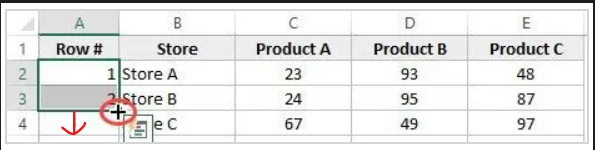
Step 3: Hover your cursor over the small square at the bottom right corner of the selected cell (the fill handle).
Step 4: Click and drag the fill handle down to the last row you wish to number. Excel will automatically fill in the numbers for each row.
Method 2: Utilizing the Fill Series Option
Now, let’s walk through the steps to leverage Fill Series for numbering rows in Excel:
Step 1: Start with 1
We will be working on the following sample data set:
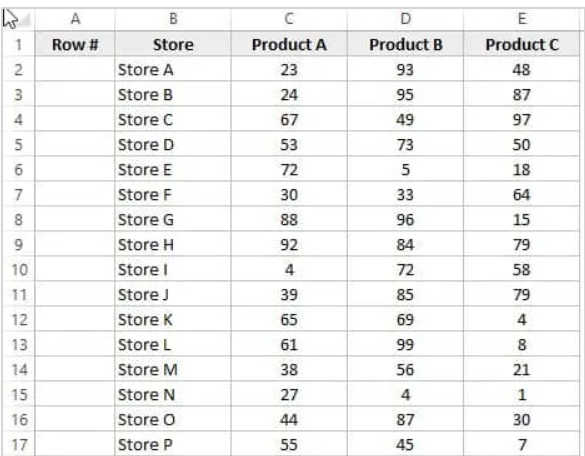
Begin by entering ‘1’ in cell A2.
Step 2: Access the Home Tab
Navigate to the Home tab in the Excel ribbon.

Step 3: Locate the Fill Dropdown
Within the Editing Group on the Home tab, you’ll find the Fill dropdown.

Step 4: Choose ‘Series…’
Click on the Fill dropdown, and from the options presented, select ‘Series…’.

Step 5: Configure Series Options
A ‘Series’ dialog box will appear. In this dialog box, opt for ‘Columns’ in the ‘Series in’ options.

Step 6: Specify the Stop Value
Now, it’s time to specify the Stop value. In our example, since we have 26 records, input ’26’ as the Stop value. If you leave this field blank, Fill Series won’t function.

Step 7: Confirmation and Completion
Click ‘OK’ to apply your settings.
Congratulations! You’ve successfully used Fill Series to instantly number the rows in Excel from 1 to 26.
Additional Tips for Efficient Row Numbering
1. Freezing Headers
When working with large datasets, consider freezing the header row to keep it visible as you scroll through the spreadsheet. This makes it easier to identify columns and data categories.
2. Conditional Formatting
You can use conditional formatting to highlight specific rows based on certain criteria, making it even simpler to spot relevant data.
3. Data Validation
Implement data validation rules to ensure that only valid row numbers are entered, reducing the risk of errors.
Bottom Line
In conclusion, numbering rows in Excel is a fundamental skill that can significantly enhance your spreadsheet management and data analysis capabilities. Whether you prefer the simplicity of AutoFill, the precision of formulas, or the flexibility of VBA, you now have the tools and knowledge to excel in Excel. Remember to apply these techniques as needed, and you’ll be well on your way to mastering this essential aspect of spreadsheet organization.