Whether you’re a seasoned data analyst or a casual spreadsheet user, the need to consolidate data in Excel is a common requirement. It’s a task that can be deceptively simple for smaller datasets but can quickly become overwhelming as your data grows in size and complexity.
In this blog post, we’ll embark on a journey through the world of data consolidation in Excel. We’ll explore various techniques, from basic functions to advanced features, that will empower you to efficiently bring together scattered data, enabling you to make informed decisions, spot trends, and ultimately harness the true potential of your information.
So, whether you’re aiming to streamline your financial reports, merge survey responses, or simply tidy up your data, join us on this Excel adventure as we unravel the art and science of consolidating data.
Understanding the Importance of Data Consolidation
Data consolidation may sound technical, but at its core, it’s a simple concept with profound implications. It involves bringing together information from various sources into a single, coherent dataset. This process is indispensable for professionals working with large volumes of data, as it allows for easier analysis, reporting, and visualization.
Streamlining Your Workflow
Imagine you’re managing sales data for a multinational corporation. This data is scattered across multiple spreadsheets, each representing a different region or product line. Without consolidation, you’d be stuck navigating through a labyrinth of files, risking errors and inefficiencies. However, by consolidating this data into a single master sheet, you streamline your workflow, saving time and minimizing the likelihood of mistakes.
Enhancing Decision-Making
Consolidation also enhances your decision-making capabilities. When your data is organized and easily accessible, you can identify trends, spot anomalies, and extract valuable insights. This, in turn, empowers you to make informed decisions that drive your business or project forward.
Preparing for Consolidation
Before you embark on your data consolidation journey, it’s essential to make a few preparations, especially if your worksheets are not identical. If your worksheets are identical, consider using 3D-references for one workbook or External References for multiple workbooks. However, for non-identical worksheets, follow these steps:
Step 1: Open All Three Workbooks
Begin by opening all the workbooks containing the data you wish to consolidate. For instance, we’re gonna take the worksheets containing the following dataset:
Worksheet 1:

Worksheet 2:

Worksheet 3:

We’re gonna name the above sheets district1, district2 and district, respectively.
Step 2: Create a Blank Workbook
In Excel, open a new blank workbook. Navigate to the “Data” tab, located in the “Data Tools” group, and click on “Consolidate” to initiate the consolidation process.

Configuring the Consolidation
Now that you’ve set the stage, let’s configure the consolidation process to suit your needs.
Step 1: Select the Aggregation Function
Choose the aggregation function that best fits your requirements. Whether you need to sum, count, average, or perform other calculations, Excel’s Consolidate feature has you covered.
Step 2: Define the Data References
Click within the “Reference” box, then select the range A1:E4 in the “District1” workbook. Click “Add” to add this reference. Repeat this step for the “District2” and “District3” workbooks.
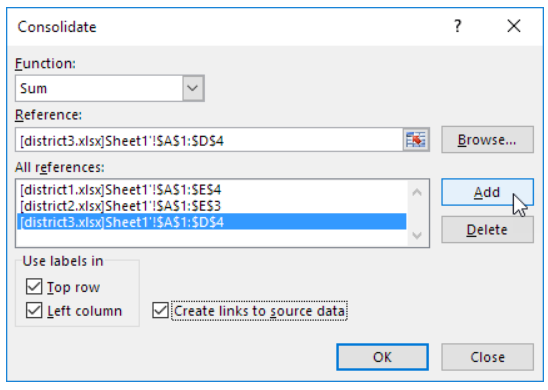
Step 3: Customize Consolidation Options
- For accurate consolidation, ensure the following options are selected:
- Check “Top row” to consolidate data based on column labels.
- Check “Left column” to consolidate data based on row labels.
- Check “Create links to source data” to establish a connection to your source data. This way, your consolidated data will automatically update if any changes occur in the source data.
Step 4: Confirm and Execute
Once you’ve configured all the necessary settings, click “OK” to initiate the consolidation process.
The Result
Congratulations! You’ve successfully consolidated your data using Excel’s powerful Consolidate feature.

This method not only simplifies data management but also ensures that your consolidated data stays up-to-date with any changes in the source data. Say goodbye to complex formulas and hello to efficient data consolidation.
Bottom Line
In conclusion, mastering the art of data consolidation in Excel is a valuable skill for anyone dealing with large datasets. By following the steps outlined in this article, you can harness the full potential of Excel’s Consolidate feature to make data management a breeze. So, go ahead and consolidate your data with confidence, knowing that you have a powerful tool at your disposal.