In the fast-paced world of data management and analysis, Microsoft Excel stands as a steadfast ally for professionals and enthusiasts alike. Whether you’re crunching numbers for a business report, organizing personal finances, or diving into complex data sets, Excel’s versatility is undeniable. However, as our tasks grow in complexity, so does our need for efficient organization and streamlined workflows.
Picture this scenario: you’ve meticulously crafted a masterpiece of a spreadsheet, complete with multiple sheets of data, interconnected formulas, and striking visuals. Yet, you need to share just one sheet with a colleague, client, or collaborator. How can you extract and share that specific sheet without sending the entire workbook?
Fear not, for in this comprehensive guide, we’ll unravel the mystery of saving a single Excel sheet separately. We’ll delve into the depths of Excel’s functionality, exploring the most efficient techniques for isolating and exporting individual sheets, ensuring your data remains pristine, accessible, and most importantly, shareable.
Join us on this Excel adventure, as we empower you with the knowledge to navigate through the intricacies of Excel’s sheet-saving prowess, unlocking new levels of productivity and collaboration in your Excel endeavors.
Understanding the Importance of Saving a Single Excel Sheet
Excel is a powerful tool that enables effective data organization, analysis, and presentation. There are instances when you require the ability to save a specific sheet from a larger workbook separately. This might be for the purpose of sharing, data segmentation, or archival. Mastering this process is essential for enhancing your workflow and productivity.
Method 1: Save an Excel Worksheet to a Separate File using the ‘Move or Copy’ Command
This method allows you to create a separate file containing the selected worksheet(s) using the ‘Move or Copy’ command. Follow these steps to achieve this:
- Click on the tab of the worksheet you intend to save as a separate file.
- You can choose multiple worksheets by holding down the CTRL key while selecting.
- Alternatively, select the first worksheet, press and hold the SHIFT key, and then click the last worksheet to select all sheets in between.
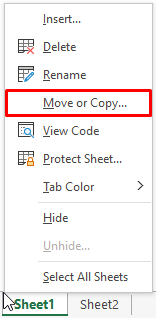
- Right-click on the chosen worksheet tab and click on “Move or Copy.”
- A dialog box will appear to facilitate this action.
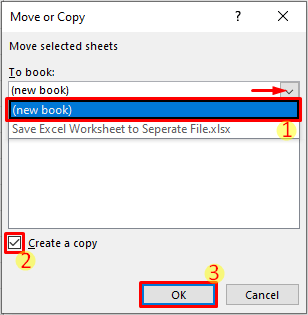
- From the dialog box, select “(new book)” from the dropdown menu.
- Ensure to check “Create a Copy” to prevent the selected worksheet(s) from being removed from the original workbook.
- Click the OK button to proceed.
- A new file will be generated, containing the chosen worksheet(s).
- Open the newly created workbook, navigate to “File,” and select “Save.”
- Choose your desired location and the appropriate file type for the new workbook.
Method 2: Export an Excel Worksheet to a Separate PDF/XPS File
This method focuses on exporting the selected worksheet(s) as a separate PDF/XPS file. Follow these steps for successful execution:
- Select the specific worksheet you want to save separately.
- Navigate to “File,” then “Export,” and choose “Create PDF/XPS Document.”
- This option will enable you to create a PDF or XPS file containing the chosen worksheet.

- Browse to your desired saving location and specify the file name.
- You can also select the preferred file type using the dropdown menu.
- Click “Options” to customize the export settings.

- Ensure that the “Active Sheet(s)” radio button is selected in the dialog box.
- Confirm your settings by clicking “OK,” then proceed by clicking the “Publish” button.

Tips for Optimizing Your Excel Sheet Separation Process
To further enhance your Excel sheet separation process, consider implementing these useful tips:
- Organize Your Workbooks: Create a structured folder system to keep your workbooks organized for easy access and management.
- Descriptive Naming: Employ descriptive and meaningful names for your sheets and workbooks to prevent confusion.
- Consistent Approach: Adopt a consistent method for saving and organizing your sheets to ensure uniformity.
Conclusion
In this comprehensive guide, we’ve outlined two effective methods to save one Excel sheet separately, providing you with the tools to efficiently manage and share your data. By following these instructions and integrating the provided tips, you can streamline your workflow and optimize your data organization.
Remember, Excel’s power lies not just in its multitude of features, but in your ability to harness them effectively. So go forth with confidence, conquer your data dilemmas, and continue to excel in your data-driven pursuits. Empower yourself to harness Excel’s potential by effortlessly separating and managing sheets as needed.