Mastering Microsoft Excel’s functions is essential for efficient data management and analysis in today’s digital age. Among its plethora of features, one fundamental skill that can significantly enhance your spreadsheet prowess is the ability to separate dates effectively. Whether you’re a seasoned
Excel user or just dipping your toes into the world of spreadsheets, understanding how to split dates into different components can save you time, streamline your workflow, and provide clearer insights from your data. In this tutorial, we’ll dive into the step-by-step process of how to separate dates in Excel using straightforward methods that any Excel enthusiast can easily grasp. So, let’s embark on this Excel journey and unravel the simplicity behind date separation!”
Understanding Date Formats in Excel
Before we dive into the methods of date separation, it’s essential to understand how Excel stores and interprets dates. In Excel, dates are represented as serial numbers, where each date is assigned a unique numerical value. For instance, January 1, 2023, is stored as 44239, January 2, 2023, as 44240, and so on. Excel automatically converts date entries into their respective serial numbers for calculations.
Understanding the Importance of Date Separation
Dates are the cornerstones of data analysis, financial modeling, project planning, and so much more. However, Excel often treats dates as a single entity, which can be problematic when you need to perform specific calculations or analysis based on individual date components, such as day, month, or year. Mastering the art of date separation empowers you to unlock the true potential of your data and derive insights that might otherwise remain hidden.
Methods to Separate Dates in Excel
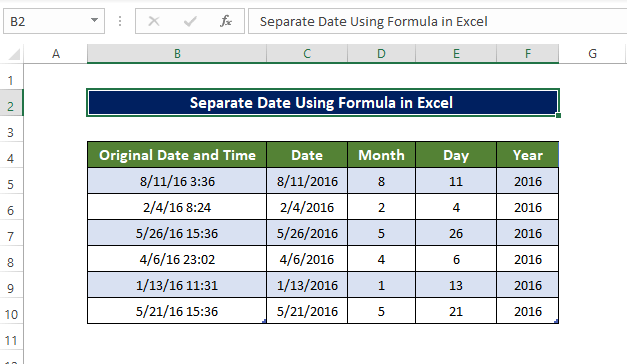
Using the dataset below as a sample, we will extract date, day, month, and year values from the Original Date and Time column (B5:B10).
Using the TEXT Function
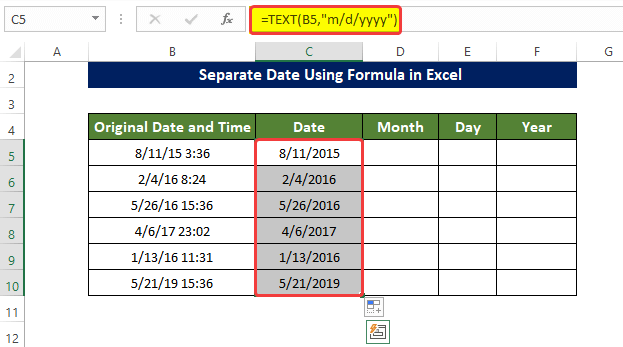
Step 1: Extracting Dates
- Open your Excel workbook and locate your dataset.
- Create a new column labeled “Date” next to the original data.
- In the first “Date” cell (C5), enter: =TEXT(B5, “m/d/yyyy”)
- Now drag and fill it to the desired range of cells
- The cells will now display the extracted date.
Step 2: Getting the Month
- Add another column labeled “Month” beside the “Date” column.
- In the first “Month” cell (D5), type: =TEXT(B5, “mmmm”)
- Drag and fill it to the desired range of cells
- You’ll see the month portion of the date in the cells.

Step 3: Finding the Day
- Create a “Day” column next to the “Month” column.
- In cell E5, input: =TEXT(B5, “dddd”) and drag and fill it to the desired range of cells
- The cells will show the day component of the date.

Step 4: Extracting the Year
- Make room for the “Year” column next to the “Day” column.
- In F5, enter: =TEXT(B5, “yyyy”) and drag it to the desired range of cells
- The cells will display only the year.

Using the DATE Function
Step 1: Separating Dates
- Locate your dataset in Excel.
- Add a new column called “Date” next to the original data.
- In cell C5, input: =DATE(YEAR(B5), MONTH(B5), DAY(B5))
- Now drag and fill it to the desired range of cells
- The cells now contains the separated date.

Step 2: Isolating the Month
- Create a “Month” column next to the “Date” column.
- In D5, type: =MONTH(B5) and again drag and fill it to the desired range of cells
- The cells will show the numeric month value.

Step 3: Identifying the Day
- Make space for a “Day” column next to the “Month” column.
- In E5, enter: =DAY(B5)
- Once again drag and fill it to the desired range of cells
- The cells will display the day of the date.

Step 4: Extracting the Year
- Create a “Year” column next to the “Day” column.
- In F5, input: =YEAR(B5)
- Drag it to the desired range of cells
- The cells will show the year of the date.

Enhance Your Excel Skills
Mastering data separation in Excel streamlines data analysis. By using the TEXT and DATE functions, you can effortlessly extract crucial date components. These methods empower you to work efficiently with combined date and time values, enhancing your Excel expertise.
Practice these techniques, and watch your data manipulation skills flourish. Excel’s functions provide practical solutions, making your work more productive and accurate. Incorporate data separation into your Excel toolkit and elevate your data analysis game today.
Bottom Line
Whether you’re organizing a personal budget, analyzing sales trends, or preparing reports for your business, the ability to break down dates into their constituent parts equips you with a powerful tool for better understanding and interpretation of your data.
Remember, Excel is not just a software program; it’s a versatile companion that can transform raw data into meaningful insights. By mastering tasks as seemingly mundane as date separation, you’re unlocking the potential to work more efficiently, make informed decisions, and present your findings with clarity. As you continue your journey with Excel, don’t hesitate to explore other features and functionalities.
Your growing proficiency will undoubtedly empower you in both your personal and professional endeavors. So, go forth with confidence, armed with the knowledge to seamlessly dissect dates and conquer the world of data manipulation in Microsoft Excel. Happy spreadsheeting!