In the realm of data manipulation and visualization, the ability to seamlessly move Excel charts across sheets is a skill that can greatly enhance your data presentation prowess. Chart mobility allows you to strategically position visual representations of your data, creating a more impactful narrative.
Whether you’re a novice Excel user or an experienced data analyst, mastering the art of chart mobility can add a valuable tool to your skill set. In this comprehensive guide, we will explore three distinct methods of chart mobility, each tailored to suit different scenarios while ensuring that your data storytelling reaches new heights.
Efficient Methods for Moving Your Excel Chart to a New Sheet
Method 1: Moving a Chart to an Existing Worksheet
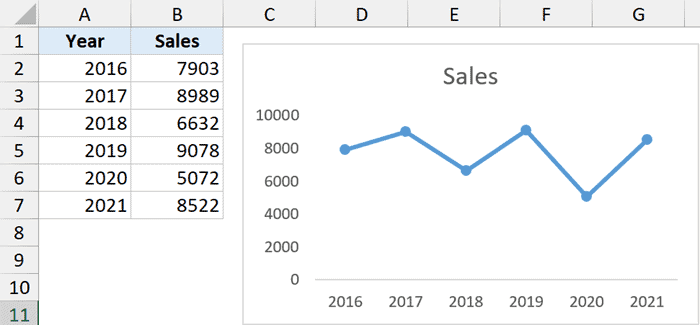
Imagine you have an elaborate chart showcasing quarterly sales data, and you wish to reposition it within your existing workbook.
Here’s a step-by-step breakdown of the process:
- Selecting Your Chart: Begin by clicking on the chart you intend to move. This action activates the Chart Tools contextual tab.
- Access Chart Design: Navigate to the Chart Design tab, which appears once you’ve selected the chart. This tab hosts a suite of design options.
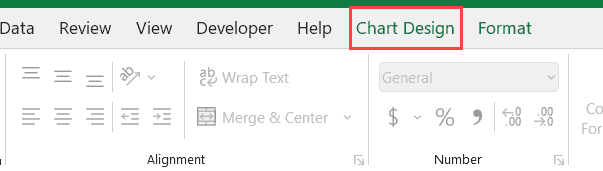
- Exploring Design Options: Click on the “Chart Design” tab to unveil an array of design choices. This step allows you to customize the look and feel of your chart.
- Initiating Chart Movement: Within the Chart Design tab, locate the ‘Move Chart’ icon. This icon serves as the gateway to relocating your chart.

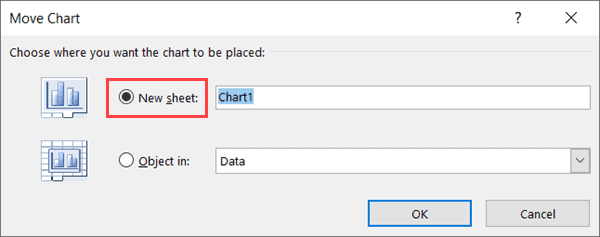
- Confirmation and Dialog Box: Upon clicking the ‘Move Chart’ icon, a dialog box appears. Ensure that the ‘Object in’ option is selected, indicating your intention to move the chart.

- Choosing the Destination Sheet: From the drop-down menu in the dialog box, choose the target sheet where you want the chart to find its new home.
- Finalizing the Move: Confirm your decision by clicking the OK button. Witness the seamless transfer of your chart to the designated sheet.

By following these steps, you’ve successfully moved your chart to a different sheet within the same workbook, streamlining your data presentation process.
Method 2: Moving a Chart to a New Blank Worksheet
Suppose you want to create a dedicated sheet for a particular chart. Perhaps you’re crafting a presentation where each chart occupies its own space. Here’s how to achieve this:
- Creating a Fresh Canvas: Begin by adding a new worksheet to your workbook. This blank sheet will serve as the canvas for your chart.
- Copying the Chart: Navigate to the original sheet containing the chart you wish to move. Right-click on the chart and select “Copy.” Alternatively, use the keyboard shortcut Control + C.

- Pasting onto the New Sheet: Switch to the newly created sheet, right-click on a cell, and select the ‘Use Destination Theme’ option with paste special option. This ensures that your chart blends seamlessly with the new sheet’s formatting.

- The arrival of Your Chart: Witness the chart settling into its new abode. You’ve successfully duplicated the chart onto a fresh worksheet, which it enjoys independent management and customization.
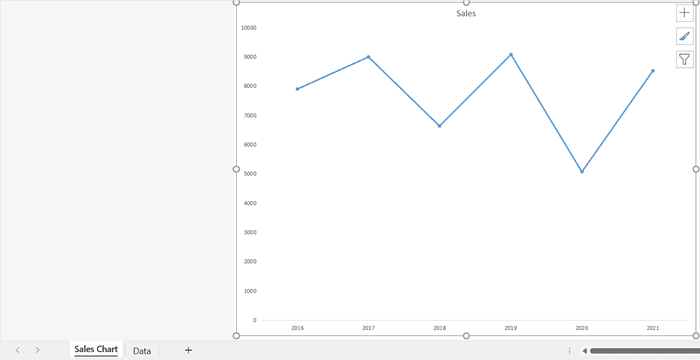
Method 3: Moving a Chart to a Dedicated Chart Sheet
Dedicated chart sheets offer an organized and visually appealing way to showcase your data insights. If you want to create a standalone chart sheet, follow these steps:
- Selecting the Chart for Migration: Click on the chart that deserves its dedicated sheet. This signals your intent to provide it with an exclusive space.
- Chart Design Tab Access: Access the Chart Design tab, located in the Excel ribbon. This tab is the gateway to various chart-related options.
- Chart Design Options: Click on the “Chart Design” tab to explore a range of design possibilities. This step enables you to fine-tune the chart’s appearance.

- Moving the Chart: In the Chart Design tab, locate the ‘Move Chart’ icon. This icon holds the key to granting your chart a new abode.

- Choosing ‘New Sheet’: As you click the ‘Move Chart’ icon, a dialog box appears. Opt for the ‘New Sheet’ option, indicating your intention to provide the chart with its own dedicated space.
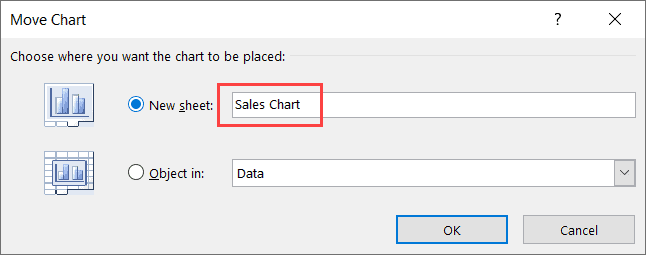
- Naming the Chart Sheet: Assign a name to the newly minted chart sheet. You have the flexibility to retain the default name, such as ‘Chart1,’ or to bestow a customized title upon it.
- Finalizing the Transition: Solidify your decision by clicking OK. Witness the chart bid adieu to its previous habitat and settle into the dedicated chart sheet—a realm solely devoted to its visualization.
Conclusion: Empowering Your Data Storytelling
As you’ve navigated through the intricacies of chart mobility, you’ve gained a versatile skill that can amplify your data storytelling. Whether it’s optimizing the arrangement of charts within existing sheets, creating a fresh canvas for each chart, or bestowing charts with dedicated realms, you can enhance data interpretation and communication.
Chart mobility isn’t just about moving visuals—it’s about orchestrating a symphony of insights that resonates with your audience. Armed with the knowledge and techniques outlined in this guide, you’re well-equipped to harness the potential of Excel chart mobility, transforming raw data into compelling narratives.