As professionals and students alike rely heavily on Excel for organizing and presenting data, knowing how to optimize the printing process is essential for creating polished and visually appealing spreadsheets.
In this blog post, we will delve into the intricacies of defining print areas, a powerful feature that enables you to select specific portions of your spreadsheet for printing, ensuring that only the necessary data and charts make their way onto paper. Whether you are a novice seeking to enhance your Excel skills or a seasoned user looking for a refresher, we’ve got you covered.
Get ready to unlock the full potential of Excel’s print area functionality as we provide clear and easy-to-follow instructions, accompanied by screenshots and expert tips, to help you achieve immaculate printouts that impress colleagues, clients, and teachers alike. So, let’s embark on this journey to mastering print areas in Excel, and soon enough, you’ll be producing printouts that are both aesthetically pleasing and exceptionally efficient.
Understanding Print Areas
Before diving into setting print areas, it’s essential to understand what they are. A print area is a specific range of cells that you want to print on a single page or multiple pages. By defining the print area, you control which part of your Excel worksheet will be printed, eliminating unnecessary data and improving the readability of your printed documents.
Importance of Print Areas
When working with large datasets in Excel, it’s common to have numerous columns and rows filled with information. However, when you print the entire worksheet, it might lead to a cluttered output with unnecessary information, making it hard to read and comprehend. This is where defining print areas becomes valuable.
Defining print areas enables you to select specific portions of your worksheet to print, omitting the irrelevant sections. It improves readability and ensures that the printed document looks professional and well-organized. Moreover, it helps you save paper and ink, promoting eco-friendly practices.
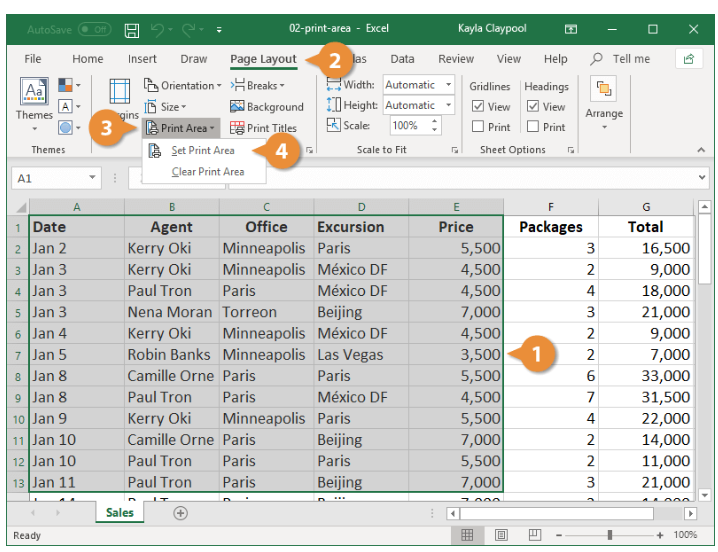
Setting the Print Area
To set up a print area in Excel, follow these simple steps:
- Open your Excel worksheet containing the data you want to print.
- Select the range of cells you wish to include in the print area.
- Navigate to the “Page Layout” tab situated on the Excel ribbon.
- Look for the “Print Area” option within the “Page Setup” group, then click on it to proceed.
- From the drop-down menu, select “Set Print Area.”
Adjusting the Print Area
At times, you might need to adjust the print area to fit your data perfectly. To do this:
- Click on any cell within the defined print area.
- Hover your cursor over the dashed lines surrounding the print area until it changes to a four-headed arrow.
- Click and drag the borders of the print area to adjust its size accordingly.
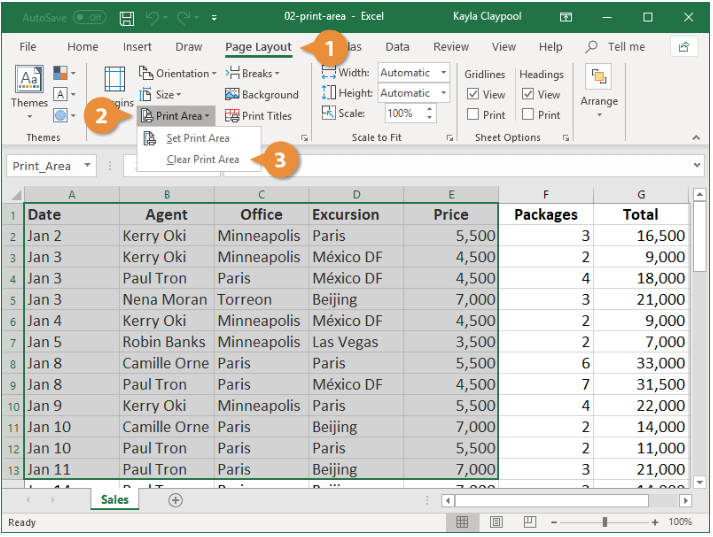
Clearing the Print Area
If you want to remove the print area and print the entire worksheet, follow these steps:
- Go to the “Page Layout” tab on the Excel ribbon.
- Click on the “Print Area” button.
- From the drop-down menu, select “Clear Print Area.”
Using Page Break Preview
Page Break Preview is a useful feature that allows you to see how your data will be divided across pages when printed. To access it:
- Go to the “View” tab on the Excel ribbon.
- Click on “Page Break Preview.”
- Now easily adjust page breaks in Excel by clicking and dragging them to your desired location.

Troubleshooting Print Area Issues
In some instances, you might encounter issues while setting print areas in Excel. Here are some common problems and their solutions:
Issue 1: Print Area Not Setting Properly
If the print area is not setting as expected, follow these steps:
- Ensure that no cells outside the desired range are selected when setting the print area.
- Check for merged cells within the print area and unmerge them, as they can interfere with the print settings.
Issue 2: Print Area Overlapping to Multiple Pages
If the print area exceeds a single page, consider the following:
- Adjust the print area to fit within a single page by selecting a smaller range.
- Modify the print settings like scaling or adjusting the margins to fit the content onto one page.
Conclusion
Setting print areas in Excel is a powerful tool to organize and present your data clearly and professionally. By following the step-by-step guide provided in this article, you can easily define the portions of your worksheet that you want to print, ensuring that the final output is concise and visually appealing.
Take advantage of print areas to eliminate clutter, save paper, and make your Excel documents more reader-friendly. This skill will not only improve your productivity but also enhance the overall quality of your work.