Unlock the full potential of Excel as a dynamic data management tool by harnessing the power of drop-down lists. Excel, a staple in the world of spreadsheets, is renowned for its ability to streamline data manipulation and organization.
One of the most practical features it offers is the creation of a Yes or No drop-down list, enabling you to handle binary responses seamlessly, whether it’s for pass or fail scenarios, true or false evaluations, or any other binary data classification. By incorporating this simple yet effective tool into your Excel worksheets, you can significantly enhance data accuracy and efficiency in your projects.
In this comprehensive blog post, we will guide you through the step-by-step process of setting up a Yes or No drop-down list in Excel. No prior knowledge of advanced Excel functions is required, as we’ll cover every detail with clarity and simplicity, making it accessible to beginners and experienced users alike.
So, whether you’re a seasoned Excel veteran looking to refine your skills or a newcomer eager to embark on the journey of data manipulation, this guide will equip you with the necessary expertise to create a user-friendly and intuitive drop-down list in Excel, streamlining your workflow and elevating your data entry game to new heights.
Steps to Add Yes or No in Excel
Step 1: Select the Cells
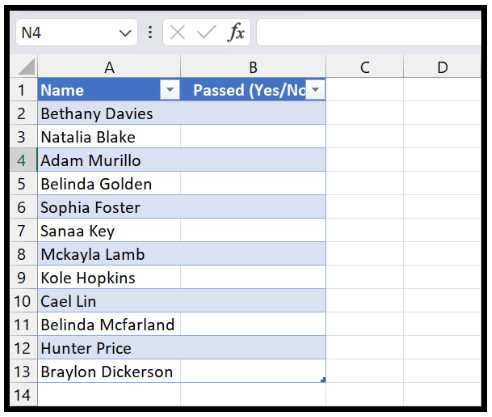
To get started, open your Excel worksheet and identify the cells or range of cells where you want to implement the drop-down list. For instance, if you have a list of students and want to track their passing status, you might choose the “Passed” column as the target cells for the drop-down list.
Step 2: Access Data Validation
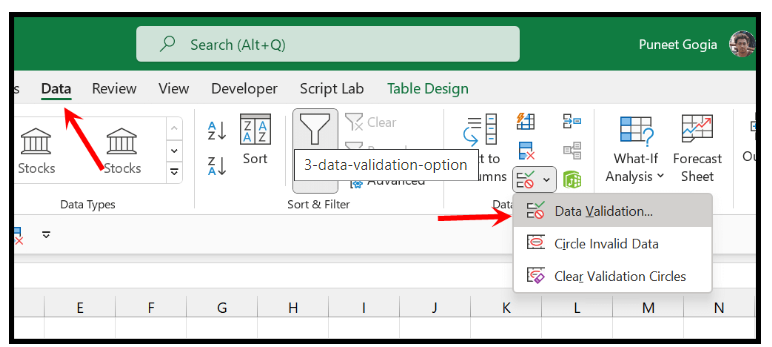
Next, head to the “Data” tab located in the Excel ribbon. Within the “Data Tools” group, click on “Data Validation.” This feature enables you to define restrictions and rules for the data entered in specific cells.
Step 3: Choose the List Option
Upon clicking “Data Validation,” a dialog box will appear. In this dialog box, navigate to the “Settings” tab. Under “Allow,” select the “List” option from the drop-down menu. This action will prompt Excel to allow only values from a pre-defined list within the selected cells.

Step 4: Enter Values
Now, it’s time to specify the values that will be included in the drop-down list. In the “Source” field, input “Yes, No” (without the quotes). This way, Excel will display a drop-down list with “Yes” and “No” as the available options.

Step 5: Confirm and Apply
With the list, of values entered, click the “OK” button to create the drop-down list. As soon as you do this, the drop-down arrow will appear in all the cells you selected in Step 1.

Step 6: Using the Drop-Down List
Once you have successfully created the drop-down list with “Yes” and “No” options, you can now utilize it to track the passing status of students or any other relevant information.
Simply click on the drop-down arrow in the desired cell, and a list with “Yes” and “No” options will appear. Choose the appropriate option to record the status accurately.
Optimizing Drop-Down Functionality
To ensure a seamless experience while using this drop-down list, you should consider enabling the following options in the Data Validation dialog box:
- Option 1: Ignore Blank Cells: By activating the “Ignore Blank” option, you can leave cells blank without triggering any errors. This is especially useful when not all cells will have immediate responses, allowing you to fill them in at a later time without any interruptions.
- Option 2: Enable In-Cell Dropdown: Checking the “In-Cell dropdown” box enables the drop-down functionality directly within the cell. As a result, you can easily input values by selecting them from the drop-down list, rather than typing or copy-pasting them. This enhances data accuracy and reduces the chances of incorrect entries.

Conclusion
In conclusion, leveraging Excel’s drop-down list feature with “Yes” and “No” options provides significant advantages in data entry and organization. By following the steps outlined in this guide and optimizing the drop-down functionality with the recommended options, you can efficiently manage your data and track various binary responses with ease.
Excel’s versatility and user-friendly interface make it a valuable tool for both professionals and enthusiasts alike. So, embrace the power of drop-down lists in Excel and experience enhanced productivity and accuracy in your data-driven endeavors.