Excel is a robust and efficient software that empowers users to effectively organize and analyze data. One useful feature of Excel is the ability to attach files directly to a worksheet. This feature enables users to include relevant documents, images, or other files within their Excel workbooks. In this article, we will provide a step-by-step guide on how to attach a file to Excel, allowing you to enhance your data analysis and presentation capabilities.
Understanding the Benefits of File Attachments in Excel
File attachments in Excel offer several advantages. They provide additional context and documentation for the data presented in the worksheet. By attaching relevant files, you can ensure that all necessary information is readily available to users who interact with the Excel workbook.
Preparing Your Excel Worksheet
Before attaching a file, make sure you have a properly set up Excel worksheet. Ensure that your workbook is saved and organized with the necessary data and any existing charts, tables, or formulas. This will provide a solid foundation for incorporating file attachments seamlessly.
Attaching a File in Excel
To attach a file in Excel, you can choose from three methods: inserting an object, linking a file, or embedding a file.
Inserting an Object
Inserting an object allows you to add a file as an icon or image within a cell. This method is suitable when you want to keep the file visible in your worksheet.
To insert an object:
- Select the cell where you want to place the file attachment.
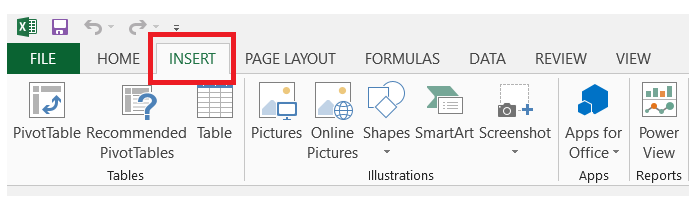
- Access the “Insert” tab located in the Excel ribbon
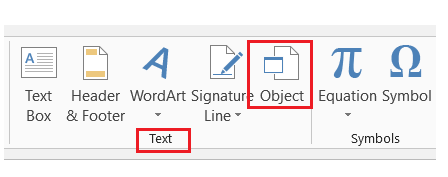
- Click on the “Object” button in the “Text” group.
- In the “Object” dialog box, choose the “Create from File” option.

- Hit the “Browse” button and navigate to the desired file for attachment.

- Select the file and click “OK.”

Linking a File
Linking a file allows you to create a connection between an Excel cell and an external file. This method is useful when you want to keep the file separate from the worksheet but still easily accessible.
To link a file:
- Select the cell where you want to place the link.
- Right-click on the cell and choose “Hyperlink” from the context menu.
- Within the “Insert Hyperlink” dialog box, choose the option labeled “Existing File or Web Page” located on the left-hand side.
- Click on the “Browse” button and locate the file you want to attach.
- Select the file and click “OK.”
Embedding a File
Embedding a file allows users to seamlessly integrate the entire file into the Excel workbook, ensuring it is fully accessible without the need for external references. This method is suitable when you want to create a self-contained workbook with all the necessary data and files.
To embed a file:
- Access the “Insert” tab located in the Excel ribbon
- Click on the “Object” button in the “Text” group.
- Within the “Object” dialog box, hit the “Create New” option.

- Select the file type you want to embed (e.g., Microsoft Word Document, Adobe PDF, etc.).

- Click “OK” and follow the prompts to select and embed the file.
Managing Attached Files
Once you have attached files in Excel, it’s essential to know how to manage them effectively. You can modify, remove, or update file attachments based on your requirements. To manage the attached files, follow these steps:
- Right-click on the attached file icon or cell containing the link.
- Choose the appropriate option from the context menu, such as “Open,” “Edit,” or “Remove.”
Best Practices for Working with File Attachments in Excel
To make the most of file attachments in Excel, consider the following best practices:
- Keep file sizes small to avoid bloating the Excel workbook.
- Use clear and descriptive filenames for easy identification.
- Organize attached files into separate folders for better organization.
- Update file attachments whenever the linked files are modified.
- Regularly review and remove unnecessary file attachments to optimize workbook performance.
Enhancing Data Presentation with File Attachments
File attachments in Excel can greatly enhance data presentation. You can incorporate images, charts, or supporting documentation to provide visual representations or additional context. This helps create comprehensive and visually appealing reports and presentations.
Troubleshooting Common Issues
While attaching files in Excel, you may encounter some common issues. Here are a few troubleshooting tips:
- Ensure the attached file is accessible from the Excel workbook’s location.
- Check file permissions to ensure appropriate access rights.
- Update file links if the linked file’s location has changed.
- Verify that the software required to open the file is installed on the user’s computer.
Conclusion
Attaching files in Excel allows you to enrich your worksheets with relevant supporting documents, images, and other files. By following the step-by-step guide provided in this article, you can easily attach files using different methods and leverage this feature to enhance data analysis, presentation, and collaboration in Excel.