As professionals, students, or even individuals managing personal finances, we often find ourselves relying on spreadsheets to organize and present data. Excel, with its vast array of features, continues to be a go-to tool for data manipulation and analysis.
One commonly encountered task is defining a print area in Excel to ensure that only specific sections of the spreadsheet are printed. However, what happens when you need to remove or clear that print area? That’s where this step-by-step guide comes in.
Whether you’re a beginner or an experienced Excel user, we’ve got you covered. In this blog post, we will walk you through the process of clearing the print area in Excel, providing detailed instructions to ensure you can follow along effortlessly.
By the end, you’ll have the skills and confidence to easily manage and modify your print areas, saving you time and enhancing your spreadsheet productivity. So, let’s dive right in and discover the tricks and techniques to effectively clear print areas in Excel!
Understanding the Print Area
Before we delve into the process of clearing the print area, let’s understand what it entails. The print area in Excel refers to the range of cells that you have designated for printing.
When you set a print area, only the selected range will be printed, excluding any data outside of that area. By clearing the print area, you remove the defined range, allowing you to print the entire worksheet or choose a new selection.
Clearing the Print Area in Excel
To clear the print area in Excel, follow these simple steps:
Step 1: Opening the Excel Worksheet
Launch Microsoft Excel on your computer and open the worksheet that contains the print area you wish to clear.
Step 2: Selecting the Print Area
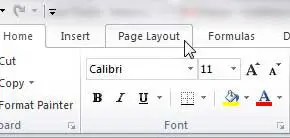
In the worksheet, navigate to the “Page Layout” tab located at the top of the Excel window.
Look for the “Print Area” section within the ribbon and click on the “Print Area” dropdown menu. From the options provided, select “Clear Print Area.”
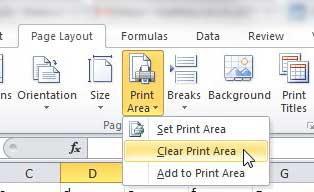
This action will remove the previously defined print area from the worksheet.
Step 3: Clearing the Print Area
After selecting “Clear Print Area,” you will notice that the print area is now cleared, and the entire worksheet is available for printing.
You can verify this by going to the “Page Layout” tab and observing that the “Print Area” section no longer displays a range of cells.
Benefits of Clearing the Print Area
Clearing the print area in Excel offers several benefits, including:
Flexibility: By removing the print area, you regain the ability to print the entire worksheet or select a new range, providing you with greater flexibility in generating printed documents.
Accurate Data Representation: Clearing the print area ensures that all data, including any changes or updates, is reflected accurately in your printed output, without any restrictions imposed by a defined range.
Enhanced Print Layout: Without a print area, you can customize the print layout based on your preferences, including adjusting margins, headers, footers, and other print settings as needed.
Improved Readability: Clearing the print area allows you to include additional rows, columns, or even entire sheets in your printouts. This is particularly beneficial when dealing with large datasets or complex worksheets, as it enables you to present the information in a more readable format, making it easier to analyze and interpret.
Efficient Resource Utilization: When you clear the print area, you optimize the utilization of printing resources such as paper and ink. By printing only the necessary information instead of a predefined range, you can avoid wasting resources on unnecessary or irrelevant content, leading to cost savings in the long run.
Seamless Collaboration: Clearing the print area can facilitate collaboration among team members. By printing the entire worksheet or a different range, you can easily share comprehensive information with colleagues, enabling better communication and understanding of the data at hand.
Conclusion
In conclusion, being able to clear the print area in Excel is a valuable skill that allows you to regain control over your printed documents. By following the simple steps outlined in this article, you can easily remove the print area and print your entire worksheet or define a new range to meet your specific requirements. Enjoy the flexibility and accuracy that clearing the print area brings to your Excel printing tasks.